# Start guide

Distro helps you schedule meetings and connect prospects with the right teammate. Set up your calendar and availability, then choose how you want people to book.

## Set yourself up

Check your name and timezone in **Settings → Profile**, connect your calendar, choose conferencing, and set your availability before sharing a booking page.

<table data-card-size="large" data-view="cards"><thead><tr><th></th><th></th><th data-hidden data-card-target data-type="content-ref"></th><th data-hidden data-card-cover data-type="files"></th></tr></thead><tbody><tr><td><strong>Calendars</strong></td><td>Connect your calendar and choose where new meetings appear.</td><td><a href="/integrations/calendars">Calendars</a></td><td><a href="https://2442454418-files.gitbook.io/~/files/v0/b/gitbook-x-prod.appspot.com/o/spaces%2FQA3GQNrIYVrPQ90NBwRa%2Fuploads%2FTpzP7NOkK0KJsxt564Cd%2Fstart-guide-calendars.png?alt=media">start-guide-calendars.png</a></td></tr><tr><td><strong>Availability</strong></td><td>Set the days and hours when people can book with you.</td><td><a href="/settings/personal-settings/my-availability">Availability</a></td><td><a href="https://2442454418-files.gitbook.io/~/files/v0/b/gitbook-x-prod.appspot.com/o/spaces%2FQA3GQNrIYVrPQ90NBwRa%2Fuploads%2FovEjd4hrTGFOlqI2RTmE%2Fstart-guide-availability.png?alt=media">start-guide-availability.png</a></td></tr></tbody></table>

If you're joining an existing workspace, use your invitation and ask your admin which meeting links or sales handoffs your team uses. You may already have everything you need to start sharing. See [conferencing](/integrations/conference-tools) to choose where meetings take place.

## Share your first link

Open **Booking links → My Personal Links**. Preview an existing link, then copy it into your message. You can also create a link or share it from Distro's Chrome extension.

<table data-card-size="large" data-view="cards"><thead><tr><th></th><th></th><th data-hidden data-card-target data-type="content-ref"></th><th data-hidden data-card-cover data-type="files"></th></tr></thead><tbody><tr><td><strong>Personal links</strong></td><td>Create a booking link for meetings with you.</td><td><a href="/booking-links/create-a-booking-link">Personal links</a></td><td><a href="https://2442454418-files.gitbook.io/~/files/v0/b/gitbook-x-prod.appspot.com/o/spaces%2FQA3GQNrIYVrPQ90NBwRa%2Fuploads%2Fl6HvXCkBi8R5BghLU0jm%2Fstart-guide-personal-links.png?alt=media">start-guide-personal-links.png</a></td></tr><tr><td><strong>Chrome extension</strong></td><td>Share links, offer times, and manage meetings from your browser.</td><td><a href="/integrations/chrome-extension">Chrome extension</a></td><td><a href="https://2442454418-files.gitbook.io/~/files/v0/b/gitbook-x-prod.appspot.com/o/spaces%2FQA3GQNrIYVrPQ90NBwRa%2Fuploads%2FBXaxW7f5osgwwp6WgIkG%2Fstart-guide-chrome-extension.png?alt=media">start-guide-chrome-extension.png</a></td></tr></tbody></table>

Need several teammates in the same meeting? [Create a group link](/booking-links/create-a-group-link). In the extension, start with [inserting a link into a message](/integrations/chrome-extension/inbox-shortcuts) or [offering times in Gmail](/integrations/chrome-extension/offer-times).

## Set up your team

Workspace admins also connect the CRM during first-time setup. Follow the [HubSpot](/crm/hubspot) or [Salesforce](/crm/salesforce) guide for your workspace. You can skip invitations during setup and [invite members](/settings/workspace-settings/members) later.

<table data-card-size="large" data-view="cards"><thead><tr><th></th><th></th><th data-hidden data-card-target data-type="content-ref"></th><th data-hidden data-card-cover data-type="files"></th></tr></thead><tbody><tr><td><strong>Teams</strong></td><td>Group teammates and set shared booking hours.</td><td><a href="/teams/create-a-team">Create a team</a></td><td><a href="https://2442454418-files.gitbook.io/~/files/v0/b/gitbook-x-prod.appspot.com/o/spaces%2FQA3GQNrIYVrPQ90NBwRa%2Fuploads%2F1mQXyNrQd1FYzALWZEhE%2Fstart-guide-teams.png?alt=media">start-guide-teams.png</a></td></tr><tr><td><strong>Routing</strong></td><td>Choose how prospects reach the right teammate.</td><td><a href="/routing/overview">Routing overview</a></td><td><a href="https://2442454418-files.gitbook.io/~/files/v0/b/gitbook-x-prod.appspot.com/o/spaces%2FQA3GQNrIYVrPQ90NBwRa%2Fuploads%2FUAl7giVdFZLhpyXYSE7v%2Fstart-guide-routing.png?alt=media">start-guide-routing.png</a></td></tr></tbody></table>

[Configure reusable event types](/event-types/create-an-event-type) for your meeting settings, then choose the route that fits:

* [Form routing](/routing/form-router) for website form submissions.
* [Click routing](/routing/click-router) for campaign and call-to-action links.
* [Outbound Routers](/routing/outbound-routing/routers) for seller-led handoffs.

Add [workflows](/workflows/create-a-workflow) when you want follow-up actions to happen automatically. Admins can also configure [enrichment](/integrations/enrichment) and [email verification](/integrations/email-verification) for Form Routers.

Use [Copilot](/copilot) for workspace questions and guided setup, or [saved views](/views) to return to the records you use often.


# Copilot

Open **Copilot** in the Distro app to ask about your workspace, explore bookings, or prepare configuration changes. The panel shows which page is included as context.

Start with a question such as “What does this page do?” or choose one of the suggested prompts. For setup tasks, Copilot can ask you to choose people, event types, teams, or other settings before preparing changes.

<div data-with-frame="true"><figure><img src="https://2442454418-files.gitbook.io/~/files/v0/b/gitbook-x-prod.appspot.com/o/spaces%2FQA3GQNrIYVrPQ90NBwRa%2Fuploads%2F3NHsjQecvPUnu2Gwsud9%2FCleanShot%202026-09-15%20at%2016.27.42%402x.png?alt=media&amp;token=d5c5721f-b131-46a5-92fa-ba18a08d6782" alt=""><figcaption></figcaption></figure></div>

## Review a proposed change

A **Review changes** card lists the settings Copilot proposes. Expand each change and check the people, meeting settings, and affected resources. Click **Apply changes** to save them to the workspace, or **Dismiss** to leave them unapplied.

<div data-with-frame="true"><figure><img src="https://2442454418-files.gitbook.io/~/files/v0/b/gitbook-x-prod.appspot.com/o/spaces%2FQA3GQNrIYVrPQ90NBwRa%2Fuploads%2FPQAkQUZuKCk8u5F6Ccy0%2FCleanShot%202026-09-11%20at%2015.36.41%402x.png?alt=media&amp;token=80d818ce-c779-4fbf-bb16-a14be2cfbfb1" alt=""><figcaption></figcaption></figure></div>

After applying, use the resource links to inspect the result. A saved router draft still needs testing and activation before new prospects use it. Connecting a website form in Distro also does not install the router on your website.

Copilot follows your workspace permissions. Members can work with their own supported resources and hosted-meeting data; administration and workspace routing reports require admin access.

## Understand a booking or routing decision

Ask about a specific booking or routing event. If several records match, choose the one you mean. Copilot uses recorded evidence to explain the outcome. Missing records can limit what it can explain; the current router settings may differ from the settings used for that event.

An explanation does not change configuration. Ask separately for a fix, then review the proposed changes.

<div data-with-frame="true"><figure><img src="https://2442454418-files.gitbook.io/~/files/v0/b/gitbook-x-prod.appspot.com/o/spaces%2FQA3GQNrIYVrPQ90NBwRa%2Fuploads%2FrlrOybj9Na9X0AxnDArs%2FCleanShot%202026-09-15%20at%2016.32.58%402x.png?alt=media&amp;token=0eb87127-7e1b-4c1d-ae2a-d4ff4fc36283" alt="" width="375"><figcaption></figcaption></figure></div>

## Return to a conversation

Open **Conversation history** to search your saved conversations, or use **New conversation** for a separate topic. **Stop response** stops the current response while keeping the conversation.

Use **Copy conversation link** to share a read-only transcript with an eligible teammate. They must sign in to the same workspace, have the same role, and be allowed to access the referenced information. Shared links expire after seven days and can become unavailable if access changes.

Deleting a conversation removes its history and saved graphs. Workspace changes you already applied remain in place.

<div data-with-frame="true"><figure><img src="https://2442454418-files.gitbook.io/~/files/v0/b/gitbook-x-prod.appspot.com/o/spaces%2FQA3GQNrIYVrPQ90NBwRa%2Fuploads%2FqDwrlCtKY5H6uNbKkZNL%2FCleanShot%202026-09-15%20at%2016.33.50%402x.png?alt=media&amp;token=49f220e2-ef33-4305-9cf1-5ca4488430f7" alt=""><figcaption></figcaption></figure></div>

If Copilot says it isn’t connected yet, ask your workspace administrator about availability. If conversation history becomes unavailable after an access change, start a new conversation with your current permissions.


# Views

Use search and **Add filter** to find records in Distro’s collections. Available fields depend on the page: event types can be filtered by availability, language, and duration, while booking links can be filtered by event type and host-related fields.

<div data-with-frame="true"><figure><img src="https://2442454418-files.gitbook.io/~/files/v0/b/gitbook-x-prod.appspot.com/o/spaces%2FQA3GQNrIYVrPQ90NBwRa%2Fuploads%2FUrs7hPmBZ4Aegi9xASvL%2FCleanShot%202026-09-15%20at%2016.35.36%402x.png?alt=media&amp;token=f64d2568-2fea-49d4-9a5a-a43ab24d2d89" alt=""><figcaption></figcaption></figure></div>

Select multiple values within a filter when you want to include more than one option. Use its remove control to clear that filter. The sidebar’s **Quick filters** provide common views, such as **In Use** and **Unused** for event types.

## Save a set of filters

After choosing custom filters, click **Save view**. Enter a **View name** and save it. The shortcut appears under **Saved views** in that section’s sidebar.

Saved views are personal to you in the current workspace. They reopen the collection with the saved filters; they do not copy or change the underlying records. The save action is hidden when there are no new custom filters to save, including a filter set you have already saved.

Delete a saved view from its sidebar action when you no longer need the shortcut. Your bookings, links, and other records remain in place.

## Choose how records appear

Use the layout controls where available to switch between table and card views, or between list and calendar views for bookings.

In a table, **Columns** controls which fields appear. Click a column heading to sort, or drag its edge to resize it. These display controls help you review records; they do not change their configuration.

<div data-with-frame="true"><figure><img src="https://2442454418-files.gitbook.io/~/files/v0/b/gitbook-x-prod.appspot.com/o/spaces%2FQA3GQNrIYVrPQ90NBwRa%2Fuploads%2F0uUzbbUIecFDfZlJ7Wsr%2FCleanShot%202026-09-15%20at%2016.37.29%402x.png?alt=media&amp;token=feb09786-f166-41c6-8215-c35959111697" alt=""><figcaption></figcaption></figure></div>

## Review configuration changes

Where available, open **Audit** from a resource’s actions or editor to see recorded configuration changes. You need permission to edit that resource to view its audit. Older configuration can predate audit recording, so an empty history does not mean the resource was never changed.

Use router **Versions** to manage activation and rollback. Audit history records changes; it does not restore them.


# Routing overview

Routing decides who should receive a meeting. Start with where the prospect enters the conversation.

<table data-view="cards"><thead><tr><th></th><th></th><th data-hidden data-card-target data-type="content-ref"></th><th data-hidden data-card-cover data-type="files"></th></tr></thead><tbody><tr><td><strong>Form routing</strong></td><td>Qualify and route prospects who submit a form on your website.</td><td><a href="/routing/form-router">Form routing</a></td><td><a href="https://2442454418-files.gitbook.io/~/files/v0/b/gitbook-x-prod.appspot.com/o/spaces%2FQA3GQNrIYVrPQ90NBwRa%2Fuploads%2FtrxhgTArTN9bMQrYwhNg%2Frouting-card-form-routing.png?alt=media">routing-card-form-routing.png</a></td></tr><tr><td><strong>Click routing</strong></td><td>Route prospects who follow a campaign or call-to-action link.</td><td><a href="/routing/click-router">Click routing</a></td><td><a href="https://2442454418-files.gitbook.io/~/files/v0/b/gitbook-x-prod.appspot.com/o/spaces%2FQA3GQNrIYVrPQ90NBwRa%2Fuploads%2FHh5YEh3Uo14O3sNrYk48%2Frouting-card-click-routing.png?alt=media">routing-card-click-routing.png</a></td></tr><tr><td><strong>Outbound routers</strong></td><td>Let teammates arrange meetings for known prospects through a sales handoff.</td><td><a href="/routing/outbound-routing/routers">Outbound routers</a></td><td><a href="https://2442454418-files.gitbook.io/~/files/v0/b/gitbook-x-prod.appspot.com/o/spaces%2FQA3GQNrIYVrPQ90NBwRa%2Fuploads%2FJ8GvZW7u4Q6aErRWxLwH%2Frouting-card-outbound-routers.png?alt=media">routing-card-outbound-routers.png</a></td></tr></tbody></table>

Ownership rules help you keep existing relationships with the right CRM owner. Distribution rules share meetings across eligible teammates. Fallback settings define what happens when the earlier rules don't find a host.

The event type defines the meeting experience. Team membership, permissions, calendars, and availability determine who can actually take the meeting.

For a fixed host, use a personal link. For several hosts attending together, use a group link. See [Choose the right scheduling link](/booking-links/choose-a-link).


# Form routing

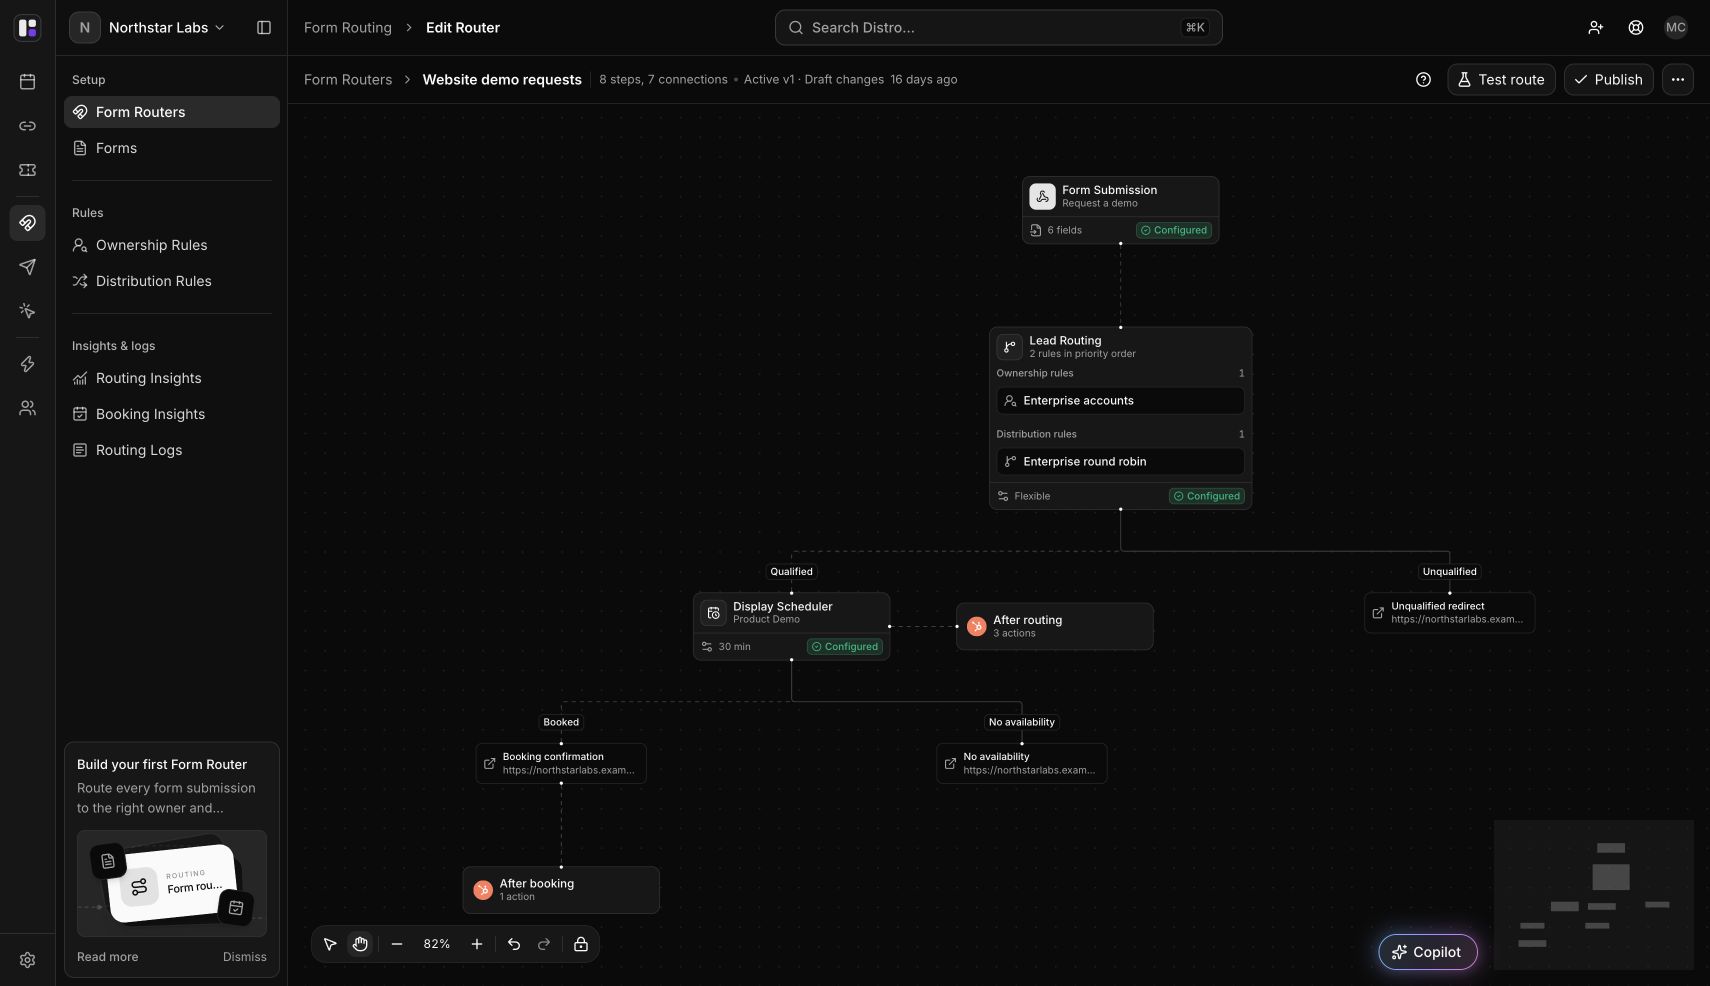
Turn a website form submission into a meeting with the right teammate. A Form Router checks the prospect's answers and CRM relationships, applies your routing rules, and shows a scheduler or the appropriate redirect.

**Workspace admins configure routers.** Start with a [mapped form](https://help.distro.so/routing-forms/overview), a [team](https://help.distro.so/teams/create-a-team) with calendar availability, and an [event type](https://help.distro.so/event-types/create-an-event-type). Connect your CRM if you want ownership matching or CRM updates.

<figure><img src="https://files.gitbook.com/v0/b/gitbook-x-prod.appspot.com/o/spaces%2FQA3GQNrIYVrPQ90NBwRa%2Fuploads%2FJ2S5Ws2GDPR2Wum1u4my%2Fform-router-canvas-dark.png?alt=media&#x26;token=895ba167-adf2-4ff5-87c5-5d2580b35af7" alt="Northstar Labs&#x27; Website demo requests router in dark mode, showing the submission, routing rules, scheduler, outcome branches, and CRM actions."><figcaption><p>The canvas shows your saved draft. New submissions use the active version until you publish changes.</p></figcaption></figure>

### Find the right place

| I want to…                                   | Open…                                                                                                                                                                                        |
| -------------------------------------------- | -------------------------------------------------------------------------------------------------------------------------------------------------------------------------------------------- |
| Create or edit a router                      | **Form routing → Form Routers**                                                                                                                                                              |
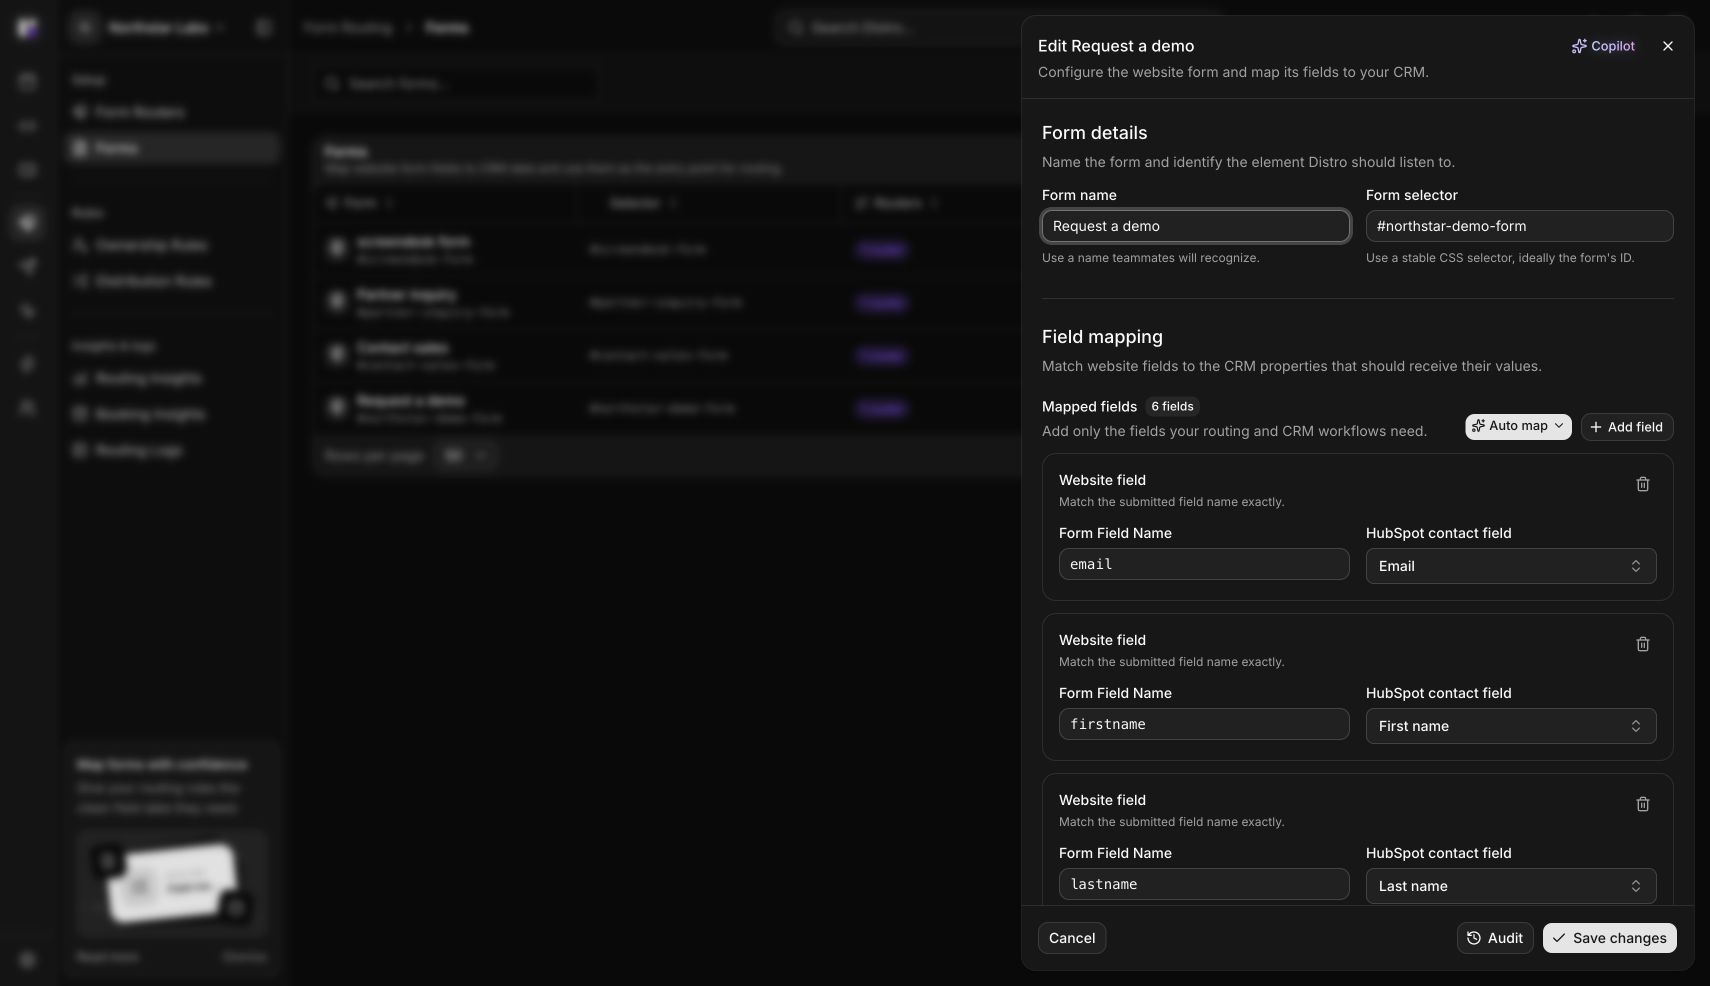
| Map website fields                           | **Form routing → Forms**                                                                                                                                                                     |
| Match an existing CRM owner                  | **Ownership Rules**, then add the rule to **Lead Routing**                                                                                                                                   |
| Qualify prospects and distribute meetings    | **Distribution Rules**, then add the rule to **Lead Routing**                                                                                                                                |
| Install, review versions, or inspect changes | The router's **three-dot menu → Install router, Versions, or Audit**                                                                                                                         |
| Duplicate a router                           | **Three-dot menu → Duplicate**. Copies have no active version and can share referenced rules, forms, and event types. See [Router versions](https://help.distro.so/routing/router-versions). |
| Investigate a submission                     | **Routing Logs**, or **three-dot menu → Routing logs**                                                                                                                                       |

The Form Routers list offers table and card views. Search by name or configuration, filter by **Form**, **Event type**, or **Routing mode**, and save filters as a [view](https://help.distro.so/views). Table metrics summarize the last 30 days; use reports for deeper analysis.

### Create and configure a router

{% stepper %}
{% step %}

#### Create the router

Open **Form routing → Form Routers → New Form Router**. Enter a **Form router name** and choose **Create Form Router**.

Click a canvas card to open its settings. Save each panel before moving on. You can pan the canvas, use **+ / −** to zoom, or press **0** to fit the whole flow. These controls change only your view.
{% endstep %}

{% step %}

#### Connect your form

Open **Form Submission** and choose the **Connected form**. Check its selector and field mappings, especially email and fields used by your rules.

Enable **Normalize email aliases** if `alex+demo@example.com` should be treated as `alex@example.com`. Click **Save**.

Mapping a form does not install Distro on the website. Follow [Form mapping](https://help.distro.so/routing-forms/overview) if the form is missing or its fields have changed.
{% endstep %}

{% step %}

#### Set rule priority and distribution

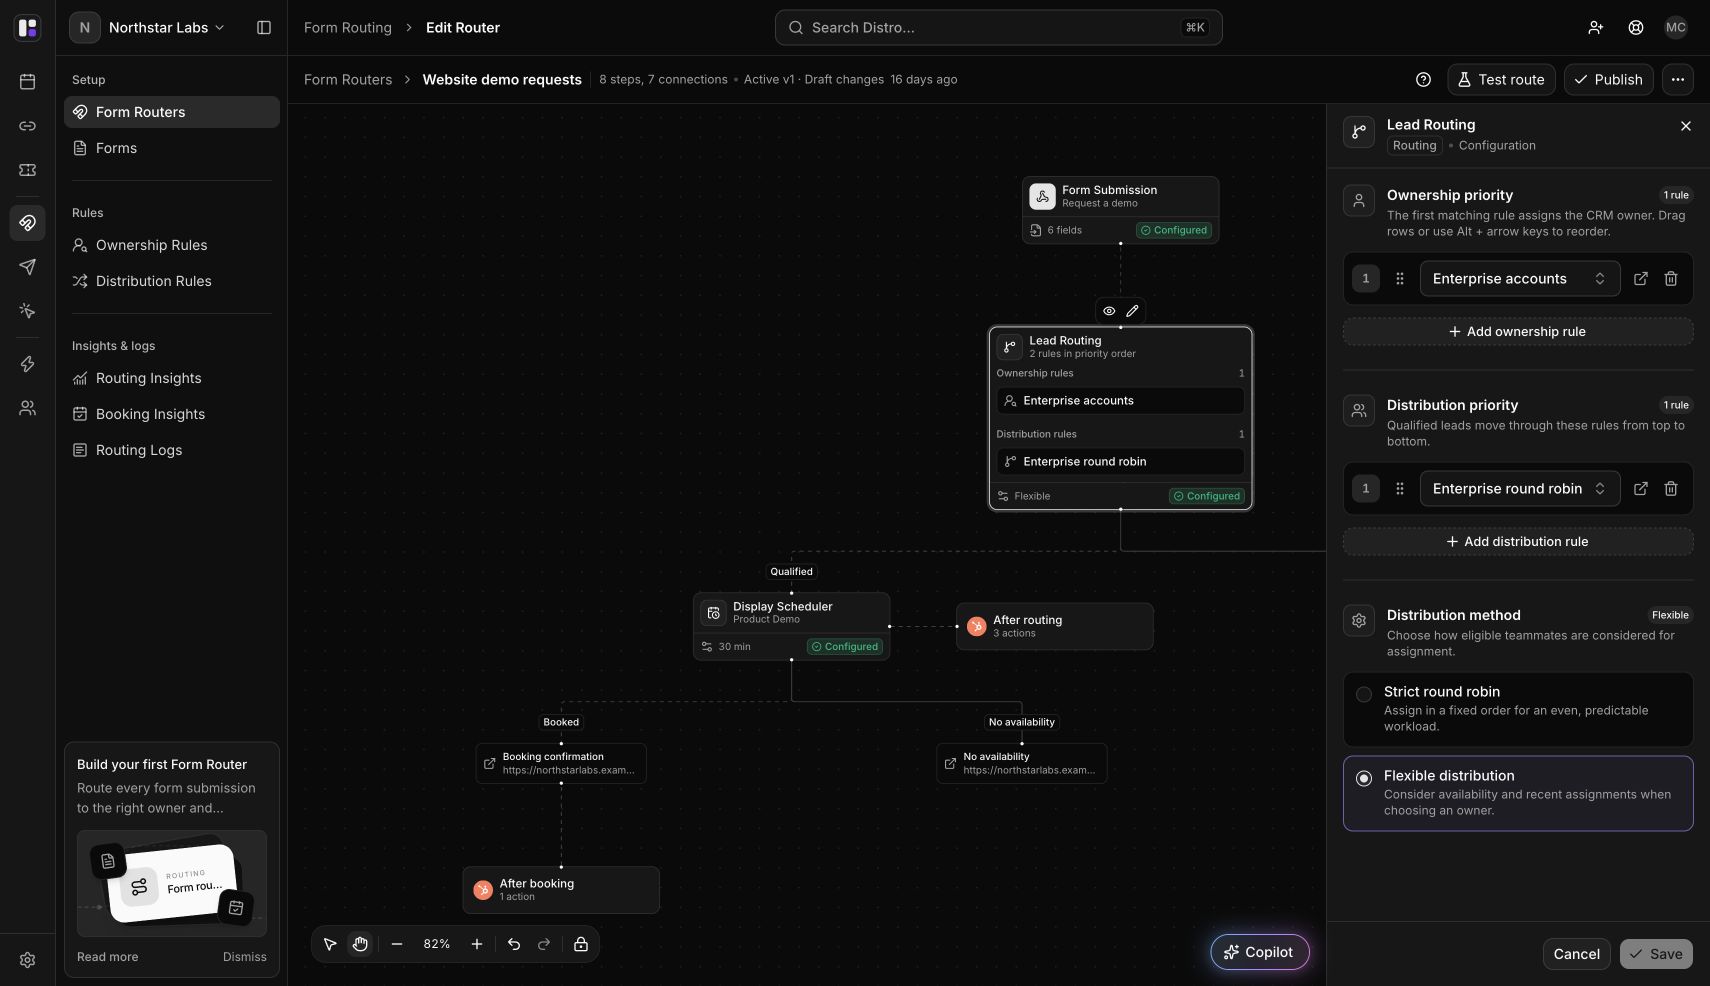
Open **Lead Routing**. Add ownership rules for existing CRM relationships, then distribution rules for qualified prospects who still need a host.

Each list runs from top to bottom. Drag rows or use **Alt + arrow keys** to change priority. Put specific rules before broader fallback rules. Click a rule on the canvas to edit its conditions and assignment settings. Conditions can also use configured [enrichment data](https://help.distro.so/integrations/enrichment).

Choose **Strict round robin** to select a host before showing times, or **Flexible distribution** to offer times across eligible teammates and select a host for the chosen slot. Save the panel.

See [Ownership rules](https://help.distro.so/routing-rules/ownership-rules), [Distribution rules](https://help.distro.so/routing-rules/distribution-rules), and [Distribution methods](https://help.distro.so/routing/form-router/distribution-method).
{% endstep %}

{% step %}

#### Configure the meeting and outcomes

Open **Display Scheduler** to choose the event type and review meeting settings. A matched rule's event-type override takes precedence over the router default.

Configure the outcome cards for **Booking confirmation**, **Unqualified redirect**, and **No availability**. They represent different outcomes: a completed booking, a prospect who cannot be routed, or no available meeting time. Leave a URL blank to use the default experience for that outcome.

Save your changes. Make sure prospects who should qualify have an appropriate distribution rule; an unqualified redirect is not a fallback team.
{% endstep %}

{% step %}

#### Add optional validation and CRM actions

Use the **+** on the connector after **Form Submission** and choose **Email validation**. It inserts a ZeroBounce card and opens its settings. Connect ZeroBounce before enabling validation. See [Email verification](https://help.distro.so/integrations/email-verification).

Use the **+** beside **Display Scheduler** for CRM actions after routing, or the **+** below **Booking confirmation** for CRM actions after booking. Click an existing action card to edit it. Available actions depend on your connected CRM.

An unsaved action disappears if you cancel. Save the action to keep it in the draft.
{% endstep %}
{% endstepper %}

<figure><img src="https://files.gitbook.com/v0/b/gitbook-x-prod.appspot.com/o/spaces%2FQA3GQNrIYVrPQ90NBwRa%2Fuploads%2FhTUr9iEyfCeCFT3tCaQH%2Flead-routing-dark.png?alt=media&#x26;token=7f874abb-1b66-4fdd-90b3-a06bbad1c795" alt="Lead Routing settings in dark mode with ownership priority, distribution priority, and the distribution method selector."><figcaption><p>Set rule priority separately from the distribution method.</p></figcaption></figure>

### When CRM actions run

| Stage             | What happens                                                                                                                                                             |
| ----------------- | ------------------------------------------------------------------------------------------------------------------------------------------------------------------------ |
| **After routing** | Supported CRM records are created or updated after rule evaluation, alongside the scheduler or unqualified redirect. Email-validation rejections skip these actions.     |
| **After booking** | Meeting creation runs after a successful booking. Connected CRMs also sync mapped meeting fields.                                                                        |
| **Owner updates** | Configured on each rule. Ownership and strict-distribution updates can run during routing; flexible-distribution updates can run after booking, once a host is selected. |

The side branches show when actions run. They do not add an extra step for the prospect to complete. See [HubSpot](https://help.distro.so/crm/hubspot) or [Salesforce](https://help.distro.so/crm/salesforce) for supported records and mappings.

### Test, publish, and install

{% hint style="info" %}
**Save updates the draft. Publish activates it.** The header can show **Active v1 · Draft changes** while the website still uses v1. The **Publish** confirmation asks you to activate the saved changes.
{% endhint %}

{% stepper %}
{% step %}

#### Test the saved draft

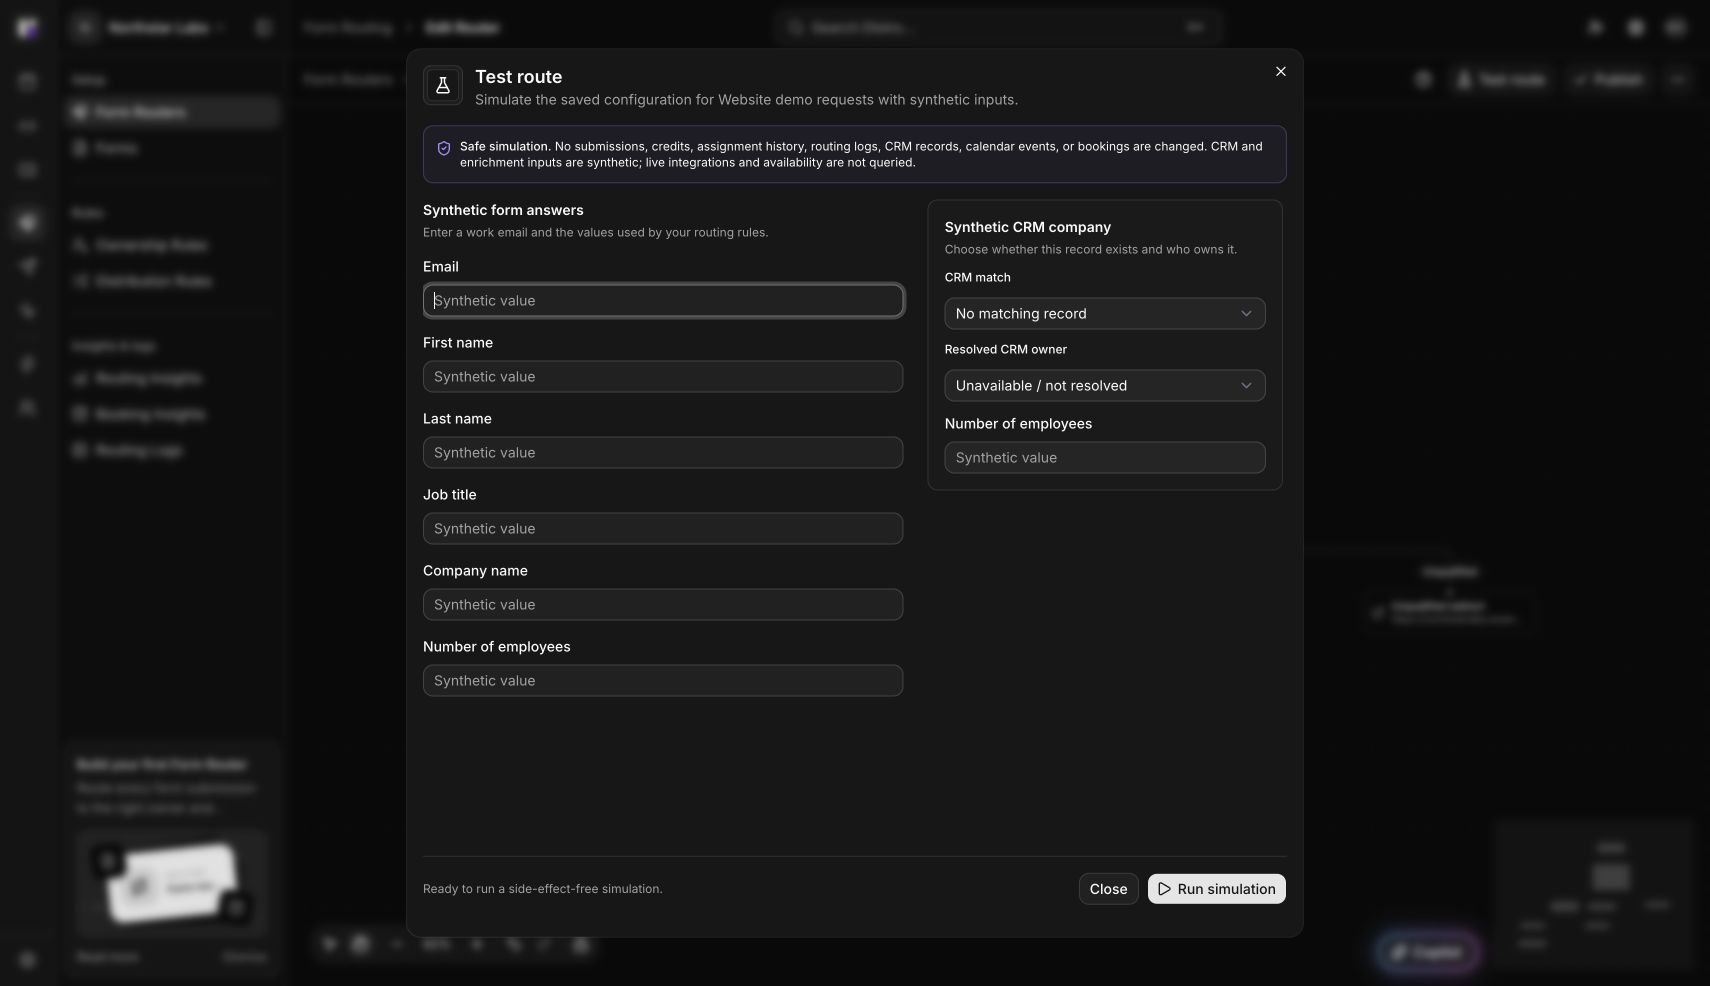
Choose **Test route**, enter synthetic form answers and any CRM inputs, then select **Run simulation**. Check an existing CRM relationship, a new qualified prospect, and an unqualified prospect. Review the resulting rule, assignment, and warnings.

This is a safe simulation: it does not change submissions, credits, assignment history, routing logs, CRM records, calendar events, or bookings. It does not query live integrations or availability, so it cannot confirm that the website integration works.
{% endstep %}

{% step %}

#### Publish the version

Choose **Publish** and confirm activation when the saved configuration is ready. New submissions use that version. Attempts already in progress keep their starting version.

Use **three-dot menu → Versions** to inspect history or roll back. See [Router versions](https://help.distro.so/routing/router-versions) for shared settings and pinned installations.
{% endstep %}

{% step %}

#### Install and check the published website

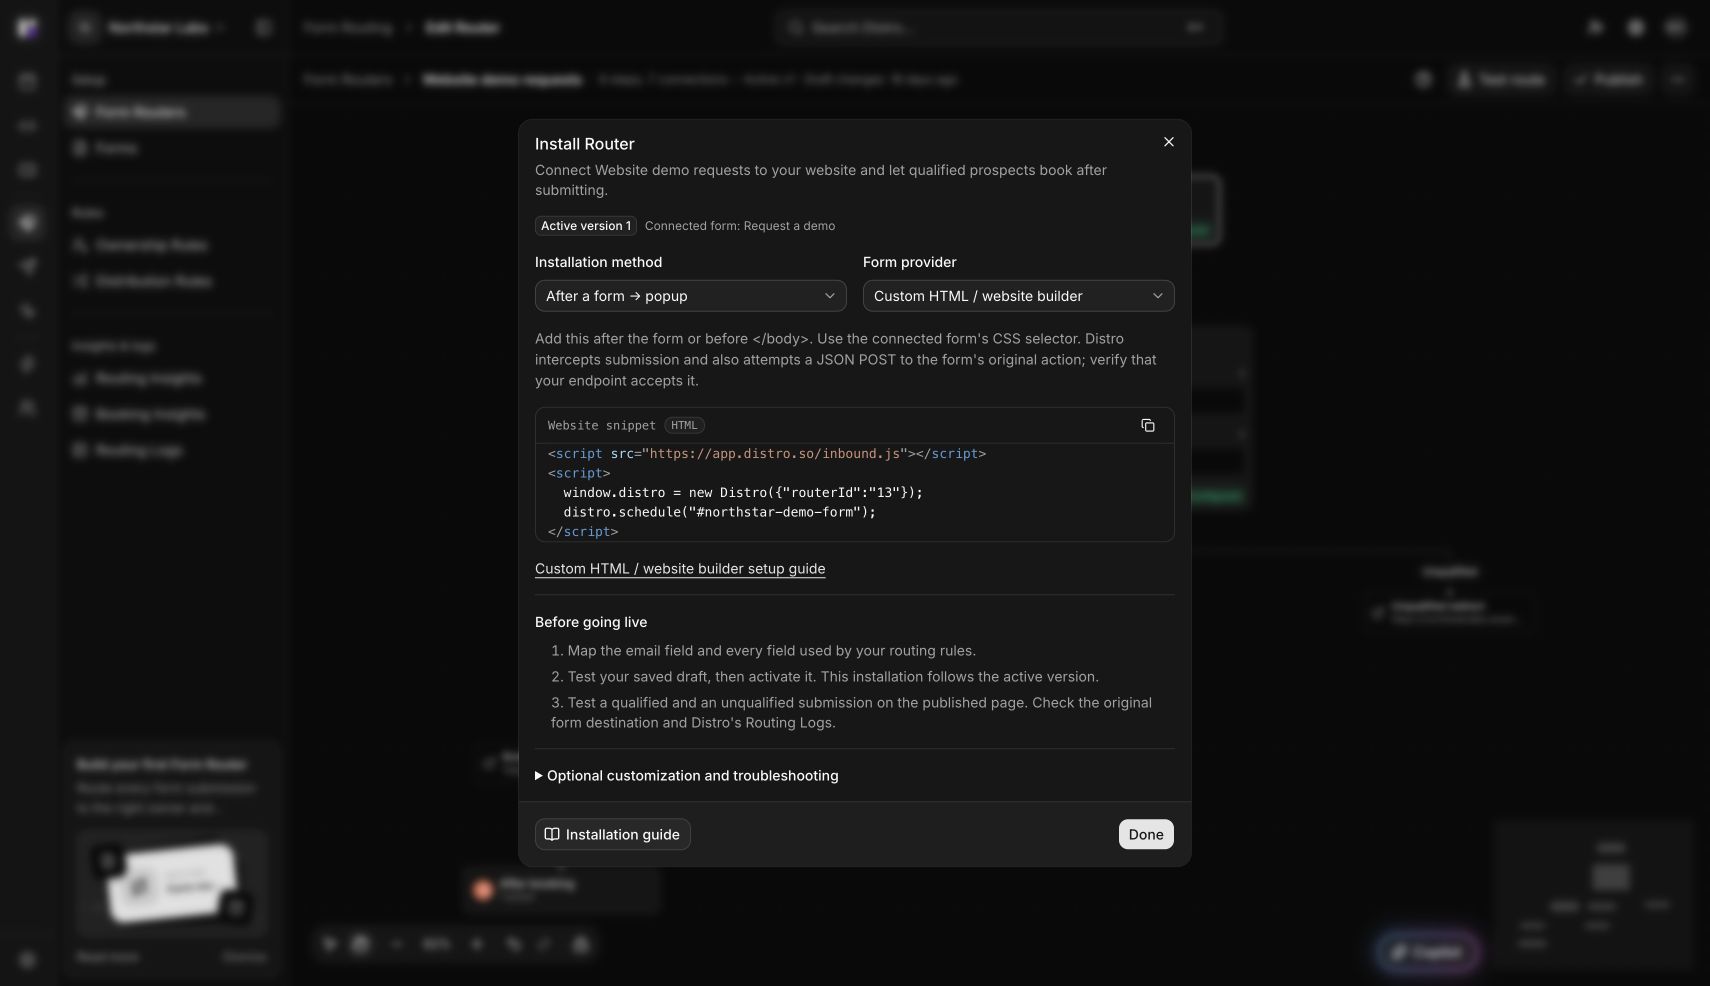
Open **three-dot menu → Install router**. Choose the **Installation method** and **Form provider**, then copy the generated code for your router and connected form.

Follow the provider guide linked in the dialog. On the published website, check a qualified and an unqualified submission, the scheduler, and the original form destination. A real test can create records or send configured notifications; use controlled test details.
{% endstep %}
{% endstepper %}

<figure><img src="https://files.gitbook.com/v0/b/gitbook-x-prod.appspot.com/o/spaces%2FQA3GQNrIYVrPQ90NBwRa%2Fuploads%2FgNey9n2vei3TcfoZGsMR%2Ftest-route-dark.png?alt=media&#x26;token=6be3001c-208b-440e-8d35-63f183b06e2e" alt="Test route dialog in dark mode with synthetic form answers, CRM inputs, and the safe-simulation notice."><figcaption><p>Test route checks the saved configuration without creating real routing or booking records.</p></figcaption></figure>

| Installation method         | Use it for                                              |
| --------------------------- | ------------------------------------------------------- |
| **After a form → popup**    | Opening the scheduler after a website form submission.  |
| **After a form → embedded** | Showing the scheduler in a page container.              |
| **Button / in-app**         | Starting routing from your own button or application.   |
| **Direct URL**              | Starting routing from a link with the required answers. |

<figure><img src="https://files.gitbook.com/v0/b/gitbook-x-prod.appspot.com/o/spaces%2FQA3GQNrIYVrPQ90NBwRa%2Fuploads%2FS08MTIqvafdxc2keDGhG%2Finstall-router-dark.png?alt=media&#x26;token=6a56870b-3909-4e21-8ebc-14ca67223fba" alt="Install Router dialog in dark mode showing installation method, form provider, and the generated website snippet."><figcaption><p>Copy your own router's snippet; the screenshot is an example from the Northstar Labs test workspace.</p></figcaption></figure>

Installation differs by provider. Start with [Form mapping and installation guides](https://help.distro.so/routing-forms/overview). For custom HTML forms, Distro also attempts a JSON POST to the original form action; verify that your endpoint accepts it.

### Review results and troubleshoot

| What you see                              | What to check                                                                                                                                                                      |
| ----------------------------------------- | ---------------------------------------------------------------------------------------------------------------------------------------------------------------------------------- |
| A change is missing on the website        | Save the panel, publish the version, and check whether the installation is pinned to an earlier version.                                                                           |
| A prospect is unqualified                 | Check mapped answers, email validation, rule order, and eligible hosts in **Routing Logs**.                                                                                        |
| The wrong team or host is offered         | Check ownership priority before distribution rules, the matched rule's team, weights, and distribution method.                                                                     |
| The scheduler has no times                | Check the effective event type, host calendars, availability, buffers, and vacation settings. Use [Availability preview](https://help.distro.so/settings/calendar-troubleshooter). |
| The form submits but Distro does not open | Check the provider-specific snippet, form selector, published page, and original form submission behavior.                                                                         |

Use [Routing Insights](https://help.distro.so/reporting/reporting/routing-insights) for conversion and routing gaps, and [Booking Insights](https://help.distro.so/reporting/reporting/booking-insights) for meeting outcomes. **Audit** records configuration changes; **Routing Logs** explains individual submissions.


# Distribution methods

Understanding Distro's Round Robin Meeting Distribution Methods

Choose whether Distro should select a host before the prospect sees available times or after they choose a slot.

| Method                    | What the prospect sees                     | When the host is selected                                          | Choose it when…                                             |
| ------------------------- | ------------------------------------------ | ------------------------------------------------------------------ | ----------------------------------------------------------- |
| **Strict round robin**    | The selected host's available times.       | Before the prospect chooses a time.                                | Assigning a particular host before scheduling matters most. |
| **Flexible distribution** | Available times across eligible teammates. | After the prospect chooses a slot, among teammates available then. | Offering more scheduling options matters most.              |

This setting controls distribution. Ownership rules are evaluated first and can assign an existing CRM owner before distribution is needed.

<figure><img src="https://files.gitbook.com/v0/b/gitbook-x-prod.appspot.com/o/spaces%2FQA3GQNrIYVrPQ90NBwRa%2Fuploads%2FhTUr9iEyfCeCFT3tCaQH%2Flead-routing-dark.png?alt=media&#x26;token=7f874abb-1b66-4fdd-90b3-a06bbad1c795" alt="Lead Routing configuration in dark mode, with Flexible distribution selected below the rule-priority lists."><figcaption></figcaption></figure>

### Set the method for a Form Router

{% stepper %}
{% step %}

#### Open Lead Routing

Open **Form routing → Form Routers**, select your router, then click the **Lead Routing** card.
{% endstep %}

{% step %}

#### Choose and save the method

Under **Distribution method**, select **Strict round robin** or **Flexible distribution**, then **Save**. Check that your distribution rules include the intended team and participants.
{% endstep %}

{% step %}

#### Test and publish

Use **Test route** to inspect the saved configuration, then choose **Publish** to activate it. Check a real controlled submission separately to verify live calendar availability.
{% endstep %}
{% endstepper %}

For a Click Router, the method is under **Fallback assignment → Distribution method**.

### How assignment stays balanced

Distro considers assignment history and member weights during the workspace's reset period. Credits and recent assignments can affect priority. Equal weights express equal intended shares; a larger weight expresses a larger intended share.

**Strict round robin does not guarantee an alphabetical or fixed turn-by-turn sequence.** Flexible distribution also uses weights and credits; it does not simply choose whoever has the fewest calendar meetings.

Actual totals can differ because of availability, repeated prospects, credits, and vacation settings. Within two hours, a repeat submission from the same email can retain the previous eligible host. Flexible distribution also checks that host's availability for the selected slot.

Rescheduling an existing meeting uses its assigned host's availability rather than redistributing it across the team.

### CRM owner updates

Configure owner updates on the [distribution rule](https://help.distro.so/routing-rules/distribution-rules). Strict distribution can queue an owner update during routing. Flexible distribution can queue it after booking, once the host is selected. Flexible mode does not disable owner updates.

### Investigate an unexpected assignment

| Check                             | Where to look                                                                                                                                               |
| --------------------------------- | ----------------------------------------------------------------------------------------------------------------------------------------------------------- |
| Which rule handled the prospect   | **Routing Logs**                                                                                                                                            |
| Eligible participants and weights | The matched **Distribution Rule → Assignment** settings                                                                                                     |
| Credits and recent assignments    | [Distribution history](https://help.distro.so/routing-rules/distribution-rules/distribution-history)                                                        |
| Reset-period behavior             | [Calibration](https://help.distro.so/settings/workspace-settings/calibration)                                                                               |
| Missing hosts or times            | [Vacation](https://help.distro.so/settings/workspace-settings/vacation) and [Availability preview](https://help.distro.so/settings/calendar-troubleshooter) |

After editing a live router, follow [Router versions](https://help.distro.so/routing/router-versions) so the intended configuration reaches new submissions.


# Click routing

Use a Click Router for a personalized link in an email, campaign, or website call to action. Distro reads the prospect's identity, checks ownership rules, and uses fallback assignment when no eligible CRM owner matches.

**Workspace admins configure Click Routers.** Have a connected CRM, mapped email and name fields, a fallback team, and a booking-form event type ready. The shared link must supply a valid prospect email and a name; a bare link is not a replacement for a qualification form.

![Pricing page CTA Click Router in dark mode, with ownership matching, fallback assignment, scheduler, and booking outcomes.](https://files.gitbook.com/v0/b/gitbook-x-prod.appspot.com/o/spaces%2FQA3GQNrIYVrPQ90NBwRa%2Fuploads%2FFjdVCvIa1hkMtwXbHFGT%2Fclick-router-canvas-dark.png?alt=media\&token=101cad6d-dce0-4ca7-8995-2eb46c451488)

*The matched-owner and fallback paths lead to the same scheduler. This example uses the Northstar Labs test workspace.*

### Configure a Click Router

{% stepper %}
{% step %}

#### Create the router

Open **Click routing → Click Routers → New Click Router**. Enter a **Click router name** and choose **Create Click Router**.

Click a canvas card to edit it. Save each panel. Use **0** or the mini map to fit the flow, and **+ / −** to zoom.
{% endstep %}

{% step %}

#### Map the prospect identity

Open **Link clicked**. Under **Required field mapping**, map **Email** and **Name** to the appropriate CRM fields. Salesforce mappings depend on the selected contact or lead setup.

Enable **Strip email suffixes** only if addresses such as `alex+campaign@example.com` should match `alex@example.com`. This normalizes an email alias; it does not remove tracking parameters from the URL. Save.
{% endstep %}

{% step %}

#### Set ownership priority and fallback

Open **Ownership Rules** and turn on **Enable ownership matching** if existing CRM relationships should take priority. Add rules and put specific matches first. Drag rows or use **Alt + arrow keys** to reorder them.

Open **Fallback Assignment**. Choose the **Fallback team**, then **All members** or **Selected members**. Selected members let you choose participants and set their assignment weights.

Choose **Strict round robin** to select a host before showing times, or **Flexible distribution** to offer times across eligible teammates and select the host for the chosen slot. Save. See [Distribution methods](https://help.distro.so/routing/form-router/distribution-method) for weights, credits, and repeat-prospect behavior.
{% endstep %}

{% step %}

#### Configure the meeting and outcome

Open **Display Scheduler** to choose the event type and review meeting settings. Only booking-form event types are offered. **Display notes to booker** lets the prospect add context.

Open **Booking confirmation** to set a **Destination URL**, or leave it blank for the default confirmation. **No availability** keeps the prospect on the scheduler; review calendars and the event type when no times appear.

Open **After booking** for CRM meeting and record actions. These run after a successful booking. Fallback owner-update settings, when available, are separate from meeting creation. Save each edited panel.
{% endstep %}

{% step %}

#### Test and publish

Choose **Test route** and use synthetic inputs for an existing CRM owner and an unmatched prospect. Check the resulting route and fallback.

The simulation does not create real submissions, CRM records, calendar events, bookings, credits, or assignment-history changes. It does not query live integrations or availability.

Choose **Publish** when the saved configuration is ready. Saving alone updates the draft; new visits keep using the active version until publication. Follow [Router versions](https://help.distro.so/routing/router-versions) for rollback and pinned links.
{% endstep %}
{% endstepper %}

![Fallback Assignment panel in dark mode showing the team, eligible members, weights, and distribution choice.](https://files.gitbook.com/v0/b/gitbook-x-prod.appspot.com/o/spaces%2FQA3GQNrIYVrPQ90NBwRa%2Fuploads%2FTka2yBEJaZueTCN2Gywn%2Fclick-fallback-dark.png?alt=media\&token=62cbc393-8a2b-4a34-99af-5c238d8b7e38)

*Ownership is checked first. Fallback provides a host when matching is disabled or no eligible owner is found.*

### Install Click Router

Open the router's **three-dot menu → Install router**. The option is unavailable until the required CRM fields are mapped. Follow [Install and test a Click Router link](https://help.distro.so/routing/click-router/install-and-test) for platform templates, personalization, and a controlled campaign test.

Copy the generated link; do not construct it from the router's display name. Renaming a router does not require deriving a different URL.

### Find the right tool

| I want to…                             | Open…                                                                             |
| -------------------------------------- | --------------------------------------------------------------------------------- |
| Copy an email-platform template        | Three-dot menu → **Install router**                                               |
| Review or roll back publication        | Three-dot menu → **Versions**                                                     |
| Review configuration changes           | Three-dot menu → **Audit**                                                        |
| Explain an individual attempt          | **Routing Logs**, or the router menu when logs exist                              |
| Inspect assignment history and credits | Three-dot menu → **Distribution history**                                         |
| Compare campaign conversion            | [Routing Insights](https://help.distro.so/reporting/reporting-1/routing-insights) |
| Review meeting outcomes                | [Booking Insights](https://help.distro.so/reporting/reporting-1/booking-insights) |

### Troubleshoot a Click Router

| Symptom                                  | Check                                                                                                                                         |
| ---------------------------------------- | --------------------------------------------------------------------------------------------------------------------------------------------- |
| Install is disabled                      | Map both required identity fields in **Link clicked**.                                                                                        |
| A link fails before showing availability | Confirm the final URL contains a valid email and a nonempty name, with no unresolved personalization tags.                                    |
| The wrong host is offered                | Check ownership priority, eligible CRM owner, fallback team, member selection, weights, and method.                                           |
| No times appear                          | Check the effective event type, host calendars, buffers, and [Availability preview](https://help.distro.so/settings/calendar-troubleshooter). |
| A saved change is missing                | Publish the draft and check whether the link is pinned to an older version.                                                                   |


# Install and test a Click Router link

Copy the router's generated URL template, personalize it for the prospect, and check the final link before using it in a campaign. This is a link-based flow; it does not require the Form Router website script.

Before you start, complete the Click Router's identity mapping, fallback, event type, and publication. See [Click routing](https://help.distro.so/routing/click-router).

![Install Click Router dialog in dark mode with email-platform choices and a personalized HubSpot URL template.](https://files.gitbook.com/v0/b/gitbook-x-prod.appspot.com/o/spaces%2FQA3GQNrIYVrPQ90NBwRa%2Fuploads%2Fhfd0KPUI96sxpKqoBue9%2Fclick-install-dark.png?alt=media\&token=c0e0373b-c085-49e1-a76f-ae80981884cc)

*The screenshot is a local test-workspace example. Copy your own production router's template, including its generated host and identifier.*

### Add the link to a campaign

{% stepper %}
{% step %}

#### Copy the platform template

Open the router's **three-dot menu → Install router**. Choose **HubSpot**, **Outreach**, **Klenty**, **Apollo**, **Pardot**, or **Mailchimp**.

Copy the URL template for a button's destination, or the HTML example for an email editor that accepts HTML. Use the instructions for the selected platform; their personalization syntax differs.
{% endstep %}

{% step %}

#### Check identity and URL encoding

The completed link needs **email** and **name**. An unresolved merge tag, missing name, or malformed email prevents the intended booking flow.

For example, the HubSpot template uses `email={{contact.email}}` and `name={{contact.firstname}}`. Verify the actual values produced by your email platform and its handling of empty contact properties.

URL-encode literal query values when building a link in your own application. A plus sign in an email should be encoded as `%2B`; spaces and ampersands in names also need encoding. Optional campaign values do not replace the required identity fields.
{% endstep %}

{% step %}

#### Test a rendered link

Preview the personalized content for a controlled test contact. Inspect the rendered destination, then open that link and confirm the prospect identity and expected scheduler.

Check both an existing CRM owner and a prospect who should use fallback. Verify available times, meeting details, and any configured confirmation redirect. Real link tests can create routing activity; completing a booking can trigger calendar and CRM actions. Use designated test details.
{% endstep %}

{% step %}

#### Use the verified link

Place the verified template in the campaign or application. When the router changes, save and **Publish** the new version, then recheck a representative link. Keep track of any deliberately pinned version. See [Router versions](https://help.distro.so/routing/router-versions).
{% endstep %}
{% endstepper %}

### Identity mapping and email aliases

![Link clicked settings in dark mode with required Email and Name mappings and Strip email suffixes.](https://files.gitbook.com/v0/b/gitbook-x-prod.appspot.com/o/spaces%2FQA3GQNrIYVrPQ90NBwRa%2Fuploads%2FbfZ0kS1NhxUnkFbPA49r%2Fclick-identity-dark.png?alt=media\&token=49acd74b-510f-4ec4-a7ce-1a98c4f73087)

**Link clicked** maps URL identity into the CRM fields used for matching. **Strip email suffixes** converts an address such as `alex+demo@example.com` to `alex@example.com` before matching. It does not clean or remove campaign tracking parameters.

For an anonymous website visitor whose email and name are not yet known, use a [Form Router](https://help.distro.so/routing/form-router) to collect their details first.

### Common link problems

| Problem                                    | Next check                                                                                                                                           |
| ------------------------------------------ | ---------------------------------------------------------------------------------------------------------------------------------------------------- |
| The Install option is unavailable          | Map both required CRM fields and save.                                                                                                               |
| The link contains braces or merge-tag text | Check the selected platform and inspect a real personalized preview.                                                                                 |
| A prospect's name is empty                 | Provide the platform's appropriate name property or fallback value.                                                                                  |
| A plus-address or name is malformed        | Check query-value encoding and the email-normalization setting.                                                                                      |
| A campaign still uses old behavior         | Check the active router version and any version pin.                                                                                                 |
| The link opens but has no slots            | Review host eligibility and calendars; use [Click Routing troubleshooting](https://help.distro.so/routing/click-router#troubleshoot-a-click-router). |


# Outbound routing

Use outbound routing when a teammate is arranging a meeting for a prospect and Distro should choose the host. An **allowed booker** starts the handoff; an **eligible host** receives the meeting. They can be different people.

### Start with your task

| I want to…                                        | Guide                                                                            |
| ------------------------------------------------- | -------------------------------------------------------------------------------- |
| Set up a handoff for the sales team               | [Outbound routers](https://help.distro.so/routing/outbound-routing/routers)      |
| Design questions and control who sees each answer | [Outbound Forms](https://help.distro.so/routing/outbound-routing/forms)          |
| Arrange a meeting for a prospect                  | [Sales handoffs](https://help.distro.so/routing/outbound-routing/book-a-meeting) |
| Let one or many prospects choose later            | [Outbound links](https://help.distro.so/routing/outbound-routing/share-links)    |
| Put two to five proposed times in a message       | [Magic Slots](https://help.distro.so/routing/outbound-routing/magic-slots)       |

![Sales demo handoff in dark mode, showing allowed bookers, the pinned form, CRM identity, routing, fallback, and scheduling.](https://files.gitbook.com/v0/b/gitbook-x-prod.appspot.com/o/spaces%2FQA3GQNrIYVrPQ90NBwRa%2Fuploads%2FmR22wZck7htNBXraCG3o%2Foutbound-router-canvas-dark.png?alt=media\&token=80633068-e932-4d0d-9092-dda4740eafcb)

*Admins configure the handoff. Sellers complete it from Distro or a supported extension launch surface.*

### How a handoff works

The booker supplies prospect details using a published **Outbound Form version**. Distro resolves CRM identity, evaluates ownership rules, then distribution rules, then the **mandatory fallback**. The router uses a fixed event type.

The booker can confirm a meeting, share a dedicated link, or propose times when enabled. A reusable link lets each recipient supply their own identity and start a separate session. Viewing availability or sharing an offer does not reserve a host or time; eligibility and availability are checked again when booking.

Outbound routing and its sharing capabilities must be enabled for the workspace. A seller must be an allowed booker on an active router. If a handoff is missing, check both access and active status.

### Review results

Workspace admins can use these pages under **Outbound routing**:

| Page                                                                                   | What it answers                                                                                                |
| -------------------------------------------------------------------------------------- | -------------------------------------------------------------------------------------------------------------- |
| [Routing Insights](https://help.distro.so/reporting/outbound-reports/routing-insights) | Are handoffs reaching an eligible route, and where are they getting stuck?                                     |
| [Booking Insights](https://help.distro.so/reporting/outbound-reports/booking-insights) | Which routed sessions turn into bookings, through which channels?                                              |
| **Routing Logs**                                                                       | What happened in this individual handoff: router, rule, status, assignee, launch surface, and booking channel? |

Insight date ranges follow when the handoff started, not the scheduled meeting date. Compare routing and booking results using the same period and filters.

A session that has no eligible host or availability is a routing problem to investigate; it does not mean the prospect was disqualified.


# Outbound routers

An Outbound Router defines who can arrange a meeting, what information they collect, how Distro selects a host, and which scheduling options they can share. **Workspace admins configure routers; allowed bookers use them.**

Have a [published Outbound Form](https://help.distro.so/routing/outbound-routing/forms), a reusable event type, a fallback team, and calendar-ready hosts before activating a router.

![Outbound Router canvas in dark mode with the Sales demo handoff configuration.](https://files.gitbook.com/v0/b/gitbook-x-prod.appspot.com/o/spaces%2FQA3GQNrIYVrPQ90NBwRa%2Fuploads%2FmR22wZck7htNBXraCG3o%2Foutbound-router-canvas-dark.png?alt=media\&token=80633068-e932-4d0d-9092-dda4740eafcb)

### Create and configure a handoff

{% stepper %}
{% step %}

#### Create the router and choose bookers

Open **Outbound routing → Outbound Routers → New Outbound Router**. Give it a recognizable name.

Open **Booker starts handoff** and select the **Allowed bookers**. Review **Allow eligible bookers to host** if sellers should be able to choose **Assign to me**. Being allowed to start a handoff does not automatically make someone an eligible host. Save.
{% endstep %}

{% step %}

#### Pin the form and review identity handling

Open **Outbound Form** and select the intended published form version. A newer form version is never selected automatically.

Open **CRM identity & prefill**. Choose whether multiple CRM matches require the booker to select a record or allow explicitly treating the prospect as new. Explicit answers from an authorized booker or prospect take precedence over CRM prefill. Save each panel.
{% endstep %}

{% step %}

#### Configure routing and mandatory fallback

Open **Lead Routing**. Choose **Strict** to name one provisional assignee before availability, or **Flexible** to keep an eligible pool and choose for the selected slot.

Add ownership and distribution rules. Ownership runs first, followed by distribution; reorder within each group by dragging or using **Alt + arrow keys**. The activated revision uses snapshots of these rules.

Open **Mandatory fallback** and choose a team plus all members or selected participants and weights. Fallback is required even when rules usually match. With no rules selected, it handles every route. Save.
{% endstep %}

{% step %}

#### Set the meeting, attendance, and sharing

Open **Display Scheduler** and choose the router's event type. Outbound routing uses this fixed event type; rules cannot override it.

Open **Booking & sharing**. Set whether booker attendance is **Optional**, **Required**, or **Excluded**, and review the sharing options below. Required or excluded attendance overrides the optional default. Save.

Use the **+ after Booking & sharing** to configure a supported booking-side CRM action when needed. CRM meeting creation runs after a successful booking; testing, routing, availability, and link creation do not create a CRM meeting or change CRM ownership.
{% endstep %}

{% step %}

#### Test and activate

Choose **Test route**. Enter synthetic answers and, when relevant, a synthetic CRM owner and record type. Check an ownership match, distribution, and fallback.

This is a safe routing simulation. It does not change credits, assignment history, CRM records, calendar events, or bookings, and it never calls your CRM. Separately check the real seller flow and calendar availability with controlled test details.

Choose **Activate** for a new router, **Publish changes** for an active router's draft, or **Publish & activate** when publishing a paused router. Resolve the visible configuration errors if the action is disabled.
{% endstep %}
{% endstepper %}

![Outbound Test route dialog in dark mode showing synthetic form answers and CRM context.](https://files.gitbook.com/v0/b/gitbook-x-prod.appspot.com/o/spaces%2FQA3GQNrIYVrPQ90NBwRa%2Fuploads%2FqKNrikhmvcJtFe05QJ1B%2Foutbound-test-route-dark.png?alt=media\&token=f6e42479-db1f-4acb-8a52-76dbe0986a05)

*Use simulation to inspect routing, then check the seller experience separately.*

### Choose sharing capabilities

![Booking and sharing configuration in dark mode with attendance, prepared links, reusable links, and Magic Slots.](https://files.gitbook.com/v0/b/gitbook-x-prod.appspot.com/o/spaces%2FQA3GQNrIYVrPQ90NBwRa%2Fuploads%2FZ26FpFISyHFxRJ2uWh6g%2Foutbound-sharing-settings-dark.png?alt=media\&token=caad8327-18e7-46e6-abcd-4e5123195eda)

| Setting in Booking & sharing                  | Result                                                                                                             |
| --------------------------------------------- | ------------------------------------------------------------------------------------------------------------------ |
| **Prepared links → Allow Share availability** | Enables recipient-specific dedicated links. Set expiry from 1–30 days, never beyond the session expiry.            |
| **Allow reusable scheduling links**           | Lets allowed bookers create reusable links through the Chrome extension. Each recipient starts a separate session. |
| **Allow Magic Slots**                         | Lets bookers propose 2–5 times. Set proposal expiry from 1–14 days, never beyond the source session expiry.        |

The prepared-link switch uses the label **Allow Share availability**. In the seller workspace, **Share link** creates a dedicated link; the separate **Share availability** action opens Magic Slots. See [Outbound links](https://help.distro.so/routing/outbound-routing/share-links) and [Magic Slots](https://help.distro.so/routing/outbound-routing/magic-slots).

Reusable links require a form that a prospect can complete. A required booker-only or locked field without a usable value can prevent activation; review the form's audience and defaults.

### Manage a live router

| Action                         | Effect                                                                                                                               |
| ------------------------------ | ------------------------------------------------------------------------------------------------------------------------------------ |
| Save a panel                   | Changes the draft configuration; existing publication remains active.                                                                |
| **Pause**                      | Stops new sessions and freezes uncommitted sessions. Draft changes stay unpublished.                                                 |
| **Resume**                     | Restores the last published revision without publishing the draft.                                                                   |
| Three-dot menu → **Versions**  | Inspect publication history and rollback options.                                                                                    |
| Three-dot menu → **Audit**     | Review configuration changes and their actors.                                                                                       |
| Three-dot menu → **Duplicate** | Creates a separate draft with configuration and pinned form version, without sessions, links, bookings, analytics, or audit history. |

Follow [Router versions](https://help.distro.so/routing/router-versions). After publishing a new form, select that version here and publish the router before new handoffs use it.

### If activation or access fails

Check the allowed-booker list, published form version, fixed event type, fallback team and participants, supported rules, and reusable-link field requirements. A seller who cannot find the router should also confirm the workspace and active status.


# Outbound Forms

An Outbound Form defines the questions in a sales handoff and who can supply or see each answer. Its published versions are reusable and immutable. Each Outbound Router pins one published version.

This is different from [website form mapping](https://help.distro.so/routing-forms/overview): you design the outbound questions in Distro rather than mapping an existing website form.

![Outbound Form editor in dark mode with field order and the booker preview.](https://files.gitbook.com/v0/b/gitbook-x-prod.appspot.com/o/spaces%2FQA3GQNrIYVrPQ90NBwRa%2Fuploads%2F3YfGftgDUNszlbzBlf8G%2Foutbound-form-preview-dark.png?alt=media\&token=58685715-1fc1-4acd-a4f7-a4751be70efe)

### Build and publish a form

{% stepper %}
{% step %}

#### Create the form

Open **Outbound routing → Outbound Forms → New Outbound Form**. Enter a **Form name** sellers will recognize.

**Work email** and **Full name** are required identity fields and cannot be removed. Use **Add field** for the extra information your handoff needs.
{% endstep %}

{% step %}

#### Choose fields and responsibility

Choose short text, long text, single selection, multiple selection, number, or boolean. Give each field a clear label. Selection fields need **Options (one per line)**.

Review **Audience and responsibility** using the table below. Turn on **Required** only when the responsible actor must provide a value. A field's type and key are fixed after creation; changing its label does not turn it into another type.
{% endstep %}

{% step %}

#### Set destinations and defaults

Under **Routing and destinations**, review **CRM prefill**, **Affects routing**, **Internal booking context**, **Calendar invitation**, and supported **CRM destinations**.

**Affects routing** means changing the answer invalidates the provisional route. **Calendar invitation** can expose the value to the prospect. Booker-only fields are excluded from invitation content.

A default applies only when no explicit answer or permitted CRM prefill is available. Save each field. CRM mappings are snapshotted when the version is published.
{% endstep %}

{% step %}

#### Preview both audiences

Use **Booker** and **Prospect** in the live preview. Check which fields appear, what is required, and whether the prospect can edit shared answers. Reorder extra fields by dragging or using **Alt + arrow keys**.

For reusable links, confirm a prospect can complete every required field without an unavailable booker-only value. A locked required field may need an appropriate default or a different audience.
{% endstep %}

{% step %}

#### Publish and connect the version

Choose **Publish version**. In the [Outbound Router](https://help.distro.so/routing/outbound-routing/routers), open **Outbound Form**, select the new published version, save, and activate or publish the router.

Publishing the form alone does not change any router's pinned version.
{% endstep %}
{% endstepper %}

### Who supplies the answer?

| Audience                | Intended use                               | Prospect behavior                                         |
| ----------------------- | ------------------------------------------ | --------------------------------------------------------- |
| **Booker only**         | Internal handoff context from the teammate | Omitted from the prospect's form and calendar invitation. |
| **Booker and prospect** | Shared context                             | Visible to both; review **Prospect can edit**.            |
| **Prospect completes**  | Information the recipient supplies         | Completed by the prospect in their part of the flow.      |

![Outbound field settings in dark mode showing audience, required and editable controls, routing, and calendar destinations.](https://files.gitbook.com/v0/b/gitbook-x-prod.appspot.com/o/spaces%2FQA3GQNrIYVrPQ90NBwRa%2Fuploads%2FLIlVueq4YgBghWbvZgKh%2Foutbound-field-settings-dark.png?alt=media\&token=874d7fb3-fe8a-47d9-aab3-2af6c6401021)

*Audience controls who sees and completes the field. Destination controls determine how its value is used.*

### Change a published form

{% stepper %}
{% step %}

#### Create a new draft

Open the form and choose **Create draft**. The previous published version stays available to existing routers.
{% endstep %}

{% step %}

#### Edit and preview

Update fields and review both actor previews. Use **Discard draft** if you want to remove unpublished changes and keep the published version. The initial unpublished draft cannot be discarded this way.
{% endstep %}

{% step %}

#### Publish and update the router

Choose **Publish version**, then explicitly select that version in each router that should adopt it. Test and publish those router changes. Existing sessions retain their starting configuration.
{% endstep %}
{% endstepper %}

### Troubleshoot form behavior

| Symptom                                 | Check                                                                             |
| --------------------------------------- | --------------------------------------------------------------------------------- |
| A seller still sees old questions       | Confirm the router's pinned version and active publication.                       |
| A prospect cannot see a field           | Check its audience in the Prospect preview.                                       |
| A shared answer cannot be edited        | Review **Prospect can edit** and the field's audience.                            |
| A route changes after editing an answer | Check **Affects routing**; the old provisional result must be recalculated.       |
| Reusable links fail activation          | Review required booker-only and locked fields, defaults, and prospect completion. |
| A field value appears in invitations    | Review **Calendar invitation** separately from internal context.                  |


# Sales handoffs

Use a sales handoff to arrange a meeting between a prospect and the right teammate. You must be an allowed booker on an active Outbound Router in the current workspace.

### Start and complete the handoff

{% stepper %}
{% step %}

#### Choose the handoff and prospect

In the extension's command palette, choose the outbound meeting command, enter the prospect's **Work email**, choose a **Sales handoff**, and continue. A Distro handoff picker shows active routers you can use with **Start handoff**.

Supported HubSpot and Salesforce person-record launches can prefill identity. Review the suggested record and details. If several CRM records match, choose the correct one or use the permitted treat-as-new option; do not assume a suggested identity is correct.
{% endstep %}

{% step %}

#### Complete the required details

Review **Work email**, **Full name**, **Prospect timezone**, and **Sales handoff**. Complete the form and wait for changes to save and CRM identity to resolve.

Choose **Route to a colleague**, or **Assign to me** when available. Assign to me still requires independent host eligibility and a ready calendar; it is not a manual override for any teammate.
{% endstep %}

{% step %}

#### Open availability and review participants

Choose **Book a meeting** to route the handoff and load availability. Under **Participants**, use **Include me in the meeting** when attendance is optional. Your admin can require or exclude your attendance.

**Add teammates…** includes additional teammates' availability. Review these participants before selecting a slot.
{% endstep %}

{% step %}

#### Select and confirm a time

Check the displayed timezone. The calendar starts with **Work Week**; use **Full Week** for weekends. Use the week controls or **Show me the next available time** when the current week is empty.

Select an available time, review the host and prospect, add permitted guests, and confirm only when the details are correct. Distro rechecks eligibility and availability before committing the booking; a displayed time or host is not reserved.
{% endstep %}
{% endstepper %}

![Seller handoff in dark mode showing prospect identity, timezone, selected handoff, and context fields.](https://files.gitbook.com/v0/b/gitbook-x-prod.appspot.com/o/spaces%2FQA3GQNrIYVrPQ90NBwRa%2Fuploads%2FjJNvIuDtXkdAAPMMyd3z%2Foutbound-handoff-dark.png?alt=media\&token=9015af15-36aa-4014-9333-4e93edc1949b)

*This guide uses synthetic prospect data from the local Northstar Labs test workspace.*

![Outbound availability calendar in dark mode with eligible teammates, participant options, timezone, and available times.](https://files.gitbook.com/v0/b/gitbook-x-prod.appspot.com/o/spaces%2FQA3GQNrIYVrPQ90NBwRa%2Fuploads%2FjrgbmOaFSYkbr49h9zwb%2Foutbound-calendar-dark.png?alt=media\&token=4b43061a-72b7-40ed-8b59-54948a23d52e)

*Busy-event details may be private even when availability can be checked. Choose from the available times Distro offers.*

### Let the prospect choose later

| Action                                           | Result                                                                         |
| ------------------------------------------------ | ------------------------------------------------------------------------------ |
| **Sharing → Share link → Create dedicated link** | Creates a recipient-specific link carrying permitted context.                  |
| A reusable outbound link from the extension      | Lets different prospects enter their own identity and start separate sessions. |
| **Share availability**                           | Opens Magic Slots to propose 2–5 times when enabled.                           |

See [Outbound links](https://help.distro.so/routing/outbound-routing/share-links) and [Magic Slots](https://help.distro.so/routing/outbound-routing/magic-slots).

### Change the sales handoff

While a signed-in session is open, use **Sales handoff** to choose another active router you may use. Distro keeps compatible answers, applies the new defaults, and clears the prior route and selected time.

Existing dedicated links and proposed-time offers for that handoff are revoked. Complete newly required fields, reroute, and share a new offer. If the new router does not allow **Assign to me**, the choice returns to **Route to a colleague**.

### If you cannot proceed

| What you see                          | What to do                                                                                                  |
| ------------------------------------- | ----------------------------------------------------------------------------------------------------------- |
| No handoffs available                 | Ask an admin to check the workspace, active router, and allowed-booker list.                                |
| Unsaved changes or incomplete details | Complete required fields and let pending saves finish.                                                      |
| Multiple CRM matches                  | Review the permitted matches and select the correct identity.                                               |
| **CRM unavailable**                   | Accepted answers are retained. Retry the lookup; ask your admin to check the CRM connection if it persists. |
| No eligible host                      | Ask your admin to review rules, fallback participants, and calendar readiness.                              |
| No times this week                    | Check timezone and participants, move to another week, or find the next available time.                     |
| A chosen slot is no longer available  | Reload current availability and choose another slot.                                                        |

No eligible host or no availability does not mean the prospect was disqualified. Admins can inspect the handoff in **Outbound routing → Routing Logs**.


# Outbound links

Choose a dedicated link for one known prospect, a reusable link for multiple recipients, or Magic Slots when you want to suggest specific times. Your admin chooses which capabilities are enabled on the router.

| Option                      | Who it is for                                               | What the recipient does                                            |
| --------------------------- | ----------------------------------------------------------- | ------------------------------------------------------------------ |
| **Dedicated prospect link** | One named prospect and one booking                          | Completes permitted missing details, chooses a time, and books.    |
| **Reusable outbound link**  | Different prospects using the same booker-owned entry point | Supplies their own identity and starts a separate private session. |
| **Magic Slots**             | One prospect choosing among 2–5 proposed times              | Selects an offered time; availability is checked again.            |

### Share a dedicated prospect link

{% stepper %}
{% step %}

#### Prepare the handoff

Open a [sales handoff](https://help.distro.so/routing/outbound-routing/book-a-meeting), confirm the prospect's identity, and complete the required booker-provided details. Dedicated links must be enabled on the router.
{% endstep %}

{% step %}

#### Create and copy the link

Under **Sharing**, choose **Share link**, then **Create dedicated link**. Review the intended recipient and copy the generated dedicated link.

The link carries only permitted handoff context. The recipient may still need to complete required prospect-owned fields before routing or booking.
{% endstep %}

{% step %}

#### Share with the intended recipient

Use the link for that prospect. It expires and is limited to one booking. It does not reserve an assignee or a time.

If you need another link for the same handoff, use **Replace link**; the previous link is revoked. **Revoke** stops the current link from being used. Changing the handoff also revokes its dedicated links.
{% endstep %}
{% endstepper %}

![Share booking link sheet in dark mode showing the intended recipient and Create dedicated link.](https://files.gitbook.com/v0/b/gitbook-x-prod.appspot.com/o/spaces%2FQA3GQNrIYVrPQ90NBwRa%2Fuploads%2FCinPaaMKWKaQx2vBm1Nj%2Foutbound-share-link-dark.png?alt=media\&token=f39d60d6-92de-4c72-a7b9-8057b6012747)

### Use a reusable link

Reusable links are created through the **Chrome extension**, not the retired dashboard link builder. After your admin enables the option and activates the router, use the extension's outbound-link flow for an active router you are allowed to use, then copy the resulting booker-owned link.

Each recipient provides their own identity and gets a separate session. Do not substitute a dedicated prospect link when you need a reusable entry point.

Admins can inspect existing booker-owned links in the router's **Booking & sharing** configuration. Revoking or rotating a link affects the places it has already been shared; replace those placements when its address changes.

If the extension does not offer the router, check the workspace, active status, allowed-booker access, reusable-link setting, and whether the pinned form can be completed by a prospect.

### Expiry and availability

| Behavior              | Dedicated link                           | Reusable link                                     | Magic Slots                                |
| --------------------- | ---------------------------------------- | ------------------------------------------------- | ------------------------------------------ |
| Prospect identity     | Already associated with a named prospect | Entered separately by each recipient              | Associated with the source handoff         |
| Configurable expiry   | 1–30 days, capped by session expiry      | Managed by the reusable-link lifecycle and access | 1–14 days, capped by source session expiry |
| Reserves time or host | No                                       | No                                                | No                                         |

In **Booking & sharing**, **Prepared links → Allow Share availability** enables dedicated links. The seller's separate **Share availability** action means [Magic Slots](https://help.distro.so/routing/outbound-routing/magic-slots).

If a link is expired, revoked, consumed, or otherwise unavailable, return to the appropriate handoff or extension flow to create a valid replacement. Do not forward another prospect's dedicated link.


# Magic Slots

Magic Slots lets an allowed booker propose **two to five available times** from an outbound handoff. The prospect chooses a time from the message instead of starting with a full calendar.

For personal or group booking links, use [Offer times](https://help.distro.so/integrations/chrome-extension/offer-times). This page covers proposed times from an Outbound Router.

### Before you start

Your workspace and the active router must allow Magic Slots. Complete the handoff's required details, resolve prospect identity, and review participants and timezone. The form must be ready for this scheduling path.

Admins enable **Allow Magic Slots** in the router's **Booking & sharing** panel. **Proposal expiry** is 1–14 whole days and cannot extend beyond the source session expiry.

### Propose times to a prospect

{% stepper %}
{% step %}

#### Open Share availability

Start or reopen the [sales handoff](https://help.distro.so/routing/outbound-routing/book-a-meeting). Choose **Share availability**. It is available when required details are ready and Magic Slots is enabled.

From the scheduling calendar, check the timezone, participants, and the week you are viewing before choosing times.
{% endstep %}

{% step %}

#### Select two to five times

Select available slots in the calendar. The selection panel shows how many are chosen. Use the week controls to offer useful alternatives.

These selections do not hold a time, reserve a host, or consume distribution credit.
{% endstep %}

{% step %}

#### Create and copy the snippet

Choose **Vertical** or **Horizontal**, then **Create snippet**. Review the proposed dates, timezone, and expiry.

Use the resulting snippet in your message. **Copy HTML** and **Copy plain text** provide alternatives. When launched from Gmail, Distro returns the snippet to the originating draft; if that draft moved or closed, copy it manually.
{% endstep %}

{% step %}

#### Handle changes before booking

Availability is checked again when the prospect chooses a time. If a slot is no longer available or the proposal expires, offer current times again.

Use **Revoke** to stop an issued proposal from accepting a booking. Changing the sales handoff revokes its prior offers. A completed booking remains unchanged.
{% endstep %}
{% endstepper %}

![Magic Slots selection in dark mode with two proposed times, layout choice, and Create snippet.](https://files.gitbook.com/v0/b/gitbook-x-prod.appspot.com/o/spaces%2FQA3GQNrIYVrPQ90NBwRa%2Fuploads%2FMJhfXpq1FeTJIO1nr6dN%2Foutbound-magic-slots-dark.png?alt=media\&token=2e17e2c0-fbcc-4242-bd7b-3b78c81a40f4)

*Two example times are selected. They remain available to others until a booking is confirmed.*

### Troubleshoot proposed times

| Symptom                                     | Check                                                                                                     |
| ------------------------------------------- | --------------------------------------------------------------------------------------------------------- |
| Share availability is disabled or missing   | Complete required details, resolve CRM identity, and confirm Magic Slots is enabled in the active router. |
| No times appear                             | Review timezone, participants, event type, host calendars, and the selected week.                         |
| Snippet creation asks for more details      | Complete required fields and reroute before proposing times.                                              |
| An offered time no longer works             | Load current availability and issue a fresh proposal. Offers do not reserve slots.                        |
| A copied offer expired                      | Check the proposal and session expiry, then create a new offer if the handoff is still usable.            |
| The Gmail draft did not receive the snippet | Use **Copy HTML** or **Copy plain text** from the generated result.                                       |


# Router versions

Saving router edits creates a draft. **Activation** makes a version available for new routing attempts. This applies to Form, Click, and Outbound Routers.

<figure><img src="https://2442454418-files.gitbook.io/~/files/v0/b/gitbook-x-prod.appspot.com/o/spaces%2FQA3GQNrIYVrPQ90NBwRa%2Fuploads%2F8ENIz2VkccrJAMvQCyxs%2FCleanShot%202026-09-10%20at%2021.35.35%402x.png?alt=media&amp;token=3957d91c-aada-4b13-ab26-b159d6e9392e" alt=""><figcaption></figcaption></figure>

Make your changes, save them, and use **Test route** to check the saved draft. Activate when you're ready for new prospects to use it.

## What changes for existing prospects?

A prospect who has already started keeps the router version they began with. This lets them finish with the configuration used for their original attempt.

Calendars, user availability, and current access are still checked. A saved version doesn't reserve a host or make a busy time available.

## Return to an earlier version

Open **Versions** to review the router's published history. **Roll back** changes the version used by new, unpinned traffic. It doesn't replace the version of an attempt already in progress or remove your saved draft.

If a link was deliberately pinned to a version, a rollback doesn't change that pin. Check pinned links when a particular test or campaign continues to show older behavior.

## Shared settings

Routers capture configuration such as event settings in their activated versions. After changing shared configuration, review and activate the router version that should use it.

Outbound Forms are also adopted explicitly. Publishing a newer form alone doesn't advance routers that use an older version.

## Test and duplicate

**Test route** simulates the saved configuration. It does not book a meeting, write CRM records, or call enrichment providers. Use representative inputs, then check the real entry point after activation.

<figure><img src="https://2442454418-files.gitbook.io/~/files/v0/b/gitbook-x-prod.appspot.com/o/spaces%2FQA3GQNrIYVrPQ90NBwRa%2Fuploads%2FP7nUOTJbMfUQwtppUnq5%2FCleanShot%202026-09-10%20at%2021.36.07%402x.png?alt=media&amp;token=cbb9e741-0d39-4d94-9df3-8ffb57bdbbdd" alt=""><figcaption></figcaption></figure>

Duplicating a router creates a separate router without an active version. Review and activate the copy before using it. Referenced rules, event types, and forms can still be shared; a duplicate is not an independent copy of every connected setting.


# Reporting overview

Use reporting to understand how prospects move through routing and booking. Start with your routing type, then choose the report that answers your question.

## Choose your reporting area

<table data-card-size="large" data-view="cards"><thead><tr><th></th><th></th><th data-hidden data-card-target data-type="content-ref"></th><th data-hidden data-card-cover data-type="files"></th></tr></thead><tbody><tr><td><strong>Inbound reports</strong></td><td>Track website form submissions, qualification, and meeting outcomes.</td><td><a href="/reporting/reporting">Inbound reports</a></td><td><a href="https://2442454418-files.gitbook.io/~/files/v0/b/gitbook-x-prod.appspot.com/o/spaces%2FQA3GQNrIYVrPQ90NBwRa%2Fuploads%2FnSbsXJknntpsJ9G33c3u%2Freport-guide-inbound.png?alt=media">report-guide-inbound.png</a></td></tr><tr><td><strong>Campaign reports</strong></td><td>Follow routed visits from campaign links through booking and meeting outcomes.</td><td><a href="/reporting/reporting-1">Campaign reports</a></td><td><a href="https://2442454418-files.gitbook.io/~/files/v0/b/gitbook-x-prod.appspot.com/o/spaces%2FQA3GQNrIYVrPQ90NBwRa%2Fuploads%2FIlXjKOHTZa2Le6Nco2q8%2Freport-guide-campaign.png?alt=media">report-guide-campaign.png</a></td></tr><tr><td><strong>Outbound reports</strong></td><td>Review sales handoffs, assignments, booking conversion, and delivery health.</td><td><a href="/reporting/outbound-reports">Outbound reports</a></td><td><a href="https://2442454418-files.gitbook.io/~/files/v0/b/gitbook-x-prod.appspot.com/o/spaces%2FQA3GQNrIYVrPQ90NBwRa%2Fuploads%2FXAL9LEjacwGlD6j3lgBV%2Freport-guide-outbound.png?alt=media">report-guide-outbound.png</a></td></tr></tbody></table>

Open inbound reports from **Form routing**, campaign reports from **Click routing**, and outbound reports from **Outbound routing**. Outbound reports are available to workspace admins.

## Find the right report

| Report               | Use it to                                                                                                  |
| -------------------- | ---------------------------------------------------------------------------------------------------------- |
| **Routing Insights** | Follow the routing process from a form submission, routed visit, or sales handoff.                         |
| **Booking Insights** | Review meeting outcomes and owner workload, or outbound booking conversion, channels, and delivery health. |
| **Routing Logs**     | Inspect an individual submission, routed visit, or handoff and its routing context.                        |

## Compare date ranges

Each report uses a specific date field. Match the date range and filters before comparing results.

| Reporting area | Routing Insights | Booking Insights |
| -------------- | ---------------- | ---------------- |
| **Inbound**    | Submission date  | Meeting date     |
| **Campaign**   | Click date       | Meeting date     |
| **Outbound**   | Handoff date     | Handoff date     |

A form submission or campaign click this week can produce a meeting scheduled next month, so routing and booking totals can differ for the same date range. Both outbound insight reports use the date the handoff started.


# Inbound reports

Open **Form routing** and choose the report that matches your question.

* [Routing Insights](/reporting/reporting/routing-insights) follows submissions through qualification and booking, using **Submission date**.
* [Booking Insights](/reporting/reporting/booking-insights) compares meeting outcomes and owner workload, using **Meeting date**.
* **Routing Logs** shows individual submissions and their routing context.

The reports use different date fields, so their totals need not match for the same date range. A form submitted this week can produce a meeting scheduled next month.


# Routing insights

Track conversions, spot routing gaps, and compare router and rule performance.

Open **Form routing → Routing Insights** to measure how form submissions move through qualification and booking.

Choose **Submission date** and use **Add filter** for the router or rule you want to inspect. The date range follows when the form was submitted, not when the resulting meeting takes place.

| Metric                    | Meaning                                                                               |
| ------------------------- | ------------------------------------------------------------------------------------- |
| **Submissions**           | All Form Router submissions in the selected scope, including unqualified submissions. |
| **Qualified**             | Submissions with a matched routing rule. The percentage uses all submissions.         |
| **Meetings booked**       | Qualified submissions with a booking. The percentage uses qualified submissions.      |
| **Qualified, not booked** | Qualified submissions without a booking.                                              |

The **Conversion path** also shows unqualified submissions and overall conversion. A qualified result is not proof that a meeting was booked or attended.

Use **Router load** to compare router volume and conversion, and **Rule performance** to compare matched rules. Select a stage, router, or rule to inspect its submissions in the current filter scope.

For low qualification, inspect submitted values, mappings, and rule conditions. For qualified prospects who do not book, inspect the exact routing attempt and [availability](/settings/find-unavailable-times). Use [Booking Insights](/reporting/reporting/booking-insights) for meeting outcomes rather than changing routing solely from the conversion percentage.


# Booking insights

Track booking distribution, outcomes, and trends for Form Router traffic.

Open **Form routing → Booking Insights** to review meetings created by Form Routers. Personal links, group links, and Outbound Routers are outside this report's source scope.

Set **Meeting date**, then use **Add filter** for **Booking Owner**, **Router**, or **Rule**. The range uses the meeting's start time, not the submission or click date.

![Booking metrics and meeting outcomes by owner.](https://2442454418-files.gitbook.io/~/files/v0/b/gitbook-x-prod.appspot.com/o/spaces%2FQA3GQNrIYVrPQ90NBwRa%2Fuploads%2FC6RGy6Yu341pQzkaCqMx%2Fbooking-insights.png?alt=media)

| Metric                          | Meaning                                                                  |
| ------------------------------- | ------------------------------------------------------------------------ |
| **Total routed bookings**       | Bookings from this router type in the selected meeting-date scope.       |
| **Completed meetings**          | Meetings marked completed.                                               |
| **Completion rate**             | Completed divided by completed, cancelled, and no-show meetings.         |
| **Cancellation + no-show rate** | Cancelled and no-show meetings divided by that same final-outcome total. |

Upcoming and unresolved meetings are excluded from the two outcome rates. A rate is not a percentage of every scheduled booking.

## Compare owners and periods

**Meeting outcomes by owner** starts in **Outcome rate**. Switch to **Volume** to compare booking counts. Use **Compare** to include the preceding period of the same length. Count changes are percentages; rate changes are percentage points.

Select an owner's status segment to open the matching records. Review the guest, booking status, source, and routing context before deciding whether an imbalance is a routing or attendance problem.

**Routed bookings over time** follows meeting dates. To understand how visitors reached those meetings, return to [Routing Insights](/reporting/reporting/routing-insights), which uses submission or click dates instead.


# Campaign reports

Open **Click routing** and choose the report that matches your question.

* [Routing Insights](/reporting/reporting-1/routing-insights) follows routed visits through booking, using **Click date**.
* [Booking Insights](/reporting/reporting-1/booking-insights) compares meeting outcomes and owner workload, using **Meeting date**.
* **Routing Logs** shows individual routed visits and their results.

A routed visit and the meeting it creates can fall in different date ranges. Compare the same date field and filters when reconciling totals.


# Routing insights

Track click-to-meeting conversions, compare routers, and spot drop-offs.

Open **Click routing → Routing Insights** to see how routed visits convert to meetings.

Choose **Click date** and use **Add filter** for the router or rule. A click here is a recorded routed visit, not a unique-person count or every click reported by your email platform.

![Click-date metrics and click-volume reporting.](https://2442454418-files.gitbook.io/~/files/v0/b/gitbook-x-prod.appspot.com/o/spaces%2FQA3GQNrIYVrPQ90NBwRa%2Fuploads%2FPlmXuXFqbGNc8c0E6EvZ%2Fclick-insights.png?alt=media)

| Metric                   | Meaning                                                                                 |
| ------------------------ | --------------------------------------------------------------------------------------- |
| **Total clicks**         | Routed visits in the selected click-date scope.                                         |
| **Meetings booked**      | Routed visits with a booking, plus their share of total clicks.                         |
| **Not booked**           | Routed visits without a booking.                                                        |
| **Average time to book** | Average hours between the routed visit and booking creation for booked visits in scope. |

**Click volume over time** shows the combined active scope. Use **Compare previous** to compare the preceding period. **Router performance** separates traffic and conversion by router; **Bookings by owner** shows who received converted traffic.

Drilldowns retain the click-date, router, and rule filters. Use **Routing Logs** to inspect an individual visit. Use [Booking Insights](/reporting/reporting-1/booking-insights) for meeting-date outcomes; its totals can differ because it uses a different date field.


# Booking insights

Track booking distribution and outcomes for Click Router traffic.

Open **Click routing → Booking Insights** to review meetings created by Click Routers. Personal links, group links, and Outbound Routers are outside this report's source scope.

Set **Meeting date**, then use **Add filter** for **Booking Owner**, **Router**, or **Rule**. The range uses the meeting's start time, not the submission or click date.

| Metric                          | Meaning                                                                  |
| ------------------------------- | ------------------------------------------------------------------------ |
| **Total routed bookings**       | Bookings from this router type in the selected meeting-date scope.       |
| **Completed meetings**          | Meetings marked completed.                                               |
| **Completion rate**             | Completed divided by completed, cancelled, and no-show meetings.         |
| **Cancellation + no-show rate** | Cancelled and no-show meetings divided by that same final-outcome total. |

Upcoming and unresolved meetings are excluded from the two outcome rates. A rate is not a percentage of every scheduled booking.

## Compare owners and periods

**Meeting outcomes by owner** starts in **Outcome rate**. Switch to **Volume** to compare booking counts. Use **Compare** to include the preceding period of the same length. Count changes are percentages; rate changes are percentage points.

Select an owner's status segment to open the matching records. Review the guest, booking status, source, and routing context before deciding whether an imbalance is a routing or attendance problem.

**Routed bookings over time** follows meeting dates. To understand how visitors reached those meetings, return to [Routing Insights](/reporting/reporting-1/routing-insights), which uses submission or click dates instead.


# Outbound reports

Workspace admins can open **Outbound routing** and choose the report that matches their question.

* [Routing Insights](/reporting/outbound-reports/routing-insights) follows handoffs through assignment, using **Handoff date**.
* [Booking Insights](/reporting/outbound-reports/booking-insights) compares booking conversion, channels, and delivery health, using **Handoff date**.
* **Routing Logs** shows individual handoffs and their ordered trace.

Both insight reports use the date the handoff started, not the meeting's scheduled date. A handoff started this week can result in a meeting scheduled next month. Use the same date range and filters when comparing results.


# Routing insights

Track outbound handoffs, assignment conversion, and routing health.

Open **Outbound routing → Routing Insights** to see how outbound handoffs reach an eligible host. These reports are available to workspace admins.

Choose **Handoff date**, then use **Add filter** for **Router**, **Rule**, or **Launch surface**. The range follows when the handoff started, not when the meeting takes place. Launch surface tells you where it started, such as Distro, a CRM, or the browser extension.

| Metric               | Meaning                                                                 |
| -------------------- | ----------------------------------------------------------------------- |
| **Handoffs started** | Outbound handoffs started in the selected date range and filter scope.  |
| **Sessions routed**  | Handoffs in that scope that reached an eligible assignee.               |
| **Session → route**  | Sessions routed divided by handoffs started.                            |
| **Routing p95**      | The duration within which 95% of successful routing attempts completed. |

A routed session means Distro found an eligible assignee. It does not mean a meeting was booked.

## Compare periods and routing health

**Handoff volume over time** shows started handoffs. Use **Compare previous** to include the preceding period of the same length.

**Routing health** shows routing p50, p95, and p99: the durations within which 50%, 95%, and 99% of successful routing attempts completed. **No assignee** counts attempts with no eligible host; **Routing failed** counts technical failures. A handoff can have more than one attempt, so these counts are not unique-handoff totals.

For handoffs without an assignee, inspect the router's rules and eligible members. For technical failures, open **Outbound routing → Routing Logs**, find the handoff, and select it to review its ordered trace.

Use [Booking Insights](/reporting/outbound-reports/booking-insights) to follow routed handoffs through booking and delivery.


# Booking insights

Track outbound booking conversion, channel performance, and delivery health.

Open **Outbound routing → Booking Insights** to review how outbound handoffs become booked meetings. These reports are available to workspace admins.

Set **Handoff date**, then use **Add filter** for **Booking owner**, **Router**, **Rule**, **Booking channel**, or **Launch surface**. The range uses the date the handoff started, not the meeting's start time.

| Metric                     | Meaning                                                              |
| -------------------------- | -------------------------------------------------------------------- |
| **Sessions routed**        | Handoffs in the selected scope that reached an eligible assignee.    |
| **Meetings booked**        | Handoffs in that scope that completed a booking.                     |
| **Route → book**           | Booked handoffs divided by routed sessions.                          |
| **Prepared links created** | Recipient-specific booking links created for handoffs in that scope. |

A prepared link is not a completed booking. This report measures booking conversion and delivery; it does not show the completion, cancellation, or no-show rates used in inbound and campaign booking reports.

## Compare channels and periods

**Booked handoffs over time** groups booked handoffs by the date each handoff started. Use **Compare previous** to include the preceding period of the same length.

**Booking channel performance** compares **Direct**, **Prepared link**, **Reusable link**, and **Magic Slots**. Each channel shows booked meetings out of started handoffs for that channel. Its conversion rate uses started handoffs, while **Route → book** uses routed sessions.

**Booking channel** describes how the booking was made. **Launch surface** describes where the handoff started. A handoff launched from the browser extension can still result in a direct booking or a prepared-link booking.

## Review booking and delivery health

**Booking and delivery health** shows availability speed, no-availability outcomes, slot conflicts, suppressed duplicates, expired or revoked links, and technical availability or booking failures.

**Delivery succeeded**, queued deliveries, and delivery failures describe downstream booking delivery. A booked meeting can still have a delivery problem. These counts track attempts, links, or delivery records rather than unique handoffs.

Open **Outbound routing → Routing Logs** and select a handoff to inspect its routing, availability, booking, and delivery trace. Check the recorded failure before retrying or changing configuration.

Return to [Routing Insights](/reporting/outbound-reports/routing-insights) to investigate assignment. Keep the same handoff-date range and shared filters when comparing the two reports.


# Form mapping

A form mapping tells Distro which website form to listen to and how its submitted fields correspond to CRM properties. A **Form Router** uses that mapping to qualify prospects and assign meetings. The **installation snippet** connects the published website to the router. You need all three for website form routing.

### Map a website form

{% stepper %}
{% step %}

#### Identify the form

Open **Form routing → Forms → New Form**. Enter a recognizable **Form name** and the **Form selector**.

For a standard HTML form, use a stable CSS selector such as `#contact-form`. Provider identifiers can differ: HubSpot uses its form ID without a `#` prefix. Check your provider guide below before copying an identifier.
{% endstep %}

{% step %}

#### Map the fields used by your rules

Under **Field mapping**, choose **Add field**. Enter the website field's submitted name and select the corresponding CRM property. Prioritize email and every field used by qualification or ownership rules.

Match the field's internal `name`, not just its visible label. For example, “Work email” might submit as `email`. HubSpot V4 contact names such as `0-1/email` normalize to `email`.

Add only the fields your routing and CRM workflows need. Choose **Create form**, or **Save changes** when editing.
{% endstep %}

{% step %}

#### Connect it to your router

Open the Form Router's **Form Submission** card and select the mapping as the **Connected form**. Review the selector and mapped fields, then **Save**.

Configure the routing rules and event type, test the saved draft, and choose **Publish** when ready. See [Form routing](https://help.distro.so/routing/form-router).
{% endstep %}

{% step %}

#### Install and verify the website

Open the router's **three-dot menu → Install router**. Select the **Installation method** and **Form provider**, then copy your generated snippet and follow its placement instructions.

Test the published page with controlled qualified and unqualified submissions. Confirm the original form destination, scheduler behavior, and submitted values in **Routing Logs**. Creating or importing a mapping alone does not install the router.
{% endstep %}
{% endstepper %}

<figure><img src="https://files.gitbook.com/v0/b/gitbook-x-prod.appspot.com/o/spaces%2FQA3GQNrIYVrPQ90NBwRa%2Fuploads%2Ffdt7RAG5mLZkRiF5nBiW%2Fform-mapping-dark.png?alt=media&#x26;token=c6fed626-7ea8-4c75-8a8c-0b8898e7eed5" alt="Request a demo form editor in dark mode, showing the form name, selector, and field mappings in the Northstar Labs test workspace."><figcaption><p>Open a form from the Forms list to edit its selector and field mappings.</p></figcaption></figure>

### Find fields automatically

{% stepper %}
{% step %}

#### Scan the form page

Choose **Auto map**, enter the **Form page URL**, and click **Find fields**. The page must be publicly accessible.
{% endstep %}

{% step %}

#### Select the right form

Choose the detected form whose selector and fields match the form you want to route. If no forms are found, try a page where the form is visible without signing in, or add the fields manually.
{% endstep %}

{% step %}

#### Review before saving

Check the imported selector, field names, and CRM mappings, then save. Automatic discovery does not verify your routing rules or install a website snippet.
{% endstep %}
{% endstepper %}

### Choose your provider guide

Use the guide for your website's form provider. It explains the correct identifier, script placement, and submission behavior.

<table data-card-size="large" data-view="cards"><thead><tr><th></th><th></th><th data-hidden data-card-target data-type="content-ref"></th><th data-hidden data-card-cover data-type="files"></th></tr></thead><tbody><tr><td><strong>Custom HTML forms</strong></td><td>Connect standard HTML forms and compatible website builders.</td><td><a href="https://help.distro.so/routing-forms/custom-html-form">https://help.distro.so/routing-forms/custom-html-form</a></td><td><a href="https://2442454418-files.gitbook.io/~/files/v0/b/gitbook-x-prod.appspot.com/o/spaces%2FQA3GQNrIYVrPQ90NBwRa%2Fuploads%2FHDBhROCNS0HWaBf1nKc9%2Fform-guide-custom-html.png?alt=media">form-guide-custom-html.png</a></td></tr><tr><td><strong>HubSpot forms</strong></td><td>Install Distro with legacy forms or the updated V4 editor.</td><td><a href="https://help.distro.so/routing-forms/hubspot-form">https://help.distro.so/routing-forms/hubspot-form</a></td><td><a href="https://2442454418-files.gitbook.io/~/files/v0/b/gitbook-x-prod.appspot.com/o/spaces%2FQA3GQNrIYVrPQ90NBwRa%2Fuploads%2FqJ2zjjVPr27FbUrfeYl4%2Fform-guide-hubspot.png?alt=media">form-guide-hubspot.png</a></td></tr><tr><td><strong>Marketo forms</strong></td><td>Connect Adobe Marketo Engage forms to your router.</td><td><a href="https://help.distro.so/routing-forms/marketo">https://help.distro.so/routing-forms/marketo</a></td><td><a href="https://2442454418-files.gitbook.io/~/files/v0/b/gitbook-x-prod.appspot.com/o/spaces%2FQA3GQNrIYVrPQ90NBwRa%2Fuploads%2F4WSOoAtvhn38PsaO14Zt%2Fform-guide-marketo.png?alt=media">form-guide-marketo.png</a></td></tr><tr><td><strong>Pardot / Account Engagement</strong></td><td>Set up form and thank-you pages, including iframe installations.</td><td><a href="https://help.distro.so/routing-forms/pardot">https://help.distro.so/routing-forms/pardot</a></td><td><a href="https://2442454418-files.gitbook.io/~/files/v0/b/gitbook-x-prod.appspot.com/o/spaces%2FQA3GQNrIYVrPQ90NBwRa%2Fuploads%2F2wEska0A911KKZNZnjFb%2Fform-guide-pardot.png?alt=media">form-guide-pardot.png</a></td></tr><tr><td><strong>Jotform</strong></td><td>Connect accessible forms and same-origin iframes.</td><td><a href="https://help.distro.so/routing-forms/jotform">https://help.distro.so/routing-forms/jotform</a></td><td><a href="https://2442454418-files.gitbook.io/~/files/v0/b/gitbook-x-prod.appspot.com/o/spaces%2FQA3GQNrIYVrPQ90NBwRa%2Fuploads%2FK4t5kTZZRukJJy3MycJq%2Fform-guide-jotform.png?alt=media">form-guide-jotform.png</a></td></tr><tr><td><strong>Contact Form 7</strong></td><td>Connect WordPress forms using Contact Form 7.</td><td><a href="https://help.distro.so/routing-forms/contact-form-7">https://help.distro.so/routing-forms/contact-form-7</a></td><td><a href="https://2442454418-files.gitbook.io/~/files/v0/b/gitbook-x-prod.appspot.com/o/spaces%2FQA3GQNrIYVrPQ90NBwRa%2Fuploads%2FXuk4WrqZH4VjK2mmapBM%2Fform-guide-contact-form-7.png?alt=media">form-guide-contact-form-7.png</a></td></tr><tr><td><strong>Framer</strong></td><td>Install Distro and map the fields on your Framer website.</td><td><a href="https://help.distro.so/routing-forms/install-router-on-framer">https://help.distro.so/routing-forms/install-router-on-framer</a></td><td><a href="https://2442454418-files.gitbook.io/~/files/v0/b/gitbook-x-prod.appspot.com/o/spaces%2FQA3GQNrIYVrPQ90NBwRa%2Fuploads%2FIZRRbqEVDuXh6YiWY3B4%2Fform-guide-framer.png?alt=media">form-guide-framer.png</a></td></tr></tbody></table>

### Choose an installation method

| Method                      | Where the scheduler appears                       |
| --------------------------- | ------------------------------------------------- |
| **After a form → popup**    | In a popup after the form is submitted.           |
| **After a form → embedded** | In the page container from the generated snippet. |
| **Button / in-app**         | From your own button or application submission.   |
| **Direct URL**              | From a link with the required form answers.       |

The provider selector changes the installation example, not the saved mapping. Check that the form identifier in the snippet matches your website.

By default, the installation follows the active router version. Pinning an activated version is an optional advanced setting. See [Router versions](https://help.distro.so/routing/router-versions).

### Maintain and troubleshoot mappings

| Problem                                                   | Check                                                                                                                                |
| --------------------------------------------------------- | ------------------------------------------------------------------------------------------------------------------------------------ |
| A submitted value is missing                              | Compare the website's submitted field name with **Form Field Name** and its CRM property.                                            |
| A rule no longer matches after a website change           | Update the mapping, review affected routers, test, and publish the intended router version.                                          |
| The wrong form is detected                                | Check the selector or provider-specific form ID.                                                                                     |
| The original form destination stops receiving submissions | Follow the provider guide. Custom HTML handling attempts a JSON POST to the original action; the endpoint must accept that behavior. |

The Forms list shows connected-router counts and supports **Usage**, **Selector**, and **Field mapping** filters. Check where a mapping is used before changing it, because multiple routers can share it.


# Custom HTML forms

Connect a standard HTML form to a Form Router with the router's installation script.

## Identify the form and fields

Inspect the form in your browser's developer tools. Use a stable form ID, such as `<form id="contact-form">`, and enter `#contact-form` as its **Form selector** in Distro.

For each field, copy the HTML `name` attribute rather than its visible label. For example, `<input name="work_email">` uses `work_email` in the mapping. Include the prospect's email and fields needed by your rules.

Create the mapping under **Form routing → Forms**, then select it in the router's **Form Submission → Connected form**. See [Forms](/routing-forms/overview) for manual mapping and **Auto map**.

## Install the script

Open **Install Router**, choose **After a form → popup** and **Custom HTML / website builder**, then copy the code. A typical popup installation looks like this; replace both placeholders with your router and form selector:

```html
<script src="https://app.distro.so/inbound.js"></script>
<script>
  window.distro = new Distro({ routerId: 'YOUR_ROUTER_ID' });
  distro.schedule('#contact-form');
</script>
```

For an embedded scheduler, choose **After a form → embedded** and place the provided `#scheduler-container` where scheduling should appear. For custom application submissions, choose **Button / in-app** and call `bookDemo(fields)` with real mapped values after validation; the scheduler opens only when `submit` returns a qualified session.

Place the script after the form or before `</body>`. Load the library before initializing `Distro`.

The standard-form handler intercepts submission, sends the form values to Distro, and attempts a JSON POST to the form's original action. If your form relies on another JavaScript handler, a redirect, or a non-JSON endpoint, check that integration explicitly; do not assume the original submission is unchanged.

Test the published page after [activating the router](/routing/router-versions). Confirm the original form destination, qualified booking experience, and disqualification behavior. Check **Routing Logs** for the submitted values.


# HubSpot forms

Distro supports both legacy embedded HubSpot forms and forms built with HubSpot's updated editor (V4). It starts routing after HubSpot reports a successful submission.

## Prepare and connect the form

1. Use an inline thank-you message so the visitor stays on the page for scheduling.
2. Copy the form ID from HubSpot's embed configuration.
3. In **Form routing → Forms**, create or edit the mapping. Use the HubSpot form ID for **Form selector** and map the field names needed by your rules.
4. Select the mapping under the router's **Form Submission → Connected form**, then configure, test, and activate the router.

For V4 contact fields, map the normalized name: `0-1/email` becomes `email`. Repeated checkbox values remain arrays. The visible field label can differ from its internal name.

## Install

Open **Install Router**, select **After a form → popup** and **HubSpot (legacy + V4)**, then copy the website snippet.

Initialize Distro **before the HubSpot form embed** so it can capture the V4 ready event. Replace the placeholders below with your router ID and HubSpot form ID. Use the form ID without a CSS `#` prefix.

```html
<script src="https://app.distro.so/inbound.js"></script>
<script>
  window.distro = new Distro({
    routerId: "YOUR_ROUTER_ID",
    formType: "hubspot"
  });
  distro.schedule("YOUR_HUBSPOT_FORM_ID");
</script>

<!-- Place the HubSpot form embed after the Distro initialization. -->
```

Existing legacy installations remain supported. Distro handles legacy `hsFormCallback` events as well as V4 ready and submission-success events, preserves captured values if HubSpot clears the form, and suppresses duplicate conversion callbacks. See HubSpot's [global form events](https://developers.hubspot.com/docs/api-reference/latest/marketing/forms/global-form-events).

## Verify

Test the published page with qualified and unqualified answers. Confirm the submission reaches HubSpot and the expected field values appear in Distro's **Routing Logs**.

If the page redirects before scheduling opens, change the HubSpot post-submission setting. If Distro does not connect, check the form ID, the order of the scripts, and whether the library loaded. Avoid installing multiple copies of the snippet for the same form.


# Marketo forms

Distro uses the Marketo Forms 2.0 success callback to start routing after a successful form submission.

1. Identify the embedded Marketo form ID, such as `mktoForm_1234`.
2. Create a [form mapping](/routing-forms/overview) in Distro with that **Form selector** and the Marketo fields' internal names.
3. Select the mapping in the Form Router, configure the rules and event type, then test and activate it.
4. Copy **Install Router** code onto the page. Initialize Distro after `MktoForms2` and the intended form are loaded.
5. Test the published page and inspect **Routing Logs**.

The Marketo handler returns `false` from `onSuccess` to prevent Marketo's normal follow-up redirect while Distro opens scheduling. Configure the required destinations in the router and test both qualified and disqualified outcomes. This changes the default follow-up behavior; it does not guarantee a CRM meeting record unless the corresponding CRM actions are configured.

For provider callback behavior, see the [Marketo Forms API reference](https://experienceleague.adobe.com/en/docs/marketo-developer/marketo/javascriptapi/forms-api-reference).


# Framer

Add a Form Router to the Framer page containing your form.

1. [Map the form](/routing-forms/overview) in Distro, including its selector and field names.
2. Connect the form to the router, configure its rules and event type, then test and activate the router.
3. Open **Install Router** and copy the installation code.
4. In Framer's project settings, open **Custom Code**, choose **Add Script**, and add the script for the intended page. Place it at the end of the body, after the form markup.
5. Publish the Framer site and test the form on the published page.

Use the actual router ID and form selector from Distro. A selector such as `#contact-form` must identify the intended form on the published site.

Framer's custom-code settings control where and when the script runs. See [Framer's custom code guide](https://www.framer.com/help/articles/how-to-add-custom-code/) for its current editor controls.

Confirm the original form submission still reaches its destination as well as checking the scheduler. A custom JavaScript form or provider integration can behave differently from a standard HTML form. See [Custom HTML forms](/routing-forms/custom-html-form) for the standard handler's submission behavior.


# Pardot forms

Connect Salesforce Account Engagement (Pardot) forms while keeping their native submission and thank-you redirect. Distro saves the answers temporarily and resumes routing on the thank-you page.

## Prepare and connect

Create a [form mapping](/routing-forms/overview) using the Pardot form's CSS selector and field names, then select it in the router's **Form Submission → Connected form**. Map email and all fields used by your rules. Select fields are captured using their displayed option labels.

Configure, test, and activate the router before testing the published form.

## A form on its own page

In **Install Router**, select **Pardot / Account Engagement**. Add the same snippet to the form page **and its thank-you page**:

```html
<script src="https://app.distro.so/inbound.js"></script>
<script>
  window.distro = new Distro({
    routerId: "YOUR_ROUTER_ID",
    formType: "pardot"
  });
  distro.schedule("#pardot-form");
</script>
```

Replace the router ID and form selector. Keep the same selector in the thank-you page's snippet even though that form is no longer present.

The form and thank-you pages must share an origin (scheme, hostname, and port) and allow session storage. On the thank-you page, the selected form and `.error` elements must be absent. Distro consumes the saved answers once; they expire after 15 minutes. Validation errors must remain on the form page.

## A Pardot form in an iframe

Choose **Pardot in an iframe** in **Install Router**. This requires two installations.

### 1. Parent website

Add this after the iframe markup and replace `#pardot-iframe` with the iframe's selector:

```html
<script src="https://app.distro.so/inbound.js"></script>
<script>
  window.distro = new Distro({
    routerId: "YOUR_ROUTER_ID",
    formType: "pardot"
  });
  distro.schedule("#pardot-iframe");
</script>
```

### 2. Pardot form and thank-you pages

Install the following on both pages inside the iframe. Replace the parent origin with your website's exact origin and the selector with the Pardot form's selector:

```html
<script src="https://app.distro.so/inbound.js"></script>
<script>
  window.distro = new Distro({
    routerId: "YOUR_ROUTER_ID",
    formType: "pardot",
    parentOrigin: "https://www.example.com"
  });
  distro.schedule("#pardot-form");
</script>
```

Use the same router ID in both snippets. If you pin `routerVersion`, use the same number on both sides. The form and thank-you pages inside the iframe must share an origin; the parent website may use a different origin. The iframe's configured `src` origin must match the page that sends the completion message.

The parent connects only to the configured iframe, and the child sends saved answers after a request from that parent. A thank-you redirect to another origin requires a separate integration.

## Verify

Submit valid and invalid answers. Confirm Pardot receives the valid submission, its thank-you page loads, and Distro routes the saved answers once. Check **Routing Logs** for the expected values and test both qualified and unqualified prospects.

If routing does not resume, check that both pages have the snippet, storage is available, and the thank-you page no longer contains the form or error elements. For an iframe, also check the selector, parent origin, iframe `src`, and router ID.


# JotForm forms

Distro can route a JotForm submission from an accessible form or same-origin iframe. It waits for the iframe to load, checks JotForm validation, and preserves JotForm's native submission handling.

## Check your embed

The parent page must be able to access the iframe's form and JotForm API. The iframe must share the parent's origin (scheme, hostname, and port); a sandbox must also permit that access.

A standard cross-origin `jotform.com` iframe cannot be read by this adapter. Use a JotForm form hosted on your own origin with the JotForm scripts available, or an integration in your application that calls Distro after validation. Merely adding an ID to a cross-origin iframe does not make it accessible.

## Connect and install

1. Create a [form mapping](/routing-forms/overview) using the actual field names. Map email and the answers used by your rules.
2. Select it under **Form Submission → Connected form** in the router.
3. Configure, test, and activate the router.
4. Open **Install Router** and choose **JotForm**.

Add the snippet to the parent page. Replace the router ID and iframe selector:

```html
<script src="https://app.distro.so/inbound.js"></script>
<script>
  window.distro = new Distro({
    routerId: "YOUR_ROUTER_ID",
    formType: "jotForm"
  });
  distro.schedule("#jotform-iframe");
</script>
```

For a form directly on the page, pass that form's CSS selector instead. Both `jotForm` and `jotform` are accepted. Distro calls `JotForm.validateAll(form)` and routes only when it returns `true`.

## Verify

Test invalid answers first: validation should prevent routing. Then submit valid qualified and unqualified answers. Confirm JotForm's normal destination still works, and inspect the expected values in Distro's **Routing Logs**.

If the form cannot be accessed, Distro emits `FORM_UNAVAILABLE` through the browser's `distro:event` event. Check the iframe's origin, sandbox, selector, and JotForm script before retrying.


# Contact Form 7

Connect a WordPress Contact Form 7 form to a Distro Form Router. Distro listens to the selected form's `.wpcf7` wrapper, so other forms on the page do not trigger that router.

## Connect and install

Create a [form mapping](/routing-forms/overview) with a stable selector for the form or its wrapper and the actual input names. Select it under **Form Submission → Connected form**, then configure, test, and activate the router.

Open **Install Router** and select **WordPress Contact Form 7**. Add the snippet on the page containing the form:

```html
<script src="https://app.distro.so/inbound.js"></script>
<script>
  window.distro = new Distro({
    routerId: "YOUR_ROUTER_ID",
    formType: "contactform7"
  });
  distro.schedule("#your-contact-form");
</script>
```

Replace the router ID and selector. The selector must identify the intended form or its Contact Form 7 wrapper.

## Verify

Distro listens for the wrapper's `wpcf7submit` event. This is a submission event, not proof of successful mail delivery. Check validation and mail delivery alongside routing, including invalid, qualified, and unqualified submissions.

Confirm the expected answers in **Routing Logs**, and verify that submitting another Contact Form 7 form on the same page does not route through this installation.


# Rule evaluation

Routing rules decide which prospects reach which hosts. A Form Router evaluates its ownership rules first, then its distribution rules in the configured order.

* [Ownership rules](/routing-rules/ownership-rules) look for an existing CRM relationship and select the matched record's owner or a specific teammate.
* [Distribution rules](/routing-rules/distribution-rules) qualify prospects from form, CRM, or enrichment data and distribute meetings across an eligible team.

Create rules under **Form routing**, then add them to the router's **Lead Routing** stage. A rule can be reused, so check its connected routers before editing. Save, test, and activate each intended [router version](/routing/router-versions).

Click Routers use ownership matching followed by their own fallback assignment. Outbound Routers also have a mandatory fallback and separate booker-access settings. See [Click routing](/routing/click-router) and [Outbound routers](/routing/outbound-routing/routers).


# Ownership rules

Use an ownership rule to keep a prospect with an existing CRM owner or assign matching prospects to a specific teammate.

Open **Form routing → Ownership Rules → New Ownership Rule**. The editor has **Basics**, **Conditions**, and **Assignment** steps.

<figure><img src="https://2442454418-files.gitbook.io/~/files/v0/b/gitbook-x-prod.appspot.com/o/spaces%2FQA3GQNrIYVrPQ90NBwRa%2Fuploads%2FAL1U90kUlpdDzMKEnR8Z%2FCleanShot%202026-09-10%20at%2021.38.19%402x.png?alt=media&amp;token=0c747806-f102-48d9-b3f4-bd8a60772888" alt=""><figcaption></figcaption></figure>

## Choose the CRM match

In **Basics**, enter a **Rule name** and choose the CRM record to look up. Available choices depend on your integration: HubSpot contacts or companies, or Salesforce contacts, accounts, or leads.

<figure><img src="https://2442454418-files.gitbook.io/~/files/v0/b/gitbook-x-prod.appspot.com/o/spaces%2FQA3GQNrIYVrPQ90NBwRa%2Fuploads%2FmJiYMLm3Yodakneedicb%2FCleanShot%202026-09-10%20at%2021.37.06%402x.png?alt=media&amp;token=f5bac579-df65-49f4-8542-e699a51f78cb" alt=""><figcaption></figcaption></figure>

For person records, exact matching uses the prospect's email. Fuzzy matching tries the exact email first, then a domain fallback. Company or account matching uses the email domain. A domain match can identify a different person at the same company, so use it only when that relationship is appropriate for your routing.

## Add conditions

Use **Conditions** to narrow when the match applies. Choose the field, comparison operator, and value. Use **AND** when every condition must match and **OR** when any condition can match. For example, require both an existing CRM relationship and an enterprise company size.

<figure><img src="https://2442454418-files.gitbook.io/~/files/v0/b/gitbook-x-prod.appspot.com/o/spaces%2FQA3GQNrIYVrPQ90NBwRa%2Fuploads%2FePzy03I22Ox33JOoKTfs%2FCleanShot%202026-09-10%20at%2021.37.47%402x.png?alt=media&amp;token=87259c50-99db-45f0-a335-71c6a1081896" alt=""><figcaption></figcaption></figure>

The CRM lookup runs first. Additional conditions narrow that result before assignment.

## Select the host

Under **Meeting assignment**, choose:

| Option                   | Required setting                                                                 |
| ------------------------ | -------------------------------------------------------------------------------- |
| **Matched record owner** | **Owner property to read** identifies the teammate who owns the matched record.  |
| **Specific user**        | **Teammate** identifies the person who should always receive matching prospects. |

The selected owner must correspond to a usable Distro teammate. Check the CRM member mapping and calendar connection when an expected owner cannot receive the meeting.

## Update ownership and meeting details

**CRM owner sync → Update the record owner** writes the assignee back to the configured **Owner property to update**. This can run when the rule matches during routing, before a meeting is booked. It is separate from creating a CRM meeting activity. Vacation coverage does not update the original CRM owner.

Under **Advanced meeting options**, **Default guests** adds comma-separated email addresses to the invitation. Their calendars are not checked as required participants. **Override meeting settings** selects a different event type from the router default.

Save the rule, add it to the router, and review its priority. Use **Test route** and [activate the router version](/routing/router-versions) before relying on the change for new prospects.


# Distribution rules

Use a distribution rule to qualify prospects and share meetings across a team. Conditions can use form answers, supported CRM fields, or configured enrichment data.

Open **Form routing → Distribution Rules → New Distribution Rule**. Work through **Basics**, **Conditions**, and **Assignment**.

<figure><img src="https://2442454418-files.gitbook.io/~/files/v0/b/gitbook-x-prod.appspot.com/o/spaces%2FQA3GQNrIYVrPQ90NBwRa%2Fuploads%2FXjWWCWnc9hMXplj9sJoV%2FCleanShot%202026-09-10%20at%2021.39.08%402x.png?alt=media&amp;token=a5dc3e2d-2a57-429b-aced-9295480f0708" alt=""><figcaption></figcaption></figure>

## Qualify the prospect

Give the rule a descriptive name. Add a field, operator, and value for each condition. Combine conditions with **AND** when all must match, or **OR** when any may match.

For example, match a country and company-size range to an enterprise team. Provider-based conditions need the relevant [enrichment connection](/integrations/enrichment); a field that has no usable value may not satisfy your condition.

## Choose the team

Under **Meeting assignment**, select a **Team** and its **Round-robin participants**:

* **All members** includes the selected team's active members.
* **Selected members** lets you choose eligible teammates and adjust assignment weights.

A weight of 2 gives a teammate a larger intended share than a weight of 1. Actual totals also depend on availability, credits, and recent assignments. Review [Distribution methods](/routing/form-router/distribution-method) to choose strict or flexible behavior in the router.

## Sync the CRM owner

Enable the owner-update setting and select the CRM owner properties you want to write. For strict Form Router distribution, an owner update can be queued during routing. For flexible distribution, the host is selected at booking, and the owner update can be queued after that booking. Flexible distribution does not disable CRM ownership updates.

These updates require the connected CRM and valid property/member mappings. Vacation coverage does not replace the original CRM owner.

## Set meeting options

**Default guests** adds guests to the invitation without checking their availability. Use **Override meeting settings** to choose a different event type from the router default.

Save the rule, add it to the router's **Distribution priority**, and order the rules from most specific to broadest. Test representative prospects and activate the router version. Review [Distribution history](/routing-rules/distribution-rules/distribution-history) and [Calibration](/settings/workspace-settings/calibration) to understand later assignments.


# Distribution history

Use **Distribution History** from a distribution rule's actions to review assignments across its teammates. Click Routers have their own distribution history for fallback assignments.

Review the assignment counts, booking outcomes, weights, and available credits together. A booked-meeting total alone does not explain a member's position in the next assignment: repeat prospects, credits, vacation handling, and the configured reset period also matter.

Admins can open a member's credit control, adjust the non-negative credit balance, and click **Save**. A credit gives priority in a future eligible assignment; it is not a booking or a reserved time. Review the current balance before changing it.

Use [Calibration](/settings/workspace-settings/calibration) for automatic compensation and reset frequency. For an individual prospect, open the router's **Routing Logs** to inspect the attempt and its result.


# Overview

An event type is a reusable set of meeting settings. It controls duration, availability, the guest-facing scheduler, calendar invitations, and reminders.

<figure><img src="https://2442454418-files.gitbook.io/~/files/v0/b/gitbook-x-prod.appspot.com/o/spaces%2FQA3GQNrIYVrPQ90NBwRa%2Fuploads%2Fc4ItI0ersApT16YtPWJx%2FCleanShot%202026-09-10%20at%2020.14.47%402x.png?alt=media&amp;token=d85894aa-6538-43a1-99bd-e5b86ed8d756" alt=""><figcaption></figcaption></figure>

Use separate event types when meetings need different rules: for example, a short discovery call, a longer product demo, or an in-person event with fixed dates.

[Create and configure an event type](/event-types/create-an-event-type), then select it on a personal link, group link, or router. Check existing uses before editing a shared event type. Router changes require activation before new routing attempts use them.


# Configuration

Create event types for your routers and personal meeting links.

Create an event type, configure its booking experience, and review its existing uses before making shared changes.

## Create and configure an event type

Open **Event types**, click **New Event Type**, name it, and create it. In the editor, work through the sections that matter for this meeting:

**Internal settings** contains private notes and the availability strategy. **Default** follows the selected team or user schedule. **Custom weekly** defines recurring hours for this event type. **Event dates** limits booking to specific dates and hours.

<figure><img src="https://2442454418-files.gitbook.io/~/files/v0/b/gitbook-x-prod.appspot.com/o/spaces%2FQA3GQNrIYVrPQ90NBwRa%2Fuploads%2FRHM6baqpWA1Y3pu2y01e%2FCleanShot%202026-09-10%20at%2020.33.05%402x.png?alt=media&amp;token=597b2857-ce06-442f-a57f-9a43aba6a199" alt=""><figcaption></figcaption></figure>

For **Default**, choose **Team** to follow the routed team’s hours or **User** to follow the host’s hours. Personal and group links have no routed team, so they use the participants’ personal schedules when the source is Team.

For **Custom weekly**, set the timezone and recurring hours for this event type. For **Event dates**, set the timezone, location, and at least one date with a start and end time. Time periods on the same date cannot overlap. These schedules replace the usual weekly hours; calendar conflicts and booking rules still apply. Event-date bookings use the location for an in-person meeting.

**Scheduler settings** controls what guests see and when they can book. Set **Guest language**, **Time format**, **Greeting**, and **Description** for the booking page. The **Internal description** stays in the setup area; use the guest-facing description for information the prospect needs.

<figure><img src="https://2442454418-files.gitbook.io/~/files/v0/b/gitbook-x-prod.appspot.com/o/spaces%2FQA3GQNrIYVrPQ90NBwRa%2Fuploads%2FJrIbZtGSsF1NPUqDAwAn%2FCleanShot%202026-09-10%20at%2020.34.31%402x.png?alt=media&amp;token=a2c76ba0-87a8-4d85-b64d-fbff55c931f4" alt=""><figcaption></figcaption></figure>

| Setting               | Use it to                                     |
| --------------------- | --------------------------------------------- |
| Duration              | Set how long the meeting lasts.               |
| Time-slot interval    | Set how frequently a meeting can start.       |
| Buffer before / after | Leave space around meetings.                  |
| Minimum notice        | Prevent bookings too close to the start time. |
| Booking window        | Limit how far ahead guests can book.          |

Under **Booking rules**, turn on **Block other Distro meetings** to hide times that overlap a selected participant’s scheduled Distro meetings. This is an additional check alongside connected-calendar conflicts, and it is off by default for a new event type.

Under **Calendar invites**, edit **Calendar title** and **Calendar invite body**. Under **Reminders**, enable email reminders, choose **Reminder timing**, and edit **Reminder email subject** and **Reminder email body**. Use the variables offered by the editor for guest, host, meeting time, and meeting links.

<figure><img src="https://2442454418-files.gitbook.io/~/files/v0/b/gitbook-x-prod.appspot.com/o/spaces%2FQA3GQNrIYVrPQ90NBwRa%2Fuploads%2F8mZ2fBZdBJnNLGvDoHrH%2FCleanShot%202026-09-10%20at%2020.41.44%402x.png?alt=media&amp;token=7165c798-700f-4b99-8599-b8ff355240db" alt=""><figcaption></figcaption></figure>

Review the desktop and mobile previews, then click **Save**. The preview illustrates the booking page; use a real booking link to check live availability.

## Before changing a shared event type

Check which links and routers use it. A shared change can affect more than one booking experience. Router settings are versioned: activate a new router version when you want updated configuration used for new routing attempts. See [Publish changes to a router](/routing/router-versions).

New bookings keep the event settings used when they were created. Changing a link’s event type later does not rewrite those bookings’ saved settings. Older links may still have their own private event settings, which you edit from the link.

You must reassign or delete active personal and group links before deleting the reusable event type they use.

Use **Duplicate** when you need an independent event type with similar settings. Review the copied schedule, dates, location, invitation, and reminders before assigning it to links.


# Create a team

Set up team members, booking hours, and routing readiness.

A workspace contains your organization's people and scheduling configuration. Teams group the people who can receive particular meetings.

Invite people through **Invite members** or manage membership in **Settings → Members**. Give each person the access they need. Ask new members to connect their calendar and check their availability before adding them to live routing.

Open **Teams** to compare members, timezone, availability, and the rules or routers using each team. Select a team to review its configuration.

<div align="left"><figure><img src="https://2442454418-files.gitbook.io/~/files/v0/b/gitbook-x-prod.appspot.com/o/spaces%2FQA3GQNrIYVrPQ90NBwRa%2Fuploads%2FO7zVLPQVMKHSB2OjhMYM%2FCleanShot%202026-09-10%20at%2019.57.30%402x.png?alt=media&amp;token=0f1fd4b0-b4ad-40b1-b71a-dd5933fcd11e" alt=""><figcaption></figcaption></figure></div>

## Create a team

Open **Teams → New Team**. Enter the **Team name**, select the **Booking timezone**, and choose the **Reps** who should receive meetings. Set the days and hours in **When can prospects book?**, then click **Create team**.

<figure><img src="https://2442454418-files.gitbook.io/~/files/v0/b/gitbook-x-prod.appspot.com/o/spaces%2FQA3GQNrIYVrPQ90NBwRa%2Fuploads%2FJtGqdWzgHjPxwi2mElFW%2FCleanShot%202026-09-10%20at%2020.05.49%402x.png?alt=media&amp;token=742b5766-7508-457c-a4cb-2bb215a19e4c" alt=""><figcaption></figcaption></figure>

For example, keep an enterprise sales team separate from a customer success team when they handle different conversations. You can add people later, but a team needs eligible hosts before it can receive meetings.

To update an existing team, select its name, review the same settings, then click **Save team**.

## Before using a team in routing

Check membership, calendars, working hours, and the event type's availability source. If the event type uses team hours, changing only a person's weekly schedule may not give the result you expect.

Then select the team in the router's distribution or fallback configuration. Test the saved router draft and activate it when ready.

Being a team member and being allowed to start an outbound handoff are separate settings. For an Outbound Router, review **Access and allowed bookers** as well as the people eligible to host.

When someone leaves or changes roles, review their routing participation, group booking links, and any reusable outbound links they own.


# Meetings

Open **Bookings** in the Distro app. Search by meeting title or guest email, then use the status views—**Scheduled**, **Completed**, **Cancelled**, and **No Show**—to narrow the list. Switch between list and calendar views depending on whether you need details or an overview of your schedule.

<figure><img src="https://2442454418-files.gitbook.io/~/files/v0/b/gitbook-x-prod.appspot.com/o/spaces%2FQA3GQNrIYVrPQ90NBwRa%2Fuploads%2FDZNELloD6Tf7zh5dDDRC%2FCleanShot%202026-09-10%20at%2020.09.05%402x.png?alt=media&amp;token=844d310f-f4cd-47e1-96c9-b2f6db05590c" alt=""><figcaption></figcaption></figure>

Open a meeting to review its guest, host, calendar invitation, notes, and booking source. Use the available meeting actions to join, reschedule, cancel, or record a no-show.

Rescheduling and cancellation affect the actual meeting. Marking a no-show records attendance; it isn't a cancellation. Available actions depend on the booking's source and current state.

## Manage attendance

For an upcoming scheduled meeting, the host or a workspace admin can use **Add guest** when it is available. Enter the guest’s email and optional name. Adding the guest sends an invitation and updates the calendar event. This action is not available for outbound bookings in the standard booking sheet.

<figure><img src="https://2442454418-files.gitbook.io/~/files/v0/b/gitbook-x-prod.appspot.com/o/spaces%2FQA3GQNrIYVrPQ90NBwRa%2Fuploads%2FCAZthgSVqZpvHuu9GkZs%2FCleanShot%202026-09-10%20at%2020.13.07%402x.png?alt=media&amp;token=470c4422-b658-4b3c-a13b-d3e0dc29fd70" alt=""><figcaption></figcaption></figure>

Use the no-show action for a completed meeting. You can undo it to return the meeting to **Completed**. Rescheduling, cancelling, and adding guests are unavailable once a meeting is in the past.

## From the Chrome extension

Open **Meetings** in the side panel and select a meeting. The details bring together the guest, host, invitation, notes, and available actions. Use the Distro link when you need to continue in the main app.

If a meeting doesn't appear, check the extension's meeting-status visibility and timezone preferences. Use refresh or retry if the list couldn't load.

For controls directly on a calendar event, see [Use Distro in Google Calendar](/integrations/chrome-extension/google-calendar).


# Workflows

Set up automated Slack, email, and webhook notifications.

Use a workflow to send a notification or run another action when a booking or routing event happens. Workspace admins manage workflows.

<figure><img src="https://2442454418-files.gitbook.io/~/files/v0/b/gitbook-x-prod.appspot.com/o/spaces%2FQA3GQNrIYVrPQ90NBwRa%2Fuploads%2Fg8I4CqpnjijxY3XhMJ72%2FCleanShot%202026-09-10%20at%2020.45.09%402x.png?alt=media&amp;token=1b8d34a5-01e6-421c-9e3e-3156c4fc10f5" alt=""><figcaption></figcaption></figure>

For example, notify the host when a meeting is booked through a particular group link.

1. Open **Workflows** and click **New Workflow**.
2. Give it a name that describes the outcome.
3. Under **Trigger**, choose **When a meeting is booked**.
4. Under **Scope**, select the resource type, then decide whether the workflow applies to all resources of that type or selected ones.
5. Under **Action**, configure the notification or action and its content.
6. Create the workflow, review it, and activate it when ready.

Meeting triggers support Form Routers, Click Routers, personal links, group links, and Outbound Routers. Submission and no-booking triggers apply to Form and Click Routers; disqualification applies to Form Routers.

## Choose when it runs

Meeting workflows can run when a meeting is booked, rescheduled, cancelled, completed, or marked as a no-show. Use a before-meeting or after-meeting trigger for a timed action, and set its offset in minutes.

For **prospect no booking**, the workspace’s [No booking timeout](/settings/workspace-settings/scheduler-settings) determines the wait. This trigger is available for Form and Click Routers.

## Choose an action

Email the assignee when the host needs the information. Send an email to specific people for another recipient list. Use Slack for a channel notification, or a webhook when another system needs to receive the event.

Use the editor's available variables for meeting and prospect details. The available triggers, sources, and actions depend on the combination you choose.

Slack needs a connected integration and access to the destination channel. A webhook needs a receiving endpoint; ask the person responsible for that system for its URL and any required authentication settings.

## Check before enabling

Use the workflow’s preview and test options to check the output. Choose sample data or find an existing booking by its title, guest, reference, or booking URL. Existing-booking results are limited to the workflow’s selected source and scope. A preview shows content; sending a test can deliver a message or call an external system, so review the destination first.

<figure><img src="https://2442454418-files.gitbook.io/~/files/v0/b/gitbook-x-prod.appspot.com/o/spaces%2FQA3GQNrIYVrPQ90NBwRa%2Fuploads%2FqlsZy951J1QTdluWoW7o%2FCleanShot%202026-09-10%20at%2020.46.35%402x.png?alt=media&amp;token=19ef6e7a-14da-4629-a322-2a2ce70968d8" alt=""><figcaption></figcaption></figure>

After enabling the workflow, check **History** and open an execution to review individual action results. If an action did not run, review the execution details for its result. Confirm the workflow is active and that the event and source match its scope.

<figure><img src="https://2442454418-files.gitbook.io/~/files/v0/b/gitbook-x-prod.appspot.com/o/spaces%2FQA3GQNrIYVrPQ90NBwRa%2Fuploads%2FlJws3sfiTVKjG4LRflZn%2FCleanShot%202026-09-10%20at%2020.47.16%402x.png?alt=media&amp;token=0d4a273d-eadb-4b60-b3c6-b14b0e49b562" alt=""><figcaption></figcaption></figure>

**Duplicate** copies the workflow and its source filters. Review the scope and destinations before enabling a copy. For receiving systems, see [Webhook payloads](/workflows/webhook-payloads).


# Webhook payloads

Sample payloads and headers sent by Distro Workflows webhooks.

Sample webhook payloads for different sources in Distro Workflows.

Distro sends JSON by HTTP POST to your configured webhook URL.

Payload shape depends on the **source type** and **trigger**.

{% hint style="info" %}
Payloads are examples. Distro may add fields over time.
{% endhint %}

<figure><img src="https://2442454418-files.gitbook.io/~/files/v0/b/gitbook-x-prod.appspot.com/o/spaces%2FQA3GQNrIYVrPQ90NBwRa%2Fuploads%2FKp1ERMiANEzsoqlpOxwP%2FCleanShot%202026-09-10%20at%2020.48.14%402x.png?alt=media&amp;token=57331813-e63f-49b9-be4c-e897b8737c3e" alt=""><figcaption></figcaption></figure>

### Basics

All webhooks use the same envelope:

```json
{
  "event": "meeting_booked",
  "timestamp": "2024-01-15T10:30:00Z",
  "data": {}
}
```

* `event`: the trigger that fired the webhook (see [Workflows](/workflows/create-a-workflow)).
* `timestamp`: ISO 8601 time when Distro built the payload. Retries reuse the payload.
* `data`: the event payload. Shape depends on source type.

Conventions:

* Keys use `snake_case`.
* `data.source_type` is one of: `router`, `click_router`, `booking_link`, `group_meeting_link`, `outbound_router`.
* Submission-only triggers include `submission` and `assignee`; they omit `booking` and `attendees`. Meeting triggers include `booking`, `assignee`, and `attendees`; they omit `submission`.

### Meeting details

Booking payloads also include `location`, `in_person`, and `event_type`. For an in-person meeting, use `location` as the meeting address; do not expect a conferencing URL. `event_type`, when present, contains `id`, `title`, and `availability_mode`.

For an Outbound Router, `source_type` is `outbound_router`, `source_id` identifies the router, and `source_title` contains its name. The booking envelope is the same as other meeting sources. Outbound attendees also include their `role`.

### Payload examples

{% tabs %}
{% tab title="Router" %}
Triggered by **Form Routers**.

```json
{
  "event": "meeting_booked",
  "timestamp": "2024-01-15T10:30:00Z",
  "data": {
    "source_type": "router",
    "source_id": 123,
    "source_title": "Demo Request Router",
    "booking": {
      "id": 456,
      "uuid": "book-abc123-def456",
      "title": "Discovery Call with Acme Corp",
      "start_time": "2024-01-20T14:00:00Z",
      "end_time": "2024-01-20T14:30:00Z",
      "status": "scheduled",
      "meeting_url": "https://meet.google.com/abc-defg-hij",
      "time_zone": "America/New_York",
      "notes": "Looking forward to discussing your needs.",
      "location": null,
      "in_person": false,
      "event_type": {
        "id": 12,
        "title": "Discovery",
        "availability_mode": "default"
      }
    },
    "assignee": {
      "id": 1,
      "email": "alex@yourcompany.com",
      "first_name": "Alex",
      "last_name": "Smith"
    },
    "attendees": [
      {
        "name": "Jane Doe",
        "email": "jane@example.com"
      }
    ]
  }
}
```

#### Submission-only events

For `form_submitted`, `prospect_disqualified`, and `prospect_no_booking`, the payload includes submission details and omits booking details. If no host was assigned, `assignee` is an empty object.

```json
{
  "event": "form_submitted",
  "timestamp": "2024-01-15T10:30:00Z",
  "data": {
    "source_type": "router",
    "source_id": 123,
    "source_title": "Contact Form Router",
    "submission": {
      "id": 789,
      "uuid": "sub-xyz789-abc123",
      "form_data": {
        "email": "jane@example.com",
        "company": "Acme Corp",
        "employees": "50-100"
      },
      "time_zone": "America/New_York",
      "source_url": "https://example.com/contact",
      "created_at": "2024-01-15T10:30:00Z"
    },
    "assignee": {
      "id": 1,
      "email": "alex@yourcompany.com",
      "first_name": "Alex",
      "last_name": "Smith"
    }
  }
}
```

{% endtab %}

{% tab title="Click Router" %}
Triggered by **Click Routers**.

```json
{
  "event": "meeting_booked",
  "timestamp": "2024-01-15T10:30:00Z",
  "data": {
    "source_type": "click_router",
    "source_id": 456,
    "source_title": "Sales Team Round Robin",
    "booking": {
      "id": 789,
      "uuid": "book-def456-ghi789",
      "title": "Sales Call",
      "start_time": "2024-01-22T15:00:00Z",
      "end_time": "2024-01-22T15:30:00Z",
      "status": "scheduled",
      "meeting_url": "https://zoom.us/j/123456789",
      "time_zone": "America/Los_Angeles",
      "notes": null,
      "location": null,
      "in_person": false,
      "event_type": {
        "id": 12,
        "title": "Discovery",
        "availability_mode": "default"
      }
    },
    "assignee": {
      "id": 5,
      "email": "sarah@yourcompany.com",
      "first_name": "Sarah",
      "last_name": "Johnson"
    },
    "attendees": [
      {
        "name": "John Smith",
        "email": "john@prospect.com"
      }
    ]
  }
}
```

{% endtab %}

{% tab title="Booking Link" %}
Triggered by **Personal Booking Links**.

```json
{
  "event": "meeting_booked",
  "timestamp": "2024-01-15T10:30:00Z",
  "data": {
    "source_type": "booking_link",
    "source_id": 101,
    "source_slug": "alex-30min",
    "booking": {
      "id": 1001,
      "uuid": "book-jkl012-mno345",
      "title": "30-min Meeting with Alex",
      "start_time": "2024-01-25T09:00:00Z",
      "end_time": "2024-01-25T09:30:00Z",
      "status": "scheduled",
      "meeting_url": "https://meet.google.com/xyz-abcd-efg",
      "time_zone": "Europe/London",
      "notes": "Want to discuss partnership opportunities",
      "location": null,
      "in_person": false,
      "event_type": {
        "id": 12,
        "title": "Discovery",
        "availability_mode": "default"
      }
    },
    "assignee": {
      "id": 1,
      "email": "alex@yourcompany.com",
      "first_name": "Alex",
      "last_name": "Smith"
    },
    "attendees": [
      {
        "name": "Emily Chen",
        "email": "emily@partner.com"
      }
    ]
  }
}
```

{% endtab %}

{% tab title="Group Meeting Link" %}
Triggered by **Group Meeting Links**.

```json
{
  "event": "meeting_booked",
  "timestamp": "2024-01-15T10:30:00Z",
  "data": {
    "source_type": "group_meeting_link",
    "source_id": 202,
    "source_slug": "sales-engineering-demo",
    "booking": {
      "id": 2001,
      "uuid": "book-pqr678-stu901",
      "title": "Sales + Engineering Demo",
      "start_time": "2024-01-28T16:00:00Z",
      "end_time": "2024-01-28T17:00:00Z",
      "status": "scheduled",
      "meeting_url": "https://teams.microsoft.com/l/meetup-join/...",
      "time_zone": "America/Chicago",
      "notes": "Technical deep-dive requested",
      "location": null,
      "in_person": false,
      "event_type": {
        "id": 12,
        "title": "Discovery",
        "availability_mode": "default"
      }
    },
    "assignee": {
      "id": 3,
      "email": "mike@yourcompany.com",
      "first_name": "Mike",
      "last_name": "Wilson"
    },
    "attendees": [
      {
        "name": "David Brown",
        "email": "david@enterprise.com"
      }
    ]
  }
}
```

{% endtab %}
{% endtabs %}

### Operational notes

<details>

<summary>HTTP headers and signatures</summary>

Production deliveries include these headers by default:

* `Content-Type: application/json`
* `User-Agent: Distro-Webhooks/1.0`
* `X-Distro-Delivery-ID`: unique delivery ID for tracking
* `X-Distro-Timestamp`: Unix timestamp of request (seconds)
* `X-Distro-Signature`: `t={timestamp},v1={signature}` (only if a signing secret is configured)

Test webhooks include `X-Distro-Test: true` and may omit `X-Distro-Delivery-ID`. Custom headers can override defaults; avoid reusing the Distro header names.

Use `X-Distro-Delivery-ID` as an idempotency key if you store deliveries. Return a successful HTTP response after accepting the request. Failed production deliveries can be retried, up to six attempts. Review workflow history when delivery fails.

#### Verifying signatures

* Signature header: `X-Distro-Signature: t={timestamp},v1={signature}`
* Signed content: `{timestamp}.{raw_request_body}`
* Algorithm: HMAC-SHA256 using your signing secret
* Compare the computed hex digest with `v1`

{% hint style="warning" %}
Use the **raw** request body bytes for verification.

Don’t parse and re-serialize JSON before hashing.
{% endhint %}

</details>

<details>

<summary>Event-specific notes</summary>

#### Cancelled meetings

When `event` is `meeting_cancelled`, `booking.status` is `cancelled`.

```json
{
  "event": "meeting_cancelled",
  "timestamp": "2024-01-18T11:00:00Z",
  "data": {
    "booking": {
      "status": "cancelled"
    }
  }
}
```

#### No-show meetings

When `event` is `meeting_no_show`, `booking.status` is `no_show`.

```json
{
  "event": "meeting_no_show",
  "timestamp": "2024-01-18T11:00:00Z",
  "data": {
    "booking": {
      "status": "no_show"
    }
  }
}
```

</details>

<details>

<summary>Payload limits</summary>

* Maximum payload size: 1 MB
* Maximum `form_data` size: 100 KB

If limits are exceeded, Distro truncates data and includes a truncation marker:

```json
{
  "form_data": {
    "_truncated": true,
    "_original_size": 150000,
    "_message": "Form data exceeded 102400 bytes and was truncated"
  }
}
```

</details>


# Booking links overview

Booking links let guests choose an available time with you or with two or three teammates. Create the link, preview the booking page, and share its URL.

## Explore booking links

<table data-card-size="large" data-view="cards"><thead><tr><th></th><th></th><th data-hidden data-card-target data-type="content-ref"></th><th data-hidden data-card-cover data-type="files"></th></tr></thead><tbody><tr><td><strong>Personal links</strong></td><td>Create a reusable booking link for meetings with you.</td><td><a href="/booking-links/create-a-booking-link">Personal links</a></td><td><a href="https://2442454418-files.gitbook.io/~/files/v0/b/gitbook-x-prod.appspot.com/o/spaces%2FQA3GQNrIYVrPQ90NBwRa%2Fuploads%2Fl6HvXCkBi8R5BghLU0jm%2Fstart-guide-personal-links.png?alt=media">start-guide-personal-links.png</a></td></tr><tr><td><strong>Group links</strong></td><td>Find a shared time for two or three teammates to attend one meeting.</td><td><a href="/booking-links/create-a-group-link">Group links</a></td><td><a href="https://2442454418-files.gitbook.io/~/files/v0/b/gitbook-x-prod.appspot.com/o/spaces%2FQA3GQNrIYVrPQ90NBwRa%2Fuploads%2F1mQXyNrQd1FYzALWZEhE%2Fstart-guide-teams.png?alt=media">start-guide-teams.png</a></td></tr><tr><td><strong>Manage links</strong></td><td>Create and manage personal links for workspace members, or update group links.</td><td><a href="/booking-links/manage-booking-links">Manage links</a></td><td><a href="https://2442454418-files.gitbook.io/~/files/v0/b/gitbook-x-prod.appspot.com/o/spaces%2FQA3GQNrIYVrPQ90NBwRa%2Fuploads%2FTWWDZ2YeImHef2S6QAzc%2Fbooking-guide-manage-links.png?alt=media">booking-guide-manage-links.png</a></td></tr><tr><td><strong>Link types</strong></td><td>Compare personal, group, single-use, and routing links.</td><td><a href="/booking-links/choose-a-link">Link types</a></td><td><a href="https://2442454418-files.gitbook.io/~/files/v0/b/gitbook-x-prod.appspot.com/o/spaces%2FQA3GQNrIYVrPQ90NBwRa%2Fuploads%2FQO9spwWLdY8OBnkIaojx%2Fbooking-guide-link-types.png?alt=media">booking-guide-link-types.png</a></td></tr></tbody></table>

Workspace admins create group links and manage personal links for other members.

## Before you share

1. [Connect your calendar](/integrations/calendars) and [set your availability](/settings/personal-settings/my-availability). For a group link, check each participant's availability.
2. Choose an [event type](/event-types/create-an-event-type) for the meeting's duration, availability, invitations, and reminders.
3. Preview the link to check the guest experience, then use **Copy link** in Distro when you're ready to share it.

Edit the link for its URL, booking questions, and presentation. Edit its event type for reusable meeting settings.

## Share from your browser

Use the [Chrome extension](/integrations/chrome-extension) to share your personal and group links, [offer specific times](/integrations/chrome-extension/offer-times), or create a [single-use link](/integrations/chrome-extension/single-use-links) for one booking.

Sharing a link or proposed times does not reserve a meeting. The booking is created when an available time is selected and confirmed.


# Personal links

A personal link lets someone choose a time to meet with you. You can share it repeatedly in messages, signatures, or follow-ups.

<figure><img src="https://2442454418-files.gitbook.io/~/files/v0/b/gitbook-x-prod.appspot.com/o/spaces%2FQA3GQNrIYVrPQ90NBwRa%2Fuploads%2Fyt27FpuqPUXA304Q211k%2FCleanShot%202026-09-10%20at%2020.52.35%402x.png?alt=media&amp;token=ceb6428b-94af-4a94-beb0-5dc2702159f6" alt=""><figcaption></figcaption></figure>

1. In Distro, open **Booking links → My Personal Links**.
2. Click **Create Booking Link**.
3. Choose the **Event type**, then click **Continue**.
4. Enter a **Link name**, review the public URL, and finish creating the link.

![The personal booking link dialog starts by choosing an event type.](https://2442454418-files.gitbook.io/~/files/v0/b/gitbook-x-prod.appspot.com/o/spaces%2FQA3GQNrIYVrPQ90NBwRa%2Fuploads%2FKWrQhoPop035U8bwCti2%2Fcreate-personal-link.png?alt=media)

The event type controls duration, availability, invitations, and reminders. If the meeting needs different rules, [configure an event type](/event-types/create-an-event-type) before sharing the link.

Preview the link from its card to see the guest experience. Use **Copy link** when you're ready to share it. Copy the URL from Distro rather than assembling it yourself.

## Make a change later

Open the link from **My Personal Links** to edit it. Review the selected event type and the link-specific settings. Changing a public URL can affect links you've already shared, so check those messages and website placements before changing it.

For a link intended for one booking, [create a single-use link](/integrations/chrome-extension/single-use-links) from the Chrome extension instead.

## Customize the booking page

Open the link’s editor to change these link-specific sections:

* **Shareable link:** edit **Link slug** and choose **Show company logo** and **Show host details**. Changing the URL disables the old link; update places where you shared it.
* **Booking questions:** Name and Email are always required. Use **Add question** to collect additional context and review which answers are required.
* **After booking:** turn on **Redirect after booking** and enter a **Destination URL**, including `https://`, to send guests to another page after confirmation. The workspace’s [Redirect delay](/settings/workspace-settings/scheduler-settings) controls the wait.

Save the link and preview the guest experience before sharing it. Duration, availability, invitations, and reminders belong to the selected [event type](/event-types/create-an-event-type).


# Group links

Let prospects book a meeting with 2–3 team members, based on overlapping availability.

Use a group booking link when two or three teammates need to attend the same meeting. Guests see times when all selected participants are available.

<figure><img src="https://2442454418-files.gitbook.io/~/files/v0/b/gitbook-x-prod.appspot.com/o/spaces%2FQA3GQNrIYVrPQ90NBwRa%2Fuploads%2FWxssR1IC3tQY1h0xLd3I%2FCleanShot%202026-09-10%20at%2020.55.43%402x.png?alt=media&amp;token=8ada3e93-4e2d-47b6-8200-321e7fab60e8" alt=""><figcaption></figcaption></figure>

For example, a discovery call might need both the account executive and a solutions engineer. A group link finds their shared availability. Routing serves a different purpose: it chooses who should receive the meeting.

## Create the link

Workspace admins create and manage group links. In Distro, open **Booking links → Manage Group Links** and click **Create Group Link**.

![The group link setup asks for participants and an organizer.](https://2442454418-files.gitbook.io/~/files/v0/b/gitbook-x-prod.appspot.com/o/spaces%2FQA3GQNrIYVrPQ90NBwRa%2Fuploads%2F12E9sxbIRcHX58SOy6UD%2Fcreate-group-link.png?alt=media)

Choose **Participants**, then select an **Organizer** from those people. The organizer is the primary host, and their username appears in the public URL.

Continue to choose the **Event type**, then enter the link name and review the URL. Finish creating the link and preview it before sharing.

The event type provides the meeting's scheduling rules, invitations, and reminders. Check [each participant's availability](/settings/personal-settings/my-availability) if the preview offers fewer times than expected.

## Share it from Chrome

Your group links appear in the extension's **Scheduling** tab. Copy a link, save it as a favorite, or use its available scheduling actions to offer times or create a single-use link.

Group members see links they participate in. Workspace admins can see and edit all group links in the extension. If a link is missing, first check its participants and your connected workspace.

## Customize the booking page

Open the link’s editor to change these link-specific sections:

* **Shareable link:** edit **Link slug** and choose **Show company logo** and **Show host details**. Changing the URL disables the old link; update places where you shared it.
* **Booking questions:** Name and Email are always required. Use **Add question** to collect additional context and review which answers are required.
* **After booking:** turn on **Redirect after booking** and enter a **Destination URL**, including `https://`, to send guests to another page after confirmation. The workspace’s [Redirect delay](/settings/workspace-settings/scheduler-settings) controls the wait.

Save the link and preview the guest experience before sharing it. Duration, availability, invitations, and reminders belong to the selected [event type](/event-types/create-an-event-type).


# Manage links

Workspace admins can manage personal booking links for other members from **Booking links → All Members Links**.

<figure><img src="https://2442454418-files.gitbook.io/~/files/v0/b/gitbook-x-prod.appspot.com/o/spaces%2FQA3GQNrIYVrPQ90NBwRa%2Fuploads%2FL4du690qGryxCbQM8vu2%2FCleanShot%202026-09-10%20at%2020.57.12%402x.png?alt=media&amp;token=0efa1337-b2a5-43cd-83d7-4591bbe277d2" alt=""><figcaption></figcaption></figure>

Click **Create Booking Link**, select the **Owner**, choose the **Event type**, and enter the link name. Review the public URL before creating it. The selected owner is the person guests book with.

Use search and **Add filter** to find an existing link. Open it to review its owner, event type, and link settings. Preview the guest experience before copying the URL for a teammate.

For links with several participants, use **Manage Group Links**. Choose two or three participants and an organizer when [creating a group link](/booking-links/create-a-group-link).

## Decide where to make a change

Edit the link for its URL and link-specific presentation. Edit the [event type](/event-types/create-an-event-type) for reusable duration, availability, invitation, and reminder settings. Check other uses before changing a shared event type.

For an older link with private event settings, continue editing those settings in the link. These links cannot switch to a reusable event type through the event-type selector. Create a new link if you need that shared setup.

A link's star in the Chrome extension controls whether it appears with your favorites. It does not change the link's owner, participants, or availability.

## Duplicate a link

Use **Duplicate** from a link’s action menu when you want a similar link with a different URL. The copy keeps the selected event type; it does not create an independent event type. Review its questions, participants for a group link, and public URL before sharing it.


# Link types

Choose the link based on who should attend and whether it is for one person or repeated use.

| You want to…                                      | Use                                                                                                                                            |
| ------------------------------------------------- | ---------------------------------------------------------------------------------------------------------------------------------------------- |
| Let people book with you repeatedly               | A [personal booking link](/booking-links/create-a-booking-link).                                                                               |
| Find a time for two or three teammates together   | A [group booking link](/booking-links/create-a-group-link).                                                                                    |
| Share a link that accepts one booking             | A [single-use link](/integrations/chrome-extension/single-use-links).                                                                          |
| Suggest a few times in a message                  | [Offer times](/integrations/chrome-extension/offer-times) for a personal or group link.                                                        |
| Route a known prospect to the right colleague     | An [Outbound Router](/routing/outbound-routing/book-a-meeting).                                                                                |
| Let one named prospect finish an outbound handoff | A dedicated prospect link created through **Share link → Create dedicated link**. See [Outbound links](/routing/outbound-routing/share-links). |
| Reuse an outbound URL with different prospects    | A reusable outbound link, when enabled by your admin.                                                                                          |
| Route visitors arriving through a campaign link   | A [Click Router](/routing/click-router).                                                                                                       |

A group link brings several hosts into one meeting. An Outbound Router selects the host according to your team's rules.

Sharing a link or proposed times doesn't reserve a meeting. Booking happens when the available time is selected and the booking is confirmed.


# HubSpot

Connect HubSpot to use CRM ownership in routing and write configured contact and meeting updates. Workspace admins manage the connection and router actions.

## Connect Distro with HubSpot

{% hint style="success" %}
When connecting HubSpot, Distro requests the following permissions:

* Read and write access to contacts
* Read and write access to companies
* Read access to contact lists
* Read access to user settings
* Read access to owner information
* Write access to contact schemas
  {% endhint %}

<figure><img src="https://2442454418-files.gitbook.io/~/files/v0/b/gitbook-x-prod.appspot.com/o/spaces%2FQA3GQNrIYVrPQ90NBwRa%2Fuploads%2FNSO2Ge95DT2f0jJjt44R%2FCleanShot%202026-09-10%20at%2021.01.28%402x.png?alt=media&amp;token=5278e2b4-ab5b-4e13-93f1-d07d2bcaa17c" alt=""><figcaption></figcaption></figure>

{% stepper %}
{% step %}
Open **Settings → Integrations**. Workspace admins manage CRM connections.
{% endstep %}

{% step %}
Find **HubSpot** under **CRM** and choose its connection action. Distro supports one connected CRM at a time; disconnect Salesforce first if it is connected.
{% endstep %}

{% step %}
You'll be redirected to HubSpot's authorization page
{% endstep %}

{% step %}
Grant Distro permission to access your HubSpot account
{% endstep %}
{% endstepper %}

## Contacts and meetings

### **Contact Creation**

When enabled in your router settings, Distro can:

* Search for existing contacts by email
* Create new contacts if no matching contact is found
* Populate standard contact fields with booking information

### **Contact Updates**

When enabled, Distro can:

* Update existing contact information when matches are found
* Modify contact properties with new booking data
* Update contact ownership based on meeting assignments

### Meetings

When the relevant CRM actions are enabled, Distro can:

* Creating meeting records when bookings are confirmed
* Updating meeting statuses (Scheduled, Rescheduled, Completed, No Show, Cancelled)
* Linking meetings to associated contacts

Setting meeting properties:

* Meeting title
* Start and end times
* Meeting location: the address for an in-person meeting, or Remote for an online meeting
* Meeting status
* External meeting URL for online meetings; cleared for in-person meetings

### Contact properties

Distro transmits information about meetings and prospects by creating custom properties in HubSpot:

| Property label       | Internal field name            | Field type       |
| -------------------- | ------------------------------ | ---------------- |
| Meeting Time         | distro\_meeting\_time          | Date picker      |
| Meeting Type         | distro\_meeting\_type          | Single-line text |
| Meeting Status       | distro\_meeting\_status        | Dropdown select  |
| No Show              | distro\_no\_show               | Single checkbox  |
| Router Name          | distro\_router\_name           | Single-line text |
| Campaign Router Name | distro\_campaign\_router\_name | Single-line text |
| Meeting Create Time  | distro\_meeting\_create\_time  | Date picker      |

## Routing and booking are separate

A form submission starts routing. Matching a rule chooses the next routing step; it does not create a meeting. A meeting is created only when booking is confirmed.

Review the router’s **CRM Actions** to choose which records to create or update and when. Ownership rules can update a matched CRM owner after routing when configured. Strict distribution can update ownership after assignment; flexible distribution waits for the booking to select the host. Vacation coverage does not replace the original CRM owner.

For an Outbound Router, use **Booking-side CRM actions** for the actions required after a successful booking. CRM connectivity alone does not enable every router action.

## Enriched CRM fields

Use the CRM integration’s field mappings to write normalized enrichment values into supported fields. Choose whether to fill empty fields or overwrite them with a returned value. See [Enrichment](/integrations/enrichment) for provider order and mapping behavior.


# Salesforce

Connect Salesforce to use CRM ownership in routing and write configured Lead, Contact, and Event updates. Workspace admins manage the connection and router actions.

## Connect Distro with Salesforce

Authorize a Salesforce user with access to the records and fields Distro needs. The connection requests API access and permission to stay connected; the connected user’s Salesforce permissions still control which operations succeed.

{% stepper %}
{% step %}
Open **Settings → Integrations**. Workspace admins manage CRM connections.
{% endstep %}

{% step %}
Find **Salesforce** under **CRM** and choose its connection action. Distro supports one connected CRM at a time; disconnect HubSpot first if it is connected.
{% endstep %}

{% step %}
You'll be redirected to Salesforce's authorization page
{% endstep %}

{% step %}
Grant Distro permission to access your Salesforce account
{% endstep %}
{% endstepper %}

## What does Distro do to your Salesforce account

#### Lead/Contact Management <a href="#leadcontact-management" id="leadcontact-management"></a>

When enabled in your router settings, Distro can:

* Create new Leads or Contacts based on your configuration
* Search for existing Contacts by email
* Update Lead/Contact information when matches are found
* Modify Lead/Contact ownership based on meeting assignments

#### Meeting Management <a href="#meeting-management" id="meeting-management"></a>

When the relevant CRM actions are enabled, Distro can:

* Creating Event records when bookings are confirmed
* Updating Event statuses (Scheduled, Rescheduled, Completed, No Show, Cancelled)
* Linking Events to associated Leads/Contacts
* Setting Event properties:
  * Meeting title
  * Start and end times
  * Meeting location: the address for an in-person meeting, or the meeting URL for an online meeting
  * Meeting status
  * External meeting URL

Outbound bookings use **Outbound Router Meeting** as the meeting type and record the Outbound Router name. The booked-by-prospect value distinguishes a prospect booking from a teammate booking on their behalf.

## Custom Properties in Salesforce <a href="#custom-properties-in-salesforce" id="custom-properties-in-salesforce"></a>

Distro automatically creates custom fields in Salesforce to track meeting and prospect information. These fields are created for Lead, Contact, and Activity objects.

#### Important: Field Visibility Requirements <a href="#important-field-visibility-requirements" id="important-field-visibility-requirements"></a>

Ask your Salesforce administrator to make the Distro fields accessible to the connected user and visible to the profiles that need them. Add them to the relevant Lead, Contact, and Activity page layouts. If field creation or an update fails, check the connected user’s permissions and field access before reconnecting.

#### Lead Custom Fields <a href="#lead-custom-fields" id="lead-custom-fields"></a>

* **Distro Meeting Type** (`Distro_Meeting_Type__c`)
  * Type: Text (100 characters)
  * Tracks the type of meeting scheduled
* **Distro Meeting Date** (`Distro_Meeting_Date__c`)
  * Type: DateTime
  * Records when the meeting is scheduled
* **Distro Meeting Status** (`Distro_Meeting_Status__c`)
  * Type: Picklist
  * Values:
    * Scheduled
    * Rescheduled
    * Completed
    * No Show
    * Cancelled
* **Distro No Show** (`Distro_No_Show__c`)
  * Type: Checkbox
  * Indicates if the prospect missed the meeting
* **Distro Router Name** (`Distro_Router_Name__c`)
  * Type: Text (75 characters)
  * Stores the name of the Distro router used
* **Distro Meeting Created At** (`Distro_Meeting_Created_At__c`)
  * Type: DateTime
  * Records when the meeting was initially created

#### Contact Custom Fields <a href="#contact-custom-fields" id="contact-custom-fields"></a>

The same fields are created for Contacts:

* `Distro_Meeting_Type__c`
* `Distro_Meeting_Date__c`
* `Distro_Meeting_Status__c`
* `Distro_No_Show__c`
* `Distro_Router_Name__c`
* `Distro_Meeting_Created_At__c`

#### Activity Custom Fields <a href="#activity-custom-fields" id="activity-custom-fields"></a>

Activity objects receive the following custom fields:

* `Distro_Meeting_Type__c` (Text, 75 characters)
* `Distro_No_Show__c` (Checkbox)
* `Distro_Canceled__c` (Checkbox)
* `Distro_Router_Name__c` (Text, 75 characters)
* `Distro_Booked_By_Prospect__c` (Checkbox)
* `Distro_Rule_Name__c` (Text, 75 characters)
* `Distro_Assignee_Name__c` (Text, 75 characters)

These custom fields are automatically created when you connect Salesforce to Distro, allowing you to track and report on meeting-related data within your Salesforce instance.

## Routing and booking are separate

A form submission starts routing. Matching a rule chooses the next routing step; it does not create a meeting. A meeting is created only when booking is confirmed.

Review the router’s **CRM Actions** to choose which records to create or update and when. Ownership rules can update a matched CRM owner after routing when configured. Strict distribution can update ownership after assignment; flexible distribution waits for the booking to select the host. Vacation coverage does not replace the original CRM owner.

For an Outbound Router, use **Booking-side CRM actions** for the actions required after a successful booking. CRM connectivity alone does not enable every router action.

## Enriched CRM fields

Use the CRM integration’s field mappings to write normalized enrichment values into supported fields. Choose whether to fill empty fields or overwrite them with a returned value. See [Enrichment](/integrations/enrichment) for provider order and mapping behavior.


# Calendars

Connect the calendar you use for meetings so Distro can check busy times and add new bookings.

<figure><img src="https://2442454418-files.gitbook.io/~/files/v0/b/gitbook-x-prod.appspot.com/o/spaces%2FQA3GQNrIYVrPQ90NBwRa%2Fuploads%2FmmLMTR4nARKJAzRemQ3a%2FCleanShot%202026-09-10%20at%2021.04.26%402x.png?alt=media&amp;token=5f6b890b-d959-48b6-a8f4-ccdfaf01143c" alt=""><figcaption></figcaption></figure>

In the Distro app, open **Settings → My Integrations** and connect your calendar provider. Complete the provider's sign-in flow, then return to **Settings → Calendars**.

Choose your **Primary calendar** and click **Save**. This is where Distro creates new events. Connecting several calendars does not mean that every listed calendar is checked together. Google Calendar and outbound scheduling use the selected primary calendar. Some Outlook booking pages check the Outlook account’s default calendar; keep blocking events there and verify the exact link you share.

<figure><img src="https://2442454418-files.gitbook.io/~/files/v0/b/gitbook-x-prod.appspot.com/o/spaces%2FQA3GQNrIYVrPQ90NBwRa%2Fuploads%2FD4Ph0OhRPmERDHC7erKu%2FCleanShot%202026-09-10%20at%2021.05.14%402x.png?alt=media&amp;token=12089ff1-6073-482b-a34c-0a186bd7d6a8" alt=""><figcaption></figcaption></figure>

Open **Settings → Conferencing** to review how online meeting details are provided. Calendar connection and conferencing are separate parts of setup: check both before sharing your first link.

<figure><img src="https://2442454418-files.gitbook.io/~/files/v0/b/gitbook-x-prod.appspot.com/o/spaces%2FQA3GQNrIYVrPQ90NBwRa%2Fuploads%2FEihQYkZ4HnGntUxpjl9z%2FCleanShot%202026-09-10%20at%2021.06.35%402x.png?alt=media&amp;token=1adcae48-9a05-45cb-9856-85b18da7e79c" alt=""><figcaption></figcaption></figure>

## Check the booking experience

Open one of your booking links and preview the available dates. If the times don't look right, check your [weekly hours](/settings/personal-settings/my-availability), timezone, and the link's [event type](/event-types/create-an-event-type).

If your calendar connection needs attention, use **Manage integrations** from the Calendars page to return to the connection settings. Reconnect the intended account and check the primary calendar again.

Changing the primary calendar controls where new bookings are created. It is not a way to move existing meetings between calendars.


# Conferencing

Choose which service adds video links to your online meetings.

<figure><img src="https://2442454418-files.gitbook.io/~/files/v0/b/gitbook-x-prod.appspot.com/o/spaces%2FQA3GQNrIYVrPQ90NBwRa%2Fuploads%2F129UIeAe4lwNrllJIZfK%2FCleanShot%202026-09-10%20at%2021.06.35%402x.png?alt=media&amp;token=097ae8d2-7e32-472c-85c4-de2994e73d0d" alt=""><figcaption></figcaption></figure>

1. Open **Settings → My Integrations** and connect the required service.
2. Open **Settings → Conferencing**.
3. Under **Default provider**, choose a **Provider** and click **Save**.

| Provider        | Required connection |
| --------------- | ------------------- |
| Google Meet     | Google Calendar     |
| Microsoft Teams | Outlook Calendar    |
| Zoom            | Zoom                |

Only connected providers appear in the default-provider selector. Use **Manage integrations** to connect a missing service. If none are connected, use **Connect provider**.

The default applies when new calendar events need a video link. Existing bookings keep their current meeting links. In-person meetings use their location instead of creating a conferencing link; see [Event types](/event-types/create-an-event-type).


# Chrome extension

The Distro Chrome extension brings your meeting links, availability, and meetings into the browser. Use it while writing a message or working on a prospect's record.

## Install and connect

1. Install [Distro from the Chrome Web Store](https://chromewebstore.google.com/detail/distro/fhieobajbfofbfckmmlaknnibolbihki).
2. Open Chrome's **Extensions** menu and pin Distro to the toolbar.
3. Open an ordinary website and click the Distro icon.
4. Choose **Log in to Distro** and complete sign-in with your work account.

The side panel shows your connected account. If your team uses more than one workspace, check that you're connected to the intended one before sharing links.

Chrome limits extensions on pages such as its settings and the Chrome Web Store. If Distro opens a fallback page, switch to an ordinary website and open it again.

## Choose where to start

* **Scheduling:** [copy meeting links and keep favorites close](/integrations/chrome-extension/share-links).
* **Availability:** [update your weekly hours](/settings/personal-settings/my-availability).
* **Meetings:** [review upcoming meetings and open their details](/bookings/overview).
* **In a message:** [type `di/` to insert a link](/integrations/chrome-extension/inbox-shortcuts).
* **For a prospect:** [start a sales handoff](/routing/outbound-routing/book-a-meeting).

Open **More options → Settings** in the side panel to change appearance, shortcuts, meeting display, and browser integrations.

The extension uses your Distro account. Creating event types, configuring routers, and managing workspace access happen in the main app.


# Share links

Click the Distro toolbar icon and open **Scheduling**. Find your personal, group, or reusable outbound link and use its copy action. Paste the link into your message when you're ready.

Use the preview action to check what the recipient will see. Actions such as editing or creating the underlying link may open the Distro app.

## Keep frequently used links close

Use a link's star control to save it as a favorite. Saved links appear together under **Preferred** in the side panel and command palette, and under **Favorites** in the `di/` picker.

These are the same saved choices across the extension. Removing a favorite doesn't delete the link.

## More than copying

Open the link's actions to [offer times](/integrations/chrome-extension/offer-times) or [create a single-use link](/integrations/chrome-extension/single-use-links), when those actions are available.

An Outbound Router starts a handoff rather than behaving like a personal booking URL. To share an outbound URL repeatedly, use a reusable outbound link made available by your admin.

If a collection is empty or a link is missing, [check your account and access](/integrations/chrome-extension/troubleshooting).


# Offer times

Share a few available times so your recipient can choose one directly from your message.

## In Gmail

1. Place the cursor in the body of your draft.
2. Type `/slots` or `di/slots` and press **Enter**.
3. Choose a personal or group meeting link.
4. Review the suggested times. Keep at least two, change the dates, or choose other available times.
5. Check the displayed timezone, then click **Insert times into email**.

Distro inserts clickable times where you typed the shortcut. Review the message before sending it.

Use **Suggest other times** to see alternatives. You can also adjust individual days and times. Changing the displayed timezone keeps the same moments selected and shows them in the new timezone.

Recipient details are optional. If Gmail has one resolved recipient, Distro can prefill it. Check the recipient before creating the offer.

## From the side panel

Open **Scheduling**, find a personal or group link, and choose **Offer times** from its actions. Select the times and use the copy action to paste them into your message.

If insertion into Gmail is no longer available—for example, the original draft was closed—use **Copy times** to place the result in another message.

## What your recipient gets

The recipient chooses an offered time and completes the booking. Offered times are not held. If availability changes before they book, the original choice may no longer be available.

For times routed to a colleague through an Outbound Router, use the handoff's **Share availability** action when your admin has enabled it. That follows the [outbound booking flow](/routing/outbound-routing/book-a-meeting).


# Single-use links

Use a single-use link when you want one booking from a conversation without sharing your regular reusable URL.

In the Chrome extension, open **Scheduling**, find a personal or group link, and choose the single-use link action.

Review the meeting details. Add recipient information if useful, choose **Expires after**, then click **Create and copy link**. Use **Preview booking page** to check it before sharing. Recipient details prefill the booking form; the recipient can edit them.

The link accepts one booking and stops being available after it is used or expires. Creating it does not book a meeting or reserve a time.

Your original personal or group link remains reusable. If the recipient needs a new link after the first one expires, create another single-use link from the original meeting link.

For an outbound handoff, use **Share link → Create dedicated link**. This carries the prospect's handoff context and follows the Outbound Router's settings. **Share availability** proposes times instead. See [Outbound links](/routing/outbound-routing/share-links).


# Inbox shortcuts

Type `di/` in a supported message body to open your Distro links. Keep typing a link name to narrow the list, use the arrow keys to highlight a result, and press **Enter** to insert it. **Escape** closes the picker.

The selected link replaces the shortcut at your cursor. It doesn't send your message.

## Where it works

| App             | Write the shortcut in   |
| --------------- | ----------------------- |
| Gmail           | A compose message body. |
| Gong            | An email composer.      |
| Google Calendar | An event description.   |
| LinkedIn        | A message.              |

Personal, group, and reusable outbound links are available in these supported editors. Recipient-aware actions and Outbound Router launches in this picker are Gmail-specific.

The shortcut doesn't activate in recipient fields, subjects, search boxes, or unrelated website inputs.

## Shortcuts worth remembering

* `di/` opens the picker.
* `/slots` or `di/slots` starts **Offer times** in Gmail.
* `di/book` starts an outbound booking in Gmail; add the recipient first.
* A code shown beside a link, such as `di/p-1`, selects that particular link. Use your link's displayed code, not the example number.

Saved links appear first under **Favorites**. You can press **Shift+Enter** to change whether the highlighted link is a favorite without inserting it.

To control where shortcuts appear, open the extension's **Settings → Browser integrations → Keyword detection**. Turn detection off entirely or change it for individual apps.


# Command palette

Use the command palette to find a meeting link or start a handoff without opening the side panel.

The default Chrome shortcut is **Alt+Shift+D**; on Mac, use **Option+Shift+D**. The assigned shortcut may differ if you or Chrome have changed it. Check the shortcut setting in Distro's extension settings.

Type to search. Use the arrow keys to select an entry and **Enter** to open it. Link entries let you copy a link or open the available scheduling actions. Saved favorites appear under **Preferred**.

Choose **Book a new meeting** to start a sales handoff. On pages where Distro detects supported contacts, **Book for a contact on this page** helps you select the prospect first.

The Distro web app also has a search control in its header. Its **⌘K** shortcut is separate from the extension's browser shortcut.

If the extension shortcut isn't assigned or conflicts with another extension, change it through the shortcut setting and Chrome's extension keyboard shortcuts page. You can continue to use Distro's visible controls while resolving the shortcut.

## Book through a personal or group link

Choose a personal or group link, open its actions, and select **Book a meeting** when available. Pick an available time, enter the guest details, and review the booking before confirming. This uses that link's host or participants; it doesn't start a routed sales handoff.


# Extension settings

Open the side panel, then **More options → Settings**.

**Appearance** offers **System**, **Light**, and **Dark**. System follows your operating system. The inbox `di/` picker keeps its light purple appearance in either theme.

**Meeting timezone** chooses whether the meeting list uses your browser timezone or your Distro account timezone. This changes the displayed times and date grouping; it doesn't move meetings. Add a timezone in your Distro profile if account time isn't available.

**Meeting visibility** controls which meeting statuses appear in the side panel. If a meeting seems missing, check these choices as well as the selected timezone.

**Keyword detection** controls `di/` in supported apps. Use the main switch or choose apps individually.

**Calendar event buttons** adds **View in Distro** and no-show controls to matching Distro meetings in Google Calendar. This setting is separate from keyword detection in event descriptions.

The **Account** section identifies the connected user. **Log out** disconnects the extension and your Distro website session. Sign in again when you want to reconnect.


# Google Calendar

Open a Distro meeting in Google Calendar to access **View in Distro** and the available no-show controls. The buttons appear on meetings Distro can match to a booking.

Use **View in Distro** when you need the full booking details. Mark a meeting as a no-show only when the prospect didn't attend; use the undo action if it was marked by mistake.

To show or hide these controls, open the extension's **Settings → Browser integrations → Calendar event buttons**.

You can also type `di/` into an event description to insert a meeting link. That is controlled separately under **Keyword detection → Google Calendar**.

If the buttons are missing, check that you're signed in, the event belongs to a Distro booking, and **Calendar event buttons** is enabled. Refresh the Calendar page after installing or updating the extension.


# Troubleshooting

## Distro won't open on this page

Try an ordinary website. Chrome restricts extensions on its internal pages and the Chrome Web Store. If you installed or updated Distro while a website was already open, refresh that website and try again.

## A link or sales handoff is missing

Check the connected account in the extension's **Settings**. Confirm the link exists in the same Distro workspace.

For group links, check that you're a participant. For sales handoffs, ask your admin to check that the Outbound Router is active and that you're an allowed booker. Use the refresh or retry action after access is updated.

## Typing `di/` does nothing

Use a supported message body or event description, not a subject, recipient field, or search box. Check **Settings → Browser integrations → Keyword detection**, including the switch for that app. Then refresh the webpage and try again.

## Times won't insert into my email

Keep the original Gmail draft open while selecting times. If the draft has closed or the insertion is no longer available, choose **Copy times** and paste the result into your message.

## My meetings show the wrong time

Check **Settings → Meeting timezone**. Browser time and account time can differ. Changing the display timezone doesn't reschedule a meeting.

## Distro asks me to sign in again

Complete sign-in and reopen the extension. For a temporary connection error, retry when the connection returns. If sign-in repeatedly fails, include the visible error message when contacting your Distro support contact.

When reporting an issue, include the app you were using, what you tried, and whether refreshing helped. A screenshot of the error is useful; remove recipient details or private message content first.


# JavaScript

Use the script from **Install Router** when connecting a website form. The `Distro` browser interface also supports submitting data from your own form flow.

## Connect an existing form

```html
<script src="https://app.distro.so/inbound.js"></script>
<script>
  const distro = new Distro({ routerId: 'YOUR_ROUTER_ID' });
  distro.schedule('#contact-form');
</script>
```

Use a selector that identifies the intended form. Load the provider library before initializing a HubSpot or Marketo integration. See [Forms](/routing-forms/overview) for provider-specific setup.

## Submit from a custom flow

`submit(data)` creates a routing attempt and returns the qualified session data when scheduling can proceed. Call `open(session)` to show the scheduler. A disqualified or failed response can be empty; do not open a scheduler for it.

```javascript
const distro = new Distro({ routerId: 'YOUR_ROUTER_ID' });
const session = await distro.submit({
  email: 'prospect@example.com',
  name: 'Alex Morgan'
});
if (session) distro.open(session);
```

Use the exact field names expected by your form mapping. Do not attach both this custom submission flow and `schedule()` to the same submission, or you can create duplicate attempts.

## Track confirmed outcomes

A browser submission or opened scheduler is not proof of a booking. Use a [workflow webhook](/workflows/webhook-payloads) when another system needs confirmed booking and lifecycle events. Internal iframe messages control the widget's display and redirects; they should not be treated as an authenticated booking feed.


# Enrichment

Use enrichment to add person and company information to Form Router submissions. Routing rules and CRM mappings can use the fields returned by your connected providers.

Workspace admins manage enrichment in **Settings → Integrations → Data enrichment**.

<figure><img src="https://2442454418-files.gitbook.io/~/files/v0/b/gitbook-x-prod.appspot.com/o/spaces%2FQA3GQNrIYVrPQ90NBwRa%2Fuploads%2FVLmXGZRUdRhGoKoZi05e%2FCleanShot%202026-09-10%20at%2021.09.56%402x.png?alt=media&amp;token=fbabe805-a824-4f32-8402-9c845d6fa472" alt=""><figcaption></figcaption></figure>

## Connect a provider

Choose **Connect** on Apollo, People Data Labs, Clearbit, Crustdata, ZoomInfo, or Ocean. Enter the requested credentials and choose **Enrichment coverage**:

* **People and companies** requests person and company information when the required identity is available.
* **Companies only** uses the submitted work-email domain for company information.

ZoomInfo requires a client ID and client secret. Clearbit uses an existing legacy secret key and asks for a **Test email**; saving can count that lookup against your plan. Crustdata needs a submitted LinkedIn profile for person enrichment.

Read the connection page’s verification notice before saving. A successful credential check does not guarantee that your provider account can return every field. Check permissions and credits if live requests show **Needs attention**.

Connecting a profile provider adds it to the default waterfall order. Actual enrichment runs when a Form Router’s rules or workspace CRM mappings require it.

## Choose the provider order

From **Data enrichment**, open **Configure waterfall**. In **Default provider order**, move providers using their drag handles or up and down controls. The order is saved when you move a provider.

<figure><img src="https://2442454418-files.gitbook.io/~/files/v0/b/gitbook-x-prod.appspot.com/o/spaces%2FQA3GQNrIYVrPQ90NBwRa%2Fuploads%2FjiDEPRoeT7twE2AnEeKD%2FCleanShot%202026-09-10%20at%2021.10.50%402x.png?alt=media&amp;token=44adcc67-1f80-4aa6-9f8d-c933950f26a7" alt=""><figcaption></figcaption></figure>

Distro checks that order separately for each requested field and keeps the first non-empty answer. For example, one provider may supply employee count while another supplies industry.

Choose **Waterfall enrichment** in a rule or mapping to use that order. Choose a named provider to use only that provider for the field.

## Write values to your CRM

Open the connected HubSpot or Salesforce configuration and find **Enrichment mappings**.

<figure><img src="https://2442454418-files.gitbook.io/~/files/v0/b/gitbook-x-prod.appspot.com/o/spaces%2FQA3GQNrIYVrPQ90NBwRa%2Fuploads%2FxDgIH8rudwi2U9ggXQYX%2FCleanShot%202026-09-10%20at%2021.11.39%402x.png?alt=media&amp;token=13504cb7-f1fe-46cd-a7c5-3e5233d3fae3" alt=""><figcaption></figcaption></figure>

Choose **Resolve with**, the **Normalized enrichment field**, and the CRM destination. Under **When a CRM value exists**, choose **Keep the existing value** or **Replace it**, then click **Add mapping**.

Only available enrichment values are written. Company destinations update an existing company matched by domain. Choosing a provider directly means that mapping continues to depend on that provider even if you change the waterfall order.

Disconnecting a provider preserves waterfall steps, mappings, and rule conditions. Review any **Connection required** warnings and reconnect or revise the affected configuration before relying on it.

Email validation is configured separately. See [Email verification](/integrations/email-verification).


# Email verification

Use ZeroBounce to check a Form Router's submitted email before routing. Connect the provider once in workspace settings, then enable validation on each router that needs it.

### Connect ZeroBounce

{% stepper %}
{% step %}

#### Open the integration

Go to **Settings → Integrations → Email verification** and choose **Connect** on ZeroBounce.
{% endstep %}

{% step %}

#### Choose the processing region

Enter your **API key** and select the **Processing region**. The initial region is **European Union**; **United States** is also available.
{% endstep %}

{% step %}

#### Verify the connection

Choose **Connect ZeroBounce**. A valid key can still produce a warning if the provider account has no validation credits.

When updating an existing connection, leave **Replacement API key** blank to keep the saved key and choose **Verify and save**.
{% endstep %}
{% endstepper %}

### Add validation to a Form Router

{% stepper %}
{% step %}

#### Add the validation card

Open your router and use the **+** on the connector between **Form Submission** and **Lead Routing**. Choose **Email validation**. The ZeroBounce card appears and its settings open.

If the card is already present, click it to edit. You can also find the setting in **Form Submission**.
{% endstep %}

{% step %}

#### Enable and save

Turn on **Disqualify submissions with invalid email addresses** and choose **Save**. The switch is unavailable until ZeroBounce is connected. Canceling an unsaved insertion removes the new card.
{% endstep %}

{% step %}

#### Test and publish

Use **Test route** to check the saved configuration, then choose **Publish**. The simulation uses synthetic inputs; it does not call ZeroBounce. Verify the live integration separately with controlled test submissions.
{% endstep %}
{% endstepper %}

<figure><img src="https://files.gitbook.com/v0/b/gitbook-x-prod.appspot.com/o/spaces%2FQA3GQNrIYVrPQ90NBwRa%2Fuploads%2F3FLbgN8cwGvDZABUDe27%2Fform-submission-dark.png?alt=media&#x26;token=9886c457-df42-49dc-afc3-93fd8ec6395e" alt="Form Submission settings in dark mode showing mapped fields and the disabled email-validation switch while ZeroBounce is disconnected."><figcaption><p>The disabled switch links to Settings → Integrations when a ZeroBounce connection is required.</p></figcaption></figure>

### Understand the outcome

| Validation result                                                              | Routing behavior                                                                                    |
| ------------------------------------------------------------------------------ | --------------------------------------------------------------------------------------------------- |
| Email is returned as valid                                                     | Continue to routing rules.                                                                          |
| Email is missing, or a successful validation returns a result other than valid | Disqualify the submission. Email-validation rejections skip the router's after-routing CRM actions. |
| Provider error or unavailable connection                                       | Continue routing; this check does not reject the submission when validation is unavailable.         |

Validation does not guarantee a booking. A valid email must still pass your routing rules and find an eligible host and time.

**Normalize email aliases** is a separate setting: it removes text after `+` so addresses such as `alex+demo@example.com` match `alex@example.com`. It does not verify deliverability.

### Reconnect or disable validation

Disconnecting ZeroBounce preserves router settings and rule conditions. Reconnect it in **Settings → Integrations** when a warning appears. Review actual routing results rather than assuming an unavailable provider rejected the prospect.

To disable validation for a router, turn the setting off, save, and publish. Saving it off removes the validation card from the draft canvas. See [Router versions](https://help.distro.so/routing/router-versions) for how changes reach new submissions.


# Personal settings

Open **Settings** to manage your own scheduling and sign-in preferences. Choose a guide to update your profile, working hours, connected providers, or account security.

<table data-card-size="large" data-view="cards"><thead><tr><th></th><th></th><th data-hidden data-card-target data-type="content-ref"></th><th data-hidden data-card-cover data-type="files"></th></tr></thead><tbody><tr><td><strong>Profile</strong></td><td>Update your name, username, timezone, and covering colleague.</td><td><a href="/settings/personal-settings/profile">Profile</a></td><td><a href="https://2442454418-files.gitbook.io/~/files/v0/b/gitbook-x-prod.appspot.com/o/spaces%2FQA3GQNrIYVrPQ90NBwRa%2Fuploads%2FeKBFFoLq7zCOk4Ty9ffn%2Fsettings-guide-profile.png?alt=media">settings-guide-profile.png</a></td></tr><tr><td><strong>Availability</strong></td><td>Set your weekly working hours and split days around breaks.</td><td><a href="/settings/personal-settings/my-availability">Availability</a></td><td><a href="https://2442454418-files.gitbook.io/~/files/v0/b/gitbook-x-prod.appspot.com/o/spaces%2FQA3GQNrIYVrPQ90NBwRa%2Fuploads%2FovEjd4hrTGFOlqI2RTmE%2Fstart-guide-availability.png?alt=media">start-guide-availability.png</a></td></tr><tr><td><strong>Calendars</strong></td><td>Connect your calendars and choose where new meetings are created.</td><td><a href="/integrations/calendars">Calendars</a></td><td><a href="https://2442454418-files.gitbook.io/~/files/v0/b/gitbook-x-prod.appspot.com/o/spaces%2FQA3GQNrIYVrPQ90NBwRa%2Fuploads%2FTpzP7NOkK0KJsxt564Cd%2Fstart-guide-calendars.png?alt=media">start-guide-calendars.png</a></td></tr><tr><td><strong>Conferencing</strong></td><td>Choose the connected video provider used for online meetings.</td><td><a href="/integrations/conference-tools">Conferencing</a></td><td><a href="https://2442454418-files.gitbook.io/~/files/v0/b/gitbook-x-prod.appspot.com/o/spaces%2FQA3GQNrIYVrPQ90NBwRa%2Fuploads%2FHns8LOJJRNpT7GeH3fQP%2Fsettings-guide-conferencing.png?alt=media">settings-guide-conferencing.png</a></td></tr><tr><td><strong>Security</strong></td><td>Change your password and manage authenticator sign-in.</td><td><a href="/settings/personal-settings/security">Security</a></td><td><a href="https://2442454418-files.gitbook.io/~/files/v0/b/gitbook-x-prod.appspot.com/o/spaces%2FQA3GQNrIYVrPQ90NBwRa%2Fuploads%2FEap4lryBWDsNEznnoNQk%2Fsettings-guide-security.png?alt=media">settings-guide-security.png</a></td></tr></tbody></table>

Use **Settings → My Integrations** to connect or reconnect your calendar and conferencing providers. Admins manage shared defaults and membership in [Workspace settings](/settings/workspace-settings).


# Profile

Want to personalize your profile in Distro? Here's how.

Open **Settings → Profile** to update your **Full name**, **Username**, **Email**, and **Time zone**. You can also add social profile links. Click **Update** to save.

<figure><img src="https://2442454418-files.gitbook.io/~/files/v0/b/gitbook-x-prod.appspot.com/o/spaces%2FQA3GQNrIYVrPQ90NBwRa%2Fuploads%2FzBy3g43lUqBq4fRVQGIw%2FCleanShot%202026-09-10%20at%2021.16.34%402x.png?alt=media&amp;token=5cc84bc3-576a-4179-a448-41719b3b2d84" alt=""><figcaption></figcaption></figure>

Your username is used in personal booking URLs. Review links you have already shared before changing it.

Use **Assigned colleague** to select vacation coverage. Check your [availability](/settings/personal-settings/my-availability) and [calendars](/integrations/calendars) separately when changing your scheduling setup.


# Availability

Open **Settings → My Availability** in the Distro app. Turn on the days you accept meetings and choose the start and end of each working period.

<figure><img src="https://2442454418-files.gitbook.io/~/files/v0/b/gitbook-x-prod.appspot.com/o/spaces%2FQA3GQNrIYVrPQ90NBwRa%2Fuploads%2FjhRRGRGpMl7FALPiKEp9%2FCleanShot%202026-09-10%20at%2021.17.07%402x.png?alt=media&amp;token=22e4dcec-8ed9-4e8a-885b-3240eab6f437" alt=""><figcaption></figcaption></figure>

Use **Add new time slot** to split a day around a break. For example, set 9:00–12:00 and 13:00–17:00 to keep lunch free. Use **Copy time slots to other days** when several days share the same hours.

Click **Save** when you're finished. **Preview availability** opens an [availability preview](/settings/calendar-troubleshooter) for a selected user or team schedule. Check the actual booking link for the full booking experience.

## Update hours from Chrome

Open Distro's side panel and choose **Availability**. Edit the days and time periods, then click **Save**. These are the same personal hours used by the main app. Leaving the tab before saving discards your edits.

## Hours and available times are different

Your weekly hours define when you are open to meetings. Calendar conflicts, meeting length, buffers, minimum notice, and the event type's availability strategy can narrow those hours further.

Check the timezone shown above your schedule. To change your account timezone, use **Settings → Profile** in Distro. The extension's **Meeting timezone** preference changes how meetings are displayed; it doesn't change your weekly schedule.

If a time is missing, follow [Find out why a time is unavailable](/settings/find-unavailable-times).


# Security

Open **Settings → Security** to view **Security & Password**.

<figure><img src="https://2442454418-files.gitbook.io/~/files/v0/b/gitbook-x-prod.appspot.com/o/spaces%2FQA3GQNrIYVrPQ90NBwRa%2Fuploads%2FIxEWZfvuadwqXzK7OOLe%2FCleanShot%202026-09-10%20at%2021.18.00%402x.png?alt=media&amp;token=b5ec0ad5-0daa-4483-be6f-48818b986b3c" alt=""><figcaption></figcaption></figure>

## Change your password

Enter **Current password**, **New password**, and **Confirm new password**, then use the update button. The current password is required to confirm the change. Follow the password requirements shown in the form.

## Add an authenticator

Under **Authenticator app**, use the enable action and follow the setup flow. Keep the backup codes somewhere you can access if you lose your authenticator. Complete verification before relying on two-factor sign-in.

When enabled, Distro requires an authenticator code during sign-in. Use the disable action only when you intend to remove that extra step.

If the page shows **Managed by SAML**, Distro's authenticator controls are unavailable for this workspace. Your identity provider manages those authentication requirements; contact your workspace administrator.


# Workspace settings

Workspace admins manage shared scheduling defaults, membership, integrations, and sign-in settings from **Settings**. Choose a guide to configure your workspace.

<table data-card-size="large" data-view="cards"><thead><tr><th></th><th></th><th data-hidden data-card-target data-type="content-ref"></th><th data-hidden data-card-cover data-type="files"></th></tr></thead><tbody><tr><td><strong>General</strong></td><td>Update your workspace name and logo.</td><td><a href="/settings/workspace-settings/general">General</a></td><td><a href="https://2442454418-files.gitbook.io/~/files/v0/b/gitbook-x-prod.appspot.com/o/spaces%2FQA3GQNrIYVrPQ90NBwRa%2Fuploads%2FyKWzzcmXSIoHUmxhAAan%2Fsettings-guide-general.png?alt=media">settings-guide-general.png</a></td></tr><tr><td><strong>Members</strong></td><td>Invite teammates, manage roles, and review their calendar connections.</td><td><a href="/settings/workspace-settings/members">Members</a></td><td><a href="https://2442454418-files.gitbook.io/~/files/v0/b/gitbook-x-prod.appspot.com/o/spaces%2FQA3GQNrIYVrPQ90NBwRa%2Fuploads%2F1mQXyNrQd1FYzALWZEhE%2Fstart-guide-teams.png?alt=media">start-guide-teams.png</a></td></tr><tr><td><strong>Default availability</strong></td><td>Set the starting timezone and weekly hours for new members.</td><td><a href="/settings/workspace-settings/default-availability">Default availability</a></td><td><a href="https://2442454418-files.gitbook.io/~/files/v0/b/gitbook-x-prod.appspot.com/o/spaces%2FQA3GQNrIYVrPQ90NBwRa%2Fuploads%2FovEjd4hrTGFOlqI2RTmE%2Fstart-guide-availability.png?alt=media">start-guide-availability.png</a></td></tr><tr><td><strong>Scheduler settings</strong></td><td>Set booking timeouts, redirect delays, and a fallback contact.</td><td><a href="/settings/workspace-settings/scheduler-settings">Scheduler settings</a></td><td><a href="https://2442454418-files.gitbook.io/~/files/v0/b/gitbook-x-prod.appspot.com/o/spaces%2FQA3GQNrIYVrPQ90NBwRa%2Fuploads%2FUjyesdqkxOv0F9FcuyzA%2Fsettings-guide-scheduler.png?alt=media">settings-guide-scheduler.png</a></td></tr><tr><td><strong>Vacation</strong></td><td>Manage assignment exclusions and colleague coverage during time off.</td><td><a href="/settings/workspace-settings/vacation">Vacation</a></td><td><a href="https://2442454418-files.gitbook.io/~/files/v0/b/gitbook-x-prod.appspot.com/o/spaces%2FQA3GQNrIYVrPQ90NBwRa%2Fuploads%2FT6EZQDZ7MDxnEEQ0sGKs%2Fsettings-guide-vacation.png?alt=media">settings-guide-vacation.png</a></td></tr><tr><td><strong>Calibration</strong></td><td>Set the period used to balance assignments and when to award credits.</td><td><a href="/settings/workspace-settings/calibration">Calibration</a></td><td><a href="https://2442454418-files.gitbook.io/~/files/v0/b/gitbook-x-prod.appspot.com/o/spaces%2FQA3GQNrIYVrPQ90NBwRa%2Fuploads%2FviFcwmxT04FCM8iPvJoA%2Fsettings-guide-calibration.png?alt=media">settings-guide-calibration.png</a></td></tr><tr><td><strong>Email configuration</strong></td><td>Send emails from your domain and choose where workflow replies go.</td><td><a href="/settings/workspace-settings/email-configuration">Email configuration</a></td><td><a href="https://2442454418-files.gitbook.io/~/files/v0/b/gitbook-x-prod.appspot.com/o/spaces%2FQA3GQNrIYVrPQ90NBwRa%2Fuploads%2FyMXQdqzk5dAnsrE9ZYdH%2Fsettings-guide-email.png?alt=media">settings-guide-email.png</a></td></tr><tr><td><strong>SAML SSO</strong></td><td>Connect your identity provider and manage workspace SAML sign-in.</td><td><a href="/settings/workspace-settings/saml-sso">SAML SSO</a></td><td><a href="https://2442454418-files.gitbook.io/~/files/v0/b/gitbook-x-prod.appspot.com/o/spaces%2FQA3GQNrIYVrPQ90NBwRa%2Fuploads%2FqXh5cNf2nX3VAXd5Ewlw%2Fsettings-guide-saml-sso.png?alt=media">settings-guide-saml-sso.png</a></td></tr></tbody></table>

## Branding

Open **Settings → Branding** to choose the **Brand color** used for booking page accents and form highlights. Use the color picker or enter a hex color, then click **Save**. Choose a color that remains readable against white backgrounds. Change the workspace logo in [General](/settings/workspace-settings/general).

## Integrations

Use **Settings → Integrations** for the workspace [CRM](/crm/hubspot), [enrichment](/integrations/enrichment), and [email verification](/integrations/email-verification) connections. Personal calendar and conferencing connections are under **My Integrations**.


# General

Open **Settings → General** to manage your workspace’s identity.

<figure><img src="https://2442454418-files.gitbook.io/~/files/v0/b/gitbook-x-prod.appspot.com/o/spaces%2FQA3GQNrIYVrPQ90NBwRa%2Fuploads%2F6YOQFDwI29pfhHmFhazZ%2FCleanShot%202026-09-10%20at%2021.18.43%402x.png?alt=media&amp;token=a0c69527-0943-458b-88b8-c18cd913b946" alt=""><figcaption></figcaption></figure>

Under **Workspace details**, edit the **Workspace name**. Under **Workspace logo**, upload your logo, then click **Update**. The logo is used in workspace navigation and shared booking surfaces. Use a square image at least 200 × 200 pixels; the upload supports JPG, PNG, GIF, or WebP up to 5 MB.

If ownership transfer is available to you, use its separate section to choose the **User** who should take ownership and confirm the transfer. Updating workspace details does not transfer ownership.

Use **Settings → Branding** to choose the color used on booking pages. Select a color or enter its hex value, then click **Save**.


# Members

Open **Settings → Members** to see workspace members and pending invitations. Search by name or email, or choose **Members** or **Pending invites** to narrow the table.

<figure><img src="https://2442454418-files.gitbook.io/~/files/v0/b/gitbook-x-prod.appspot.com/o/spaces%2FQA3GQNrIYVrPQ90NBwRa%2Fuploads%2FCEMzA3dfsmjMpL2VETzW%2FCleanShot%202026-09-10%20at%2021.26.24%402x.png?alt=media&amp;token=ccc5568a-d950-4e34-878c-618ce3204cb2" alt=""><figcaption></figcaption></figure>

Workspace admins manage invitations and roles. The table also shows each member’s CRM mapping, calendar connection, and conferencing setup.

## Invite people

Click **Invite Member** or the header’s **Invite members** button. Enter an email address and choose **Member** or **Admin** for that person. Use **Add new member** to add more rows, then review the addresses and roles before clicking **Send invitations**.

<figure><img src="https://2442454418-files.gitbook.io/~/files/v0/b/gitbook-x-prod.appspot.com/o/spaces%2FQA3GQNrIYVrPQ90NBwRa%2Fuploads%2FdMtmGSnxYlRD3iz46wBo%2FCleanShot%202026-09-10%20at%2021.27.03%402x.png?alt=media&amp;token=0fd5f1c9-3077-4264-90f7-e0a59e29c0cf" alt=""><figcaption></figcaption></figure>

You can invite up to 50 people at once. If an address or role needs correcting, fix the highlighted rows before sending. Use **Pending invites** to track invitations and find the available follow-up actions.

## Help a member get ready

If a member has no connected calendar, use **Send reminder** in their Calendar column to email them a connection reminder. A reminder can be sent once every 24 hours. The table shows **Reminder sent** after it is sent.

Open the member’s action menu and choose **Edit** to manage their role, or **Manage User Preferences** to review their timezone, weekly hours, and vacation coverage. See [Member availability](/settings/workspace-settings/members/managing-member-availability).

Ask members to connect their calendar and check their hours before including them in live routing. Being a workspace member does not automatically give someone access to every sales handoff; review the router’s allowed bookers separately.


# Member availability

Workspace admins can review and update another member’s timezone, weekly hours, and vacation coverage.

Open **Settings → Members**, find the person, and choose **Manage User Preferences** from their action menu.

<figure><img src="https://2442454418-files.gitbook.io/~/files/v0/b/gitbook-x-prod.appspot.com/o/spaces%2FQA3GQNrIYVrPQ90NBwRa%2Fuploads%2Fwnk2XtIWUmpkxtZIFk0m%2FCleanShot%202026-09-10%20at%2021.27.28%402x.png?alt=media&amp;token=50e784d1-e199-4726-a526-1b9a7f60294c" alt=""><figcaption></figcaption></figure>

## Timezone and weekly hours

Choose the member’s **Timezone**, then click **Save timezone**. This is the timezone used for their weekly hours.

Under **Weekly availability**, turn on the days they accept meetings and set the start and end times. Use **Add new time slot** for a break within a day, or **Copy time slots to other days** to reuse a schedule. Click **Save** in the weekly availability card when finished.

The timezone and weekly hours have separate save buttons. Saving one section does not save edits in the other.

Use **Preview availability** to open the calendar troubleshooter. The event type, calendar conflicts, and booking rules can narrow the hours guests can actually book. See [Unavailable times](/settings/find-unavailable-times).

## Vacation coverage

Under **Vacation coverage**, choose a **Covering colleague** and click **Save coverage**. That colleague receives meetings when vacation coverage is enabled for the workspace.

**Detected vacations** shows time away detected for the next three months. Choosing a covering colleague does not create a vacation or turn on the workspace’s vacation routing.


# Default availability

Workspace defaults give new members a starting timezone and weekly schedule. They do not replace existing members’ settings, and members can customize their hours after joining.

<figure><img src="https://2442454418-files.gitbook.io/~/files/v0/b/gitbook-x-prod.appspot.com/o/spaces%2FQA3GQNrIYVrPQ90NBwRa%2Fuploads%2FJy6yIHAMGaWrytGFcrik%2FCleanShot%202026-09-10%20at%2021.24.33%402x.png?alt=media&amp;token=b82b7c43-7ba4-4063-9024-ace9012712ba" alt=""><figcaption></figcaption></figure>

Open **Settings → Default Availability**.

* Turn on **Set default timezone** and choose a **Timezone** to use for new members.
* Turn on **Set default availability** to configure their starting weekly hours. Enable the days they work and add time ranges for each day.

Click **Save** when finished. To change an existing member’s schedule, use [Member availability](/settings/workspace-settings/members/managing-member-availability).


# Scheduler settings

Open **Settings → Scheduler** to change the workspace’s booking timeouts and fallback contact. Save each section separately.

<figure><img src="https://2442454418-files.gitbook.io/~/files/v0/b/gitbook-x-prod.appspot.com/o/spaces%2FQA3GQNrIYVrPQ90NBwRa%2Fuploads%2F8LLWrax5qGPjSFvKkLs9%2FCleanShot%202026-09-10%20at%2021.23.41%402x.png?alt=media&amp;token=cd770b06-faea-4da1-a113-a33b490e19e2" alt=""><figcaption></figcaption></figure>

| Setting                     | What to enter                                                        | Effect                                                                                                   |
| --------------------------- | -------------------------------------------------------------------- | -------------------------------------------------------------------------------------------------------- |
| **No booking timeout**      | **Wait time (minutes)**, from 1 to 1,440. The default is 10 minutes. | How long Distro waits before running a prospect’s no-booking workflow.                                   |
| **Redirect delay**          | **Delay (seconds)**, from 5 to 120.                                  | How long the confirmation page stays open before a configured redirect. A redirect URL must also be set. |
| **No availability contact** | **Contact email**.                                                   | The address shown when no booking times are available. Leave it empty to use your user email.            |

Changing the redirect delay does not set the destination. Configure that URL in the relevant booking experience.


# Vacation

Vacation and distribution settings allow you to easily control how leads are distributed across your workspace and team members.

## How does Distro handle vacations?

Distro detects time away from the member’s primary Google Calendar. Mark time away as **All day** and **Busy**, then review **Detected vacations** in member preferences. Automatic Outlook vacation detection is not supported.

Detection looks for long, uninterrupted busy periods and groups adjacent days, including Friday-to-Monday periods. Check the detected dates before relying on assignment removal; a normal partial-day calendar block is not a vacation setting. See [Mark your calendar](/settings/workspace-settings/vacation/mark-calendar).

With vacation calibration enabled, detected vacation periods can remove a team member from round-robin assignment so eligible teammates receive the meetings.

Open **Settings → Vacation**. **Distribution rules** can remove people from assignments, while **Ownership rules** can send meetings to a designated covering colleague. Configure each section and click **Save**.

![Vacation controls for distribution exclusions and ownership-rule coverage.](https://2442454418-files.gitbook.io/~/files/v0/b/gitbook-x-prod.appspot.com/o/spaces%2FQA3GQNrIYVrPQ90NBwRa%2Fuploads%2FYSlKQqCgKza4gaUXduFA%2Fvacation-settings.png?alt=media)

## Distribution Rules <a href="#distribution-rules" id="distribution-rules"></a>

Turn on **Vacation calibration** to remove users from meeting assignments during vacation. The switch is also labelled **Remove members from assignments**.

### **Vacation Buffer**

Use **Before vacation starts** and **After vacation ends** to extend the period when members are removed from distribution. The after value adds days after the end date.

Let's say Emma has a vacation from March 10th to March 20th, and the vacation buffer is set to 2 days before and 1 day after.

* Emma will stop receiving leads on March 8th (2 days before vacation starts)
* The exclusion continues through March 21st (1 day after vacation ends). Emma can receive assignments again after that period.

#### **Key Points**

1. **Zero Buffer**: If set to "0", the vacation date range is excluded, including its first and last days.
2. **Buffer Longer than Vacation**: If the **After vacation ends** value is greater than the difference between the detected start and end dates, that vacation period is skipped by this check. Check **Detected vacations** and avoid an after-buffer longer than the detected period.
3. **Different Before/After Settings**: You can set different numbers for the before and after buffers.
4. **Partial Days**: The system only considers full days for vacation and buffer calculations.

## Ownership Rule <a href="#matching-rule" id="matching-rule"></a>

Turn on **Cover for colleagues on vacation** if you want to re-route meeting assignments to a designated colleague during their vacation.

### Cover for colleagues on vacation buffer <a href="#cover-for-colleagues-on-vacation-buffer" id="cover-for-colleagues-on-vacation-buffer"></a>

{% hint style="danger" %}
Distro will never update lead/contact owner in the CRM when cover for colleagues is triggered.
{% endhint %}

Set **Before vacation starts** and **After vacation ends** in the ownership section to extend colleague coverage around the vacation. As with distribution, an after-buffer longer than the difference between the detected start and end dates causes that period to be skipped by this check.

## Choose a covering colleague <a href="#design-a-colleague" id="design-a-colleague"></a>

Members can choose **Assigned colleague** in **Settings → Profile**.

Admins can open **Settings → Members → Manage User Preferences** and use **Covering colleague**, then **Save coverage**. See [Member availability](/settings/workspace-settings/members/managing-member-availability).


# Mark your calendar

Use your primary connected Google Calendar for automatic vacation detection.

1. Create an event covering the days you are away.
2. Select **All day** and set your availability to **Busy**.
3. Save the event in Google Calendar.
4. In Distro, review **Detected vacations** in your member preferences and confirm the dates.

Distro checks long, uninterrupted busy periods over the next three months. Adjacent periods can be grouped, including Friday-to-Monday periods. Detection uses calendar busy time, so check the detected dates rather than relying only on an event’s title.

Automatic Outlook vacation detection is not supported. A normal partial-day busy event still blocks its calendar time, but does not configure vacation coverage.

Your admin must separately enable removal from distribution or ownership-rule coverage in [Vacation](/settings/workspace-settings/vacation). Choose a covering colleague in [Profile](/settings/personal-settings/profile), or ask an admin to update [Member availability](/settings/workspace-settings/members/managing-member-availability).


# Email configuration

Use **Settings → Email Configuration** to send Distro emails from your company’s domain and choose where replies to workflow emails go. **Currently sending from** shows the sender in use while you complete setup.

<figure><img src="https://2442454418-files.gitbook.io/~/files/v0/b/gitbook-x-prod.appspot.com/o/spaces%2FQA3GQNrIYVrPQ90NBwRa%2Fuploads%2Fni4UJsy9PjpFlEm4gXN4%2FCleanShot%202026-09-10%20at%2021.21.49%402x.png?alt=media&amp;token=cf770384-298d-4d95-9925-673d912d0515" alt=""><figcaption></figcaption></figure>

## Connect a sending domain

You need access to your domain’s DNS settings, or help from the person who manages them.

1. In **Domain**, enter your **Company domain**, such as `yourcompany.com`, without `https://` or an email address.
2. Click **Continue to DNS records**.
3. Add the five records shown by Distro at your DNS provider. Keep your existing records. Add the MX and TXT records on the subdomain shown in Distro, rather than replacing your main mailbox records.
4. Click **I’ve added the records**, then **Check connection**.

The checks cover **Domain ownership**, **Email authentication**, and **Delivery feedback**. DNS changes can take up to 72 hours to be detected. If a check is pending, use **Review DNS records** to compare the names and values, then check again after they have propagated. **Copy setup instructions** gives your IT team the records and instructions together.

If you see **DNS records are not ready**, click **Retry Setup** to generate the complete records before changing anything at your DNS provider.

Once verification is complete, keep the DNS records in place. Choose the part of the **Sender address** before the `@`, then click **Save sender address**. You can return to **View DNS records** later.

Changing the domain restarts verification. **Remove domain** returns sending to Distro’s default sender; reconnecting it requires verification again. Distro’s default sending remains available while setup is incomplete.

## Choose where replies go

Under **Reply-to address**, enter a monitored inbox in **Reply-to email** and click **Save reply-to address**. This setting applies to workflow emails and does not need DNS setup. Leave it blank to use the sender’s address.

<figure><img src="https://2442454418-files.gitbook.io/~/files/v0/b/gitbook-x-prod.appspot.com/o/spaces%2FQA3GQNrIYVrPQ90NBwRa%2Fuploads%2F8rcEx2Ct0ROTZL9SRboN%2FCleanShot%202026-09-10%20at%2021.22.26%402x.png?alt=media&amp;token=f37d147c-5593-4d08-9dfc-977f342744d4" alt=""><figcaption></figcaption></figure>


# Calibration

Open **Settings → Calibration** to choose the assignment-history period and compensation rules for distribution rules and Click Router round robin. Review the settings, then click **Save**.

<figure><img src="https://2442454418-files.gitbook.io/~/files/v0/b/gitbook-x-prod.appspot.com/o/spaces%2FQA3GQNrIYVrPQ90NBwRa%2Fuploads%2FVj8i6cTi5RAi7PGeFOtt%2FCleanShot%202026-09-10%20at%2021.20.36%402x.png?alt=media&amp;token=78ddd233-3aca-467d-939f-b0ad8742f296" alt=""><figcaption></figcaption></figure>

## Reset frequency

Under **Reset frequency**, choose **Frequency**:

| Frequency | History used for balancing                                                            |
| --------- | ------------------------------------------------------------------------------------- |
| Monthly   | Assignments since the start of the current month.                                     |
| Quarterly | Assignments since the start of the current quarter: January, April, July, or October. |
| Yearly    | Assignments since the start of the current year.                                      |

This changes the period used for assignment balancing. It does not delete bookings or promise equal meeting counts. Member weights, eligibility, availability, recent assignments, and credits also affect who receives a meeting.

## Compensation rules

Credits give a member priority for a future eligible assignment. They apply within the relevant distribution rule or Click Router.

| Rule                      | Effect when enabled                                                                                                                           |
| ------------------------- | --------------------------------------------------------------------------------------------------------------------------------------------- |
| **Vacation and holidays** | Adds credit when vacation handling skips a member selected by strict round robin. Flexible distribution does not award vacation compensation. |
| **Cancelled meetings**    | Returns a credit to the host when a prospect cancels an eligible distributed booking.                                                         |
| **No-show meetings**      | Returns a credit when the booking is marked as a no-show. Undoing the no-show reverses that adjustment.                                       |
| **Reassigned meetings**   | Returns a credit to the original host and records an assignment for the new host.                                                             |

These settings do not create compensation for personal or group links, or for meetings assigned through CRM ownership matching. Vacation compensation is separate from the [Vacation](/settings/workspace-settings/vacation) controls that remove members from assignments.

Open a distribution rule’s [Distribution history](/routing-rules/distribution-rules/distribution-history) to review assignments, weights, and credits.


# SAML SSO

Workspace admins can connect an identity provider so members sign in through SAML.

<figure><img src="https://2442454418-files.gitbook.io/~/files/v0/b/gitbook-x-prod.appspot.com/o/spaces%2FQA3GQNrIYVrPQ90NBwRa%2Fuploads%2FXLYOKTDL6m6gzNcGLLlJ%2FCleanShot%202026-09-10%20at%2021.19.21%402x.png?alt=media&amp;token=e2b1f6e4-eaff-424a-bd2f-5fbf4eac58f6" alt=""><figcaption></figcaption></figure>

## Configure the connection

1. Open **Settings → SAML SSO → Edit SAML SSO settings**.
2. Copy the **Assertion Consumer Service URL**, **Audience URI**, and **Relay State** shown by Distro into your identity provider's application settings.
3. Enter your **SSO domain**, **IdP entity ID**, **Single sign-on URL**, and **IdP certificate** in Distro.
4. Click **Save**.
5. Test SAML sign-in with a provisioned member before requiring it for the workspace.

The SSO domain is used to find the workspace from the email address entered during SAML sign-in. Use the domain your members sign in with.

## Require SAML sign-in

Turn on **Only allow SAML login** in the **Enforce SAML SSO** section, then save that section. Members must use the identity provider instead of ordinary password sign-in. The workspace owner is exempt from the password sign-in enforcement check.

## Create users at first sign-in

**Create new users from SAML** controls **Automatic account creation**. When enabled, a new user can be created after successful SAML authentication. When disabled, users without an account are told to ask their administrator to provision one. Save this section separately from the enforcement setting.

If sign-in cannot find the workspace, check the email domain and **SSO domain**. If authentication fails after reaching the identity provider, review its application configuration and the saved IdP values.


# Availability preview

Use **Preview availability** from availability settings to inspect how a user’s calendar, working hours, and meeting timing affect available slots.

<figure><img src="https://2442454418-files.gitbook.io/~/files/v0/b/gitbook-x-prod.appspot.com/o/spaces%2FQA3GQNrIYVrPQ90NBwRa%2Fuploads%2FbluWbjpEhRMQWbayOYwR%2FCleanShot%202026-09-10%20at%2021.13.29%402x.png?alt=media&amp;token=9a370a51-e34b-41d9-9282-8f3c65154f6f" alt=""><figcaption></figcaption></figure>

1. Select an **Event type**.
2. Choose an **Availability schedule**: **User working hours** or a team schedule.
3. Select the **Calendar user** whose connected calendar you want to check.
4. Click **Preview availability**.

Use **Week**, **Day**, or **4 days** to inspect the calendar. **Schedule details** shows the duration, buffers, start-time intervals, and schedule timezone.

Admins can select other workspace members with a primary connected calendar. Members can inspect their own calendar.

This preview uses the user or team schedule you select. Check the actual link or router when diagnosing custom weekly hours, event dates, group participants, or routing eligibility. See [Unavailable times](/settings/find-unavailable-times) for the other checks that can affect booking.


# Unavailable times

Start with the exact booking link and date the guest is trying to use. A free-looking calendar doesn't always mean the time can be booked.

| Check                | What can hide a time                                                                                                                                                |
| -------------------- | ------------------------------------------------------------------------------------------------------------------------------------------------------------------- |
| Timezone             | The guest, browser, and account may display the same moment differently.                                                                                            |
| Weekly hours         | The time falls outside the schedule used by this event type.                                                                                                        |
| Calendar connection  | A disconnected account prevents Distro from reliably checking availability.                                                                                         |
| Busy events          | An event on the calendar checked by this booking flow blocks the time. See [Calendars](/integrations/calendars) before relying on an additional connected calendar. |
| Distro meetings      | **Block other Distro meetings** can exclude a selected participant’s scheduled Distro meetings, even if they are not shown as busy on the connected calendar.       |
| Event dates          | The event type only accepts bookings during its configured dates and hours.                                                                                         |
| Duration and buffers | The full meeting and required space around it don't fit.                                                                                                            |
| Minimum notice       | The proposed start is too soon.                                                                                                                                     |
| Booking window       | The date is too far in the future.                                                                                                                                  |
| Group participants   | Every required participant must be available together.                                                                                                              |
| Routing              | The expected host may not be eligible under the router's current rules.                                                                                             |

In the Distro app, open **Settings → My Availability → Preview availability** to use the calendar troubleshooter.

<figure><img src="https://2442454418-files.gitbook.io/~/files/v0/b/gitbook-x-prod.appspot.com/o/spaces%2FQA3GQNrIYVrPQ90NBwRa%2Fuploads%2FXKbGA6w0aHcG0bvMOBJ5%2FCleanShot%202026-09-10%20at%2021.13.29%402x.png?alt=media&amp;token=b5a7012e-7b1a-4722-a9d8-5077cb40cb4a" alt=""><figcaption></figcaption></figure>

Check the link's selected event type before changing your weekly hours. An event type can use team hours, custom weekly hours, or specific event dates instead of your usual personal schedule.

If you change router configuration, [activate the updated version](/routing/router-versions) before testing a new routing attempt. Existing attempts can keep the version they started with.


# Changelog

New updates and improvements

{% updates format="full" %}
{% update date="2026-01-13" %}

## Release Notes

We're excited to announce a major update packed with new features, improved workflows, and enhanced analytics to help you route leads more effectively and streamline your scheduling operations.

***

### ✨ New Features

#### Workflows (Automation Engine)

Build powerful automations triggered by bookings and form submissions. Create custom workflows that:

* Send personalized emails to prospects and team members
* Post notifications to Slack channels
* Trigger webhooks to integrate with external systems
* Use dynamic placeholders for personalized messaging

#### Group Meeting Bookings

Group meeting links now fully support booking management:

* View all group meeting bookings in a dedicated filter
* Track bookings from group links alongside personal and click router bookings
* Improved booking list with source indicators

#### Click Router Insights Dashboard

Get deeper visibility into your click router performance with a new dedicated analytics view:

* **Routing Funnel**: Visualize the journey from form submissions to booked meetings
* **Booking Insights**: Track conversion rates and booking trends over time
* **Team Performance**: See how leads are distributed across your team
* **Custom Filters**: Filter by date range, team members, and more

#### Admin Credit Management

Admins can now manually adjust team member credits for round-robin routing:

* Add or remove credits directly from the assignments view
* Useful for compensating holidays, sick days, or manual adjustments
* Available for both lead routers and click routers

#### Round-Robin Queue Reset

New calibration settings allow admins to reset the round-robin queue:

* Start fresh with equal distribution across all team members
* Compensate for holidays and time off
* Shadow tracking for fair distribution auditing

***

### 🔧 Improvements

#### Router Edit Experience

The router configuration page has been completely redesigned:

* **Visual Flow Design**: Connected sections with arrows show the routing logic clearly
* **Collapsible Sections**: Easier navigation through form connection, lead routing, event configuration, redirect settings, and CRM integration
* **Slideover Panels**: Edit detailed settings without leaving the main view
* **Better Organization**: Cleaner interface that's easier to navigate

#### Event Type Editor

Improved event type editing experience:

* Single-page edit view with all settings accessible in one place
* Navigation guard warns before leaving with unsaved changes
* Inline editing for custom form titles
* Better form validation and error handling

#### HubSpot Integration Enhancements

* **User Lookup Fields**: Rules now properly display HubSpot team member options with names and emails
* **Owner Sync**: Automatically fetch and cache HubSpot owners for faster rule configuration
* **Better Field Detection**: Improved detection of user lookup field types

#### Custom No-Availability Email

Configure a custom contact email address that displays when no time slots are available:

* Set a team or support email instead of showing individual user emails
* Maintains professional branding when prospects can't find available times
* Configurable in Scheduler Settings

#### Booking Insights

Enhanced booking analytics across all link types:

* Improved charts and data visualization
* Better date range filtering
* Clearer metrics and conversion tracking

***

### Getting Started

All features are available immediately in your account. To explore:

1. **Workflows**: Navigate to Automations → Workflows to create your first automation
2. **Click Router Insights**: Open any click router and select "Insights" from the sidebar
3. **Credit Management**: Go to any router's assignments section and click the credit adjustment icon
4. **Custom Email**: Visit Settings → Scheduler to configure your no-availability email

Questions or feedback? Reach out to our support team – we'd love to hear from you!
{% endupdate %}
{% endupdates %}